Module Assessment | Yext Hitchhikers Platform

Background
Now that you have a working experience, you want to make it better! There are a few additional components we need to add so users have more flexibility when interacting with the brand’s search experience:
- Facets and Filters - Having facets or filters available makes the end consumer experience so much easier. You’re going to add facets to the Restaurant vertical. Remember, facets and filters are only supported in vertical search!
- Sorting - You have already ensured that events are returned in chronological order by default. That said, you still want to allow users to change the sort order by event name, relevance, or event date.
- Q&A Component - Adding the Q&A component to Search allows the customer support team to figure out what questions the Search experience isn’t answering so they can improve the search quality. This will help to keep the support costs down long term. They want to add the Q&A component to universal search and FAQ search only.
Your Challenge
Step 1: Add Facets to Restaurants Vertical
Navigate to Pages > Brand Search > Deploys, go to the Code Editor, and click into the master branch. You should expect this to take a couple minutes to load – in the background, it’s starting up a container for your development.
Click “View Live Preview” to open your preview in a new tab.
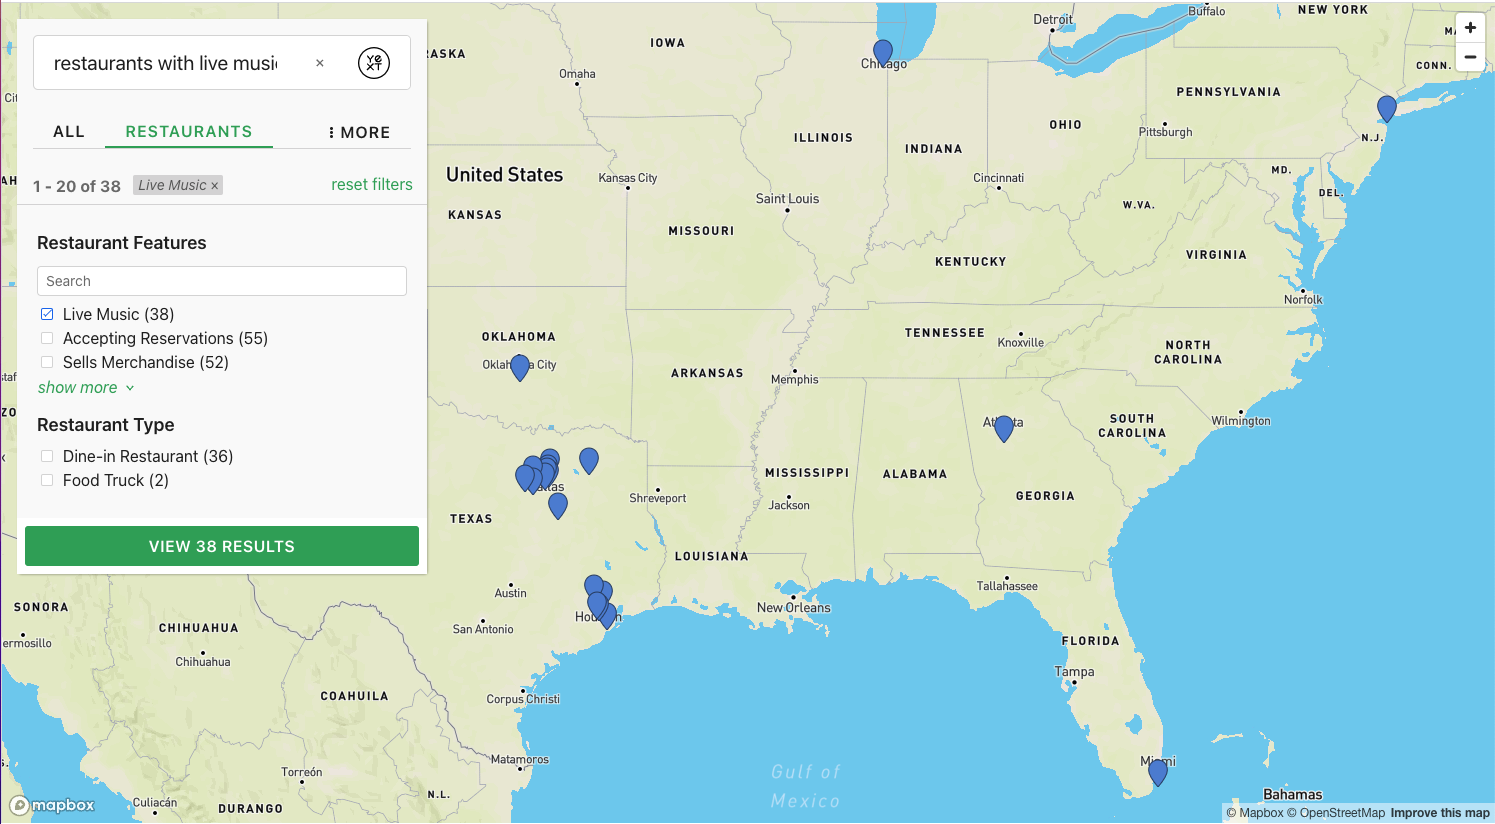
- Run a search for “restaurants with live music” in the Restaurants vertical – note what it looks like before any facet or filter options. Remember facets only appear in vertical search, so be sure to click into the Restaurants tab!
In the
pages > restaurants.html.hbsfile, comment in the partials for the facets component. This includes:Scripts - Facets
{{> templates/vertical-full-page-map/script/facets}}Markup - Facets
{{> templates/vertical-full-page-map/markup/facets}}Scripts - Collapsible Filters
{{> templates/vertical-full-page-map/collapsible-filters/page-setup }}Markup - Collapsible Filters
{{> templates/vertical-full-page-map/collapsible-filters/markup/filterlink }}
{{> templates/vertical-full-page-map/collapsible-filters/markup/viewresultsbutton }}
You’ll also want to comment in the surrounding
<div>that the facets markup is part of.<!-- Uncomment the following div if you want to include filters, facets, or sort options --> <div class="Answers-filtersWrapper js-answersFiltersWrapper CollapsibleFilters-inactive"> </div>Pro-tip: You can easily comment-in / comment-out code by using your keyboard commands! Try
cmd + /on a Mac orctrl + /on Windows.
Use Live Preview to check to make sure the facets and filter link components are showing up (using the default settings). If not,
- Double check to make sure the components are present and there are no typos.
- Double check you’re on vertical search and not universal search.
In the
config > restaurants.jsonfile, let’s customize how the facets look and behave. Comment in theFacetsobject inComponentSettings(remove the/**before and the**/after theFacetsobject).- Set the
showMoreproperty to “true” - Set the
expandproperty to “false” because you always want the facet options displaying by default (instead of collapsed if not being used) - Add the
showMoreLimitproperty to 3 (note – you’ll need to add this as an additional property!) Make just the
c_restaurantFeaturesfield searchable by adding this in your Facets object:"fields": { "c_restaurantFeatures": { "searchable": true, "searchLabelText": "Search for our features", "placeholderText": "Search" } }
Use Live Preview to verify your updates. It should look like this:
- Set the
In the
config > restaurants.jsonfile, let’s customize how theFilterLinkcomponent looks. Comment in theFilterLinkobject inComponentSettings.- Set the
changeFiltersTextto “filters”
Use Live Preview to verify your updates.
- Set the
Commit your code. Click “Back to Code Editor”.
Step 2: Add Sorting to Events Vertical
In Live Preview, run a search for “events” in the Events vertical (not on universal search - remember that frontend sorting is only available on vertical search) – note how it looks without any ability to sort!
Like with facets, go to the
pages > events.html.hbsfile and comment in thesortoptionscomponent partials, along with the collapsible filters components. You’ll need all of the following:Pro-tip: You can easily comment in / comment out code by using your keyboard commands! Try
cmd + /on a Mac orctrl + /on Windows.Scripts - Sorting
{{> templates/vertical-standard/script/sortoptions}}Markup - Sorting
{{> templates/vertical-standard/markup/sortoptions}}You’ll also want to comment in the surrounding
<div>that the sortoptions markup is part of.<div class="Answers-filtersWrapper js-answersFiltersWrapper CollapsibleFilters-inactive"> </div>Scripts - Collapsible Filters
{{> templates/vertical-standard/collapsible-filters/page-setup }}Markup - Collapsible Filters
{{> templates/vertical-standard/collapsible-filters/markup/filterlink }}
{{> templates/vertical-standard/collapsible-filters/markup/viewresultsbutton }}
If you try to preview your changes here, you won’t see sorting yet because we need to configure what frontend sorting should look like. Go to the
config > events.jsonfile and add theSortOptionsobject toComponentSettings. You want to allow users to sort by the following (in addition to the default sort):- Event name - fill in: type as “FIELD”, field as “name”, direction as ascending (“ASC”), and label as “Event Name”
- Event start date - fill in: type is “FIELD”, field is “time.start”, direction ascending (“ASC”) and label “Event Date”
Here’s a template, input the values per above:
"SortOptions" : {
  "options": [
    {
      "type": "<INSERT HERE>",
      "field": "<INSERT HERE>",
      "direction": "<INSERT HERE>",
      "label": "<INSERT HERE>"
    },
    {
      "type": "<INSERT HERE>",
      "field": "<INSERT HERE>",
      "direction": "<INSERT HERE>",
      "label": "<INSERT HERE>"
    }
  ]
}
Click out of the code editor to trigger a live preview update. You can open the Code Editor console (Tools > Console) to check when the update is complete. Make sure to look at the console for any errors. Check out what you have so far by refreshing your preview. Try sorting by date and then by event name. How do you think it looks? If you aren’t able to get it working, check your code to make sure you don’t have any syntax errors like missing quotations or commas (you would see red squiggly underlines).
Let’s make some more adjustments to the
SortOptionsobject. Add the following properties to change them from their default values:- The legend
labelto say “Sort Options” instead of “Sorting” (default value) - The
defaultSortLabelto say “Most Relevant” instead of “Best Match”
Check the library documentation to confirm what the property names should be and then add to the SortOptions object. Remember that these should be added on the same level as “options” and not within the options array.
- The legend
Confirm it looks how you want using Live Preview.
Commit your code. Click “Back to Code Editor”.
Step 3: Add Q&A Component to Universal and FAQ Search
Enable the Organization Entity Type in Content. If you need help doing this, follow the Enable Entity Types help article.
Add a new entity of type Organization.
- Entity Name: Turtlehead Tacos
- Entity ID: organization-1
Add services to the Organization entity to enable it for Q&A. Navigate to Entity Search, select the new organization entity you created and click
More Actions > Add Services. Follow the flow to add the First Party Q&A Feature pack to the Organization entity you created.- Select “Feature Packs” (since the First Party Q&A Feature uses our Feature Pack and not Subscription system) and click “Continue”.
- Select “Add Feature Packs” (default selected) and click “Continue”.
- Check off “Q&A” and click “Continue”.
- There are no features to configure for Q&A so click “Continue” on the next screen.
- Review your changes and click “Process Change”.
- Click “Return to Content”.
Go back to the Code Editor. Remember you can navigate to Pages > Brand Search > Deploys, go to the Code Editor, and click into the master branch. You should expect this to take a couple minutes to load – in the background, it’s starting up a container for your development.
Click “View Live Preview” to open your preview in a new tab.
You want to add the Q&A Component to the FAQ and universal search pages. Open up the
pages > index.html.hbsANDpages > faqs.html.hbsfiles and comment in the script and markup lines for the QASubmission partials, which are commented out by default. This should include:{{> templates/universal-standard/script/qasubmission }} {{> templates/universal-standard/markup/qasubmission }}Now you need to update the settings for these pages. Open up the
config > index.jsonANDconfig > faqs.jsonfiles and comment in theQASubmissionobject inComponentSettings.- Add the entity ID for the entity you just created (organization-1).
Add a privacy policy URL of
https://www.turtleheadtacos.com/privacy."QASubmission": { "entityId": "organization-1", "privacyPolicyUrl": "https://www.turtleheadtacos.com/privacy" },
Use Live Preview to verify your updates. Once you think it is working as expected, commit your changes.
Monitor the deploy.
Open your staging link and run a search and submit a question. Since you’re doing this in our sandbox environment, you won’t receive the emails but you can still see the questions in the platform.
Navigate to Reviews > Q&A in the platform and answer your own question.
Note: if you’re having any issues, make sure that you are completing step 3 and adding the services to the Organization entity.
Here are some things to double check:
- Make sure the Privacy URL is exactly as specified in the challenge
- Make sure the entity ID matches the entity ID of the organization entity you created
- Make sure you the right JSON syntax and look out for any red underlines in your code
There are two common causes:
The syntax is off – the property is called “savedSearchId” (case sensitive) and the filter ID should be encased in quotations (the filter ID can be an alphanumeric string, it’s just that those created in the UI happen to be numeric)
The filter is invalid. Make sure you’re copying a valid filter ID from account settings.
