
Linking Entities Together | Yext Hitchhikers Platform
What You’ll Learn
In this section, you will learn:
- When to link entities together
- How to link entities together
- Important considerations around linking entities
Relating Entities
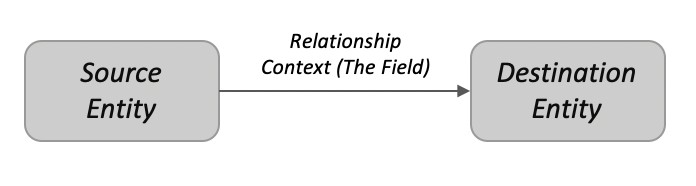
Understanding One Way Relationships
Part of the power of Yext Content is the ability to relate entities together. This can be done via the Entity Relationship custom field type.
One Way Relationships in Yext have 3 properties:
- The source entity
- The destination entity
- The relationship context (the field)
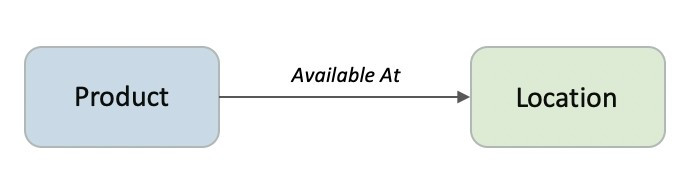
For example, if we wanted to say that Products are available at specific Locations, we could create a field called “Available at” on the Product type. We can use custom field validation to limit what type of entities can be the “destination Entity”. In this case, we would limit it to just Locations. Once the field is created, we would update the “Available at” field on Product entity to point to a location or set of locations.
Creating a One Way Relationship
- Navigate to Content > Configuration > Fields
- Click on the ”+ Add Field” button
- Select Entity Relationship for Field Type
- Select One Way for the Relationship Type
- Enter a name for the field. The ID will populate based on the name you choose, but you can edit it if you’d like.
- Select the entity type(s) that you want this custom field to be available for in the Field Availability field. This is where the relationship will be accessed and stored in the Content. (In this example, you would select Restaurants)
- Click on the Field Settings and select Validation to choose the Entity Type(s) you want to link from. (In this example you would select FAQs)
- Click Save Field.
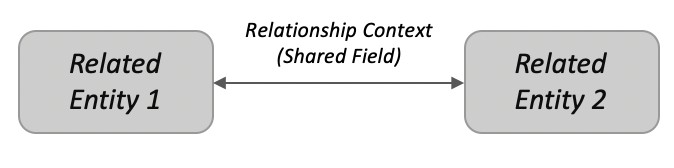
Understanding Two Way Relationships
An understanding of One Way Relationships is useful to understand Two Way Relationships. More often than not, it is desirable to be able to view and traverse a relationship from (the entity on) either side of the relationship, so that we can search and display information from the linked entity from either direction. In order to support this bi-directional linking, Yext gives users the option to automatically sync relationships between entities, via a Two Way Relationship. Two way relationships are composed of slightly different properties, depending on the type of relationship selected:
Two Way (via a Shared Field) Relationships have the following properties:
- The related entities
- The relationship context (the shared field)
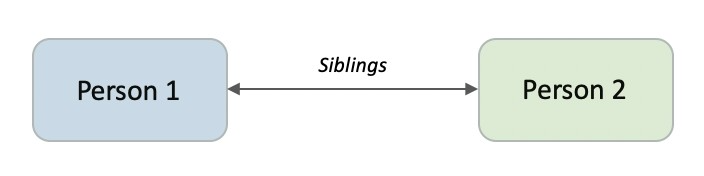
For example, consider the relationship between two siblings; we can use a Two Way Relationship with a Shared Field to represent this relationship. Regardless of which sibling the user is viewing the relationship from, the related entity should live in the same “Siblings” field, so this is our shared field. We can then populate a related entity Persons 2 in the “Siblings” Field on Person 1, and the “Siblings” Field on Person 2 will be updated to include Person 1! This configuration allows us to access data about related “sibling” entities from either side of the relationship, and the related entities are automatically kept in sync.
Creating a Two Way (via a Shared Field) Relationship
- Navigate to Content > Configuration > Fields.
- Click on the + Add Field button.
- Select Entity Relationship for Field Type
- Select Two Way for the Relationship Type and select Shared Field in the drop-down.
- Enter a name for the field. The ID will populate based on the name you choose, but you can edit it if you’d like.
Select the entity type(s) that you want this custom field to be available for in the Field Availability field. This is where the relationship will be accessed and stored in Content. (In this example, you would select the People entity type)
- Note that this parameter also defines which Entity Types you will be able to select as the related entity in this field, since populating Entity B in the field on Entity A necessarily results in that field being populated with Entity A on Entity B.
Click Save Field.
Two Way (via Distinct Fields) Relationships have the following properties:
- The related entities
- Two relationship context = two distinct fields
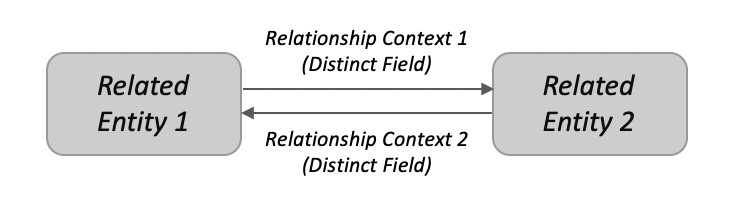
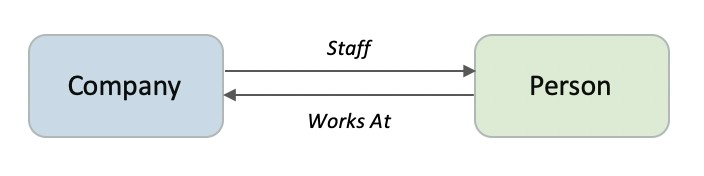
In some cases, there may be a semantic difference in the way the relationship should be represented, depending on which entity the relationship is being examined from. For example, we may want a two-way relationship between a Company and People. From the perspective of the company, the related people are its staff. From the perspective of the Person, the related company is where they work. In this sort of hierarchical two-way relationship, we would want to use a Two Way Relationship with Distinct Fields. The first field would be the “Staff” field, and would be available to the Company Entity Type; the second field would be the “Works At” field and would be available to the Person Entity Type. Then, when updating the “Works At” Field of a Person entity to include a Company entity, the “Staff” field of that same Company would be updated to include the Person whom it employs.
Creating a Two Way (via Distinct Fields) Relationship
- Navigate to Content > Configuration > Fields.
- Click on the + Add Field button.
- Select Entity Relationship for Field Type.
- Select Two Way for the Relationship Type and select Distinct Field in the drop-down.
Configure Field 1 (In this example, c_staff):
- Enter a name for the field. The ID will populate based on the name you choose, but you can edit it if you’d like.
- Select the entity type(s) that you want this custom field to be available for in the Field Availability field. This is where the relationship will be accessed and stored in Content. (In this example, you would select Company)
Configure Field 2 (In this example, c_worksAt):
- Enter a name for the field. The ID will populate based on the name you choose, but you can edit it if you’d like.
- Select the entity type(s) that you want this custom field to be available for in the Field Availability field. This is where the relationship will be accessed and stored in Content. (In this example, you would select People)
Click Save Field.
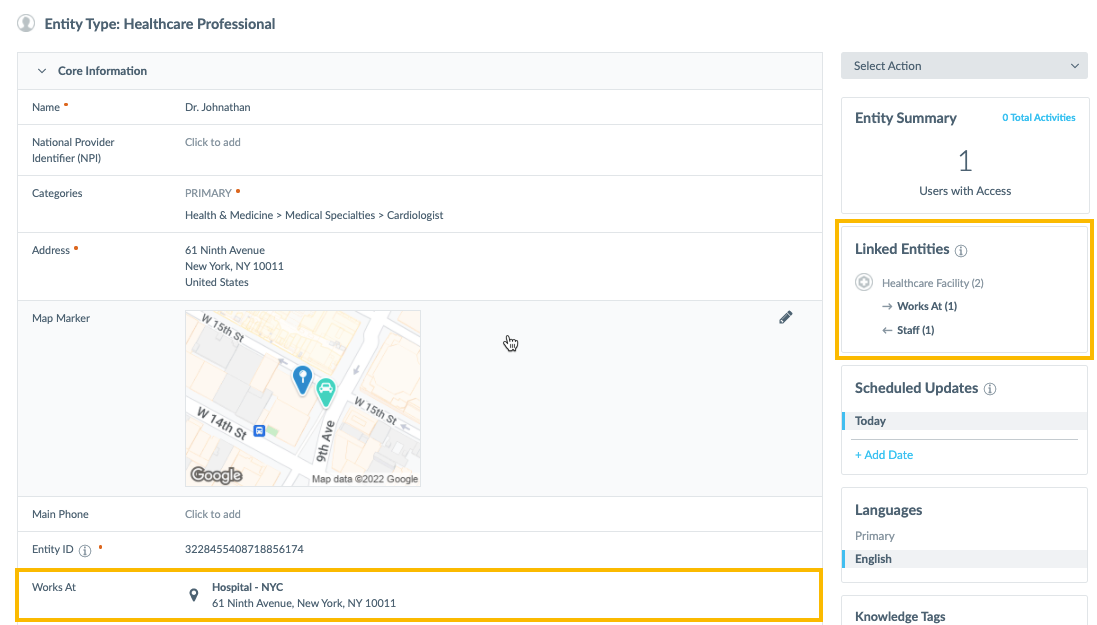
How to View Entity Relationships
Once a relationship exists, you can see the information about relationships for a specific entity using the Linked Entities Module in Entity Edit. This module will list all relationships organized by Entity Type and Field, including when the relationship is either outgoing or incoming (i.e., another entity is pointing to it). The arrow indicates the relationship direction – if the arrow is pointing to the right, the relationship is outgoing, meaning is pointing to other entities. If the arrow is pointing to the left, the relationship is incoming, meaning another entity is pointing to it. You can view the count of entities that the entity you are on is related to, or you can click on the field name to view the list of entities related.
You can also navigate to the specific field where the relationship is stored for the Entity in Entity Edit. If the relationship is stored on the entity, that means the relationship is outgoing; clicking into the relevant field should show all the entities linked from the entity you are viewing for that particular relationship.
Common Use Cases
There are many reasons to want to link entities together. For example:
Pull in data from linked entities for Pages (e.g., feature doctor headshots on a facility page or featured menu items on a restaurant page).
Relate entities together to answer questions (e.g., “where does Dr. Sara work?” or “what offices have open job positions”)
Filter related entity names in Search (like condition names for Healthcare Professionals for queries like “doctors who treat back pain”)
Organize your data for easier management (e.g., bulk editing)
Updating Linked Entity Fields
You can update the linked entity fields just like any other field! You can use the platform for single or bulk edit and we will display an easy-to-search UI for selecting the related entities. You can also use Entity Upload or use the API to update these fields – all you’ll need is the Entity ID (unique identifier) of the related entities.
Important Considerations
While this feature is very powerful, there are a few things to keep in mind when working with Linked Entities:
You can use Validation to determine what types of entities can be linked (e.g., if you only want users to be able to select the Location type entity).
You can use Validation on the item count to limit the number of relatable entities (1 to unlimited).
For Search, you can only use the related entity’s name for filters or indexing. You cannot use other related data at this time.
How do you relate entities together?
Are you able to define what types of entities can be selected?
True or False: If you link a Restaurant entity with an Event entity, you can display content from the Event entity on a Restaurant page?
True or False: If you link a Condition entity to a Healthcare Professional entity, you can use the Condition name to filter Healthcare Professionals in Search (for example, a search for 'doctors that treat condition x')?
Wahoo - you did it! 🙌
