

Step 1: Create Bot
Bot Overview
Each chatbot has a few basic elements of configuration:
- A unique
id, which is used in API requests - A
name, which is only for display purposes - A
greeting, which is the first message the chatbot will send to a user by default - An
identityContextfor giving the bot additional instructions and background information - A
contextEntityId, which is the ID of an entity that the bot can use as context for all questions
In addition to these, the most important aspect of a bot’s configuration are its goals. You can read more about
Create Bot
- Navigate to the bot platform from the link you received from your account team.
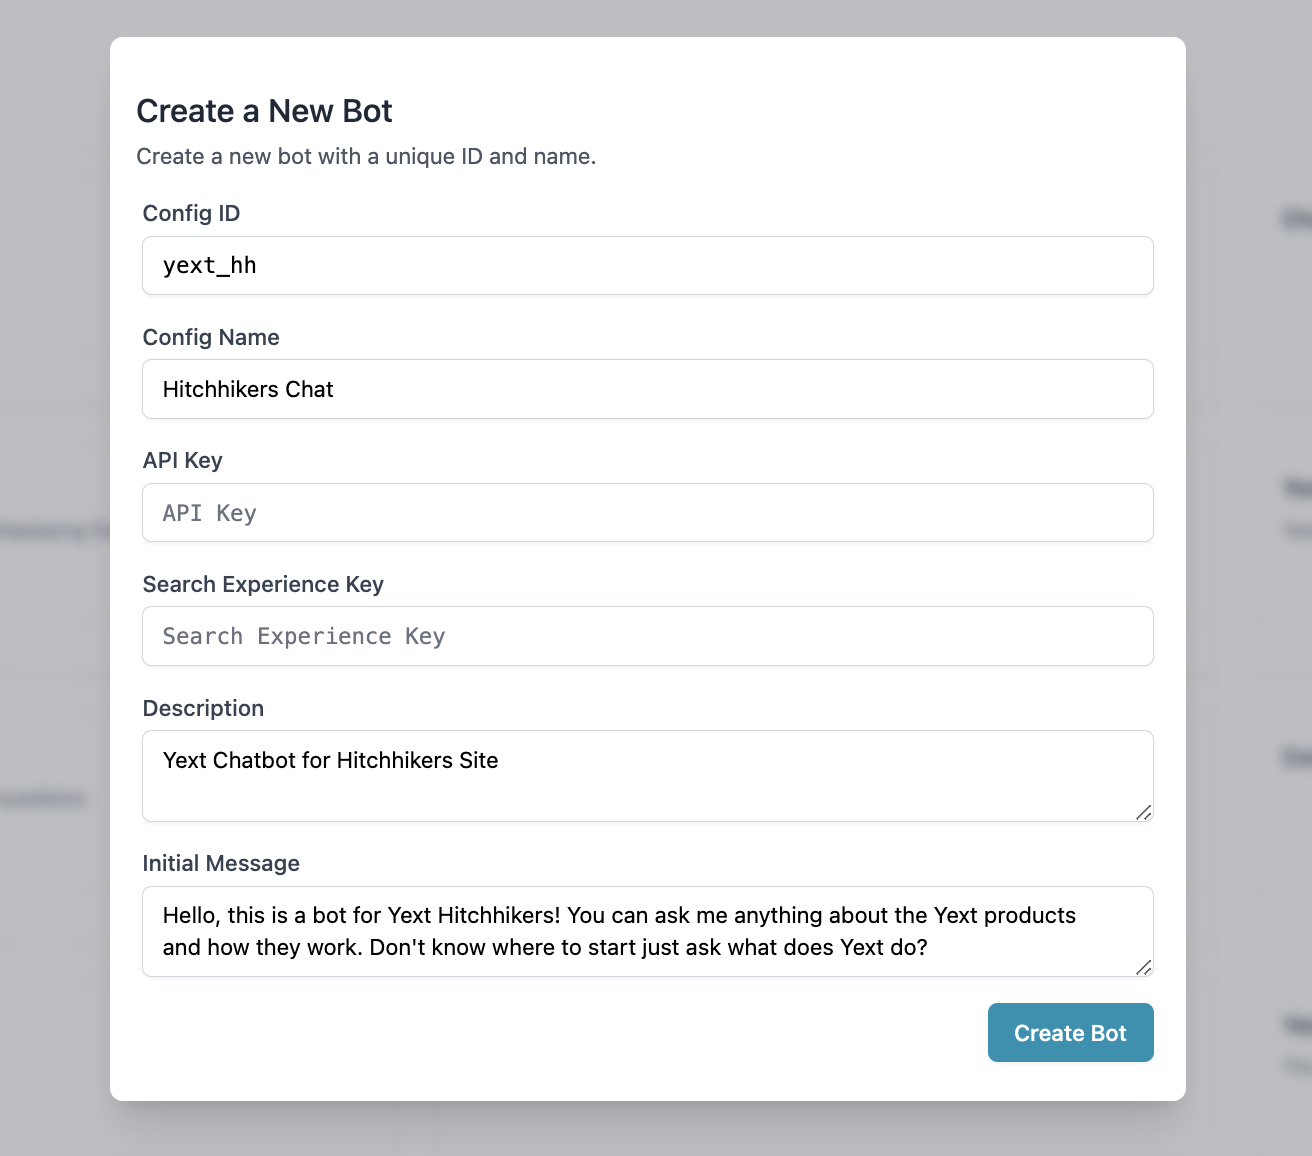
- Click New Bot. A dialog box appears. Enter the following details:
- Config ID: A unique ID for your bot. This ID is used in API requests.
- Config Name: A name for your bot. This is only used for display purposes. We recommend naming this something specific if you
- API Key: The API Key of the Search experience you would like the bot to leverage when answering questions.
- Search Experience Key: The Search experience key for the Search experience you would like the bot to leverage when answering questions.
- Description: A description of the bot. This is only used for display purposes alongside the Config Name.
- Initial Message: The public-facing message that will appear when a user opens the bot.
- Click Create Bot.
Once you click Create Bot you will see your bot settings on the left, and your bot preview on the right. You can now start interacting with your bot from this screen if you want to test it out. Because you added an API and Search experience key you will see results based on that search experience.
Goals
Goals are the fundamental building block of each chatbot. A goal describes something that chatbot can do, such as:
- Answering questions from the Yext Knowledge Graph
- Scheduling an appointment
- Checking on an order status
- Collecting leads
Goal Details
Each bot needs at least one goal, but can have as many as you want.
Whenever Yext Chat receives a message, it conducts goal detection to determine which goal the user is trying to pursue. It does this by looking at the text of each goal along with its examples.
This process is based completely on natural language; the bot looks at the user’s message, compares it to each goal and its examples, and makes its best guess at what the user is trying to do. This means that providing a more descriptive goal and relevant examples can help the bot better understand what your users are trying to achieve.
Each goal has a few configuration elements:
- An unique ID
- A Name
- A Description that the bot uses to determine which goal the user is trying to achieve.
- A list of Examples of things a user might say to signal that they’re trying to achieve this goal (the bot also uses this to determine the user’s goal).
- A list of Instructions that tells the bot how to achieve the goal.
Create a Goal
- Click into your chatbot, then click Goals in the sidebar.
- Click + Add Another Goal. A dialog box appears.
- Enter the Basic Configuration Settings:
- ID
- Name
- Description
- Examples
- To add more than one example, click + Add Another and enter an additional example.
- Click Create.
As an example, if the Marketing team had a goal to help users get a demo via the chatbot, this is what the goal configuration could look like:
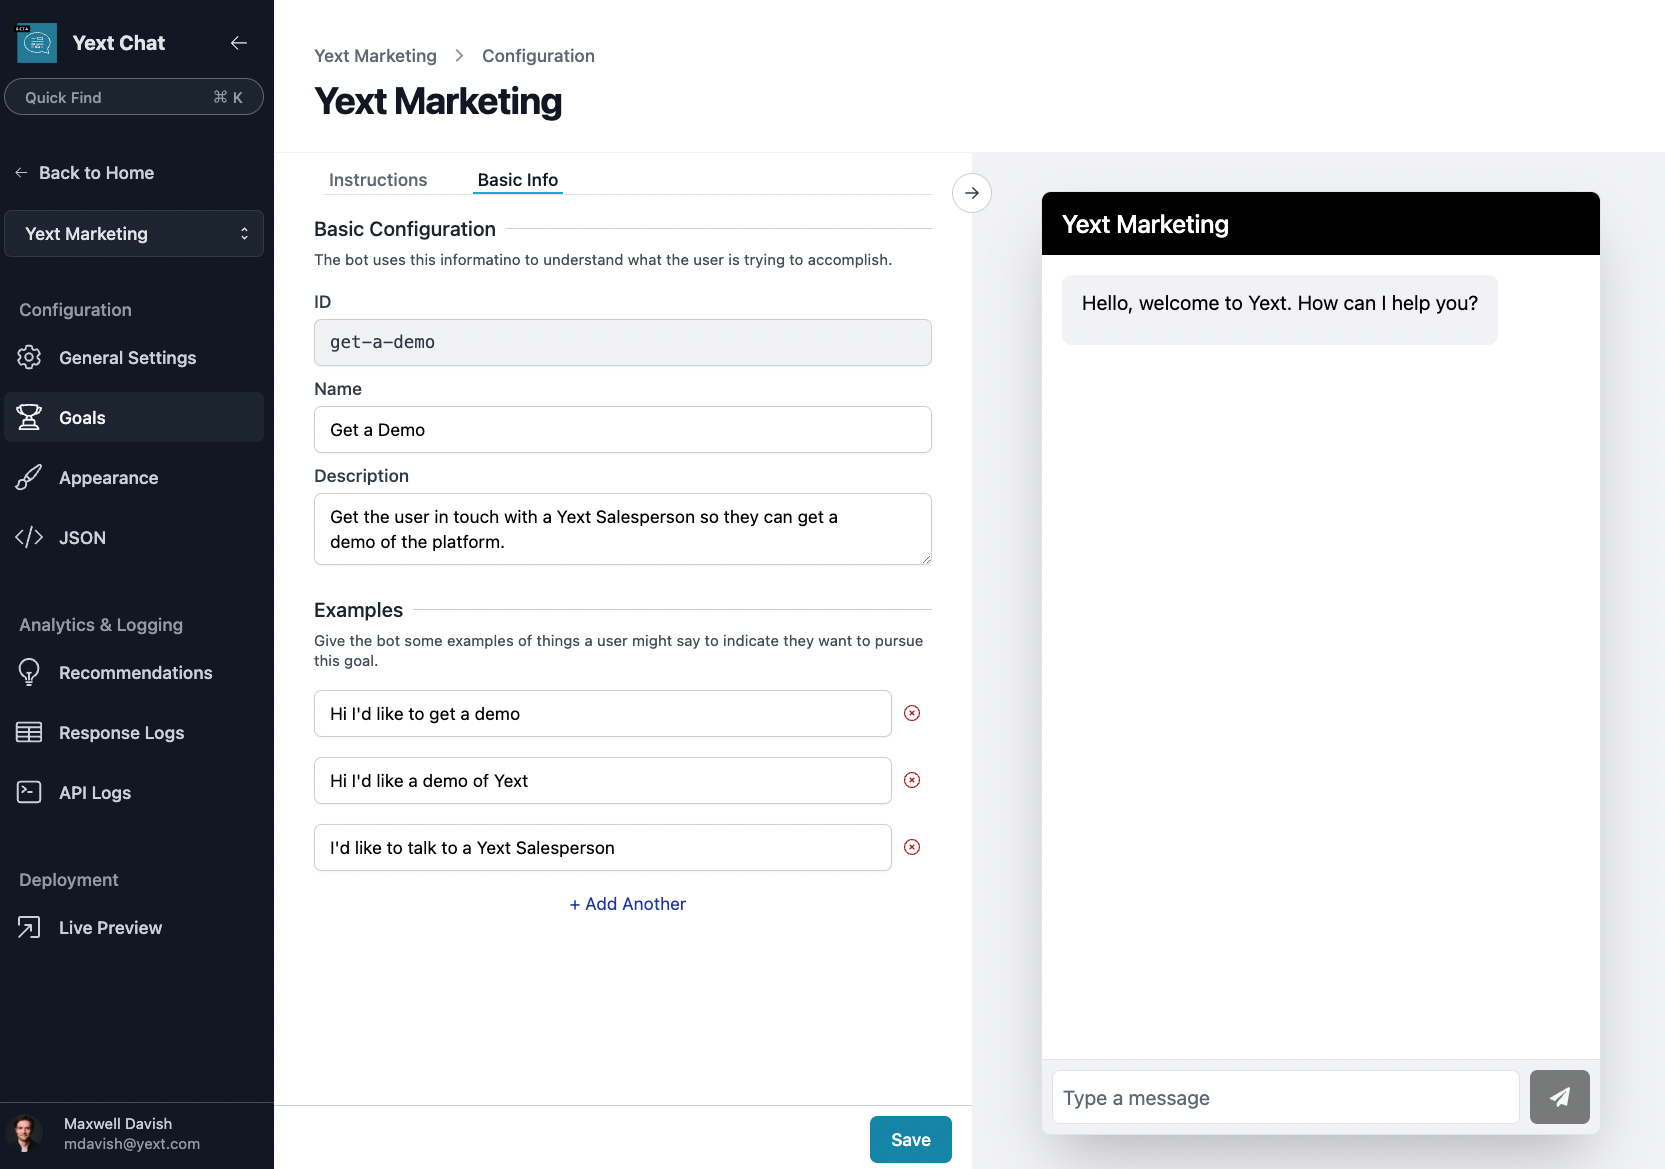
Once you click Create you will land on the Instructions page to give your bot the relevant instructions it needs to execute on the goal you are creating.
Instructions
Instructions tell the bot how to achieve each goal. You write instructions to the bot the same way you would to a person - in written language, as a numbered list.
For example, by default you will see that each bot already has an “Answer Question” goal set up. This already has a “Search” and “Answer” instruction step set up to provide users with answers to questions based on the search experience you associated with the bot. The instructions for this goal are:
- Search Yext for information relevant to the user’s question.
- Answer the user’s question based on the search results.
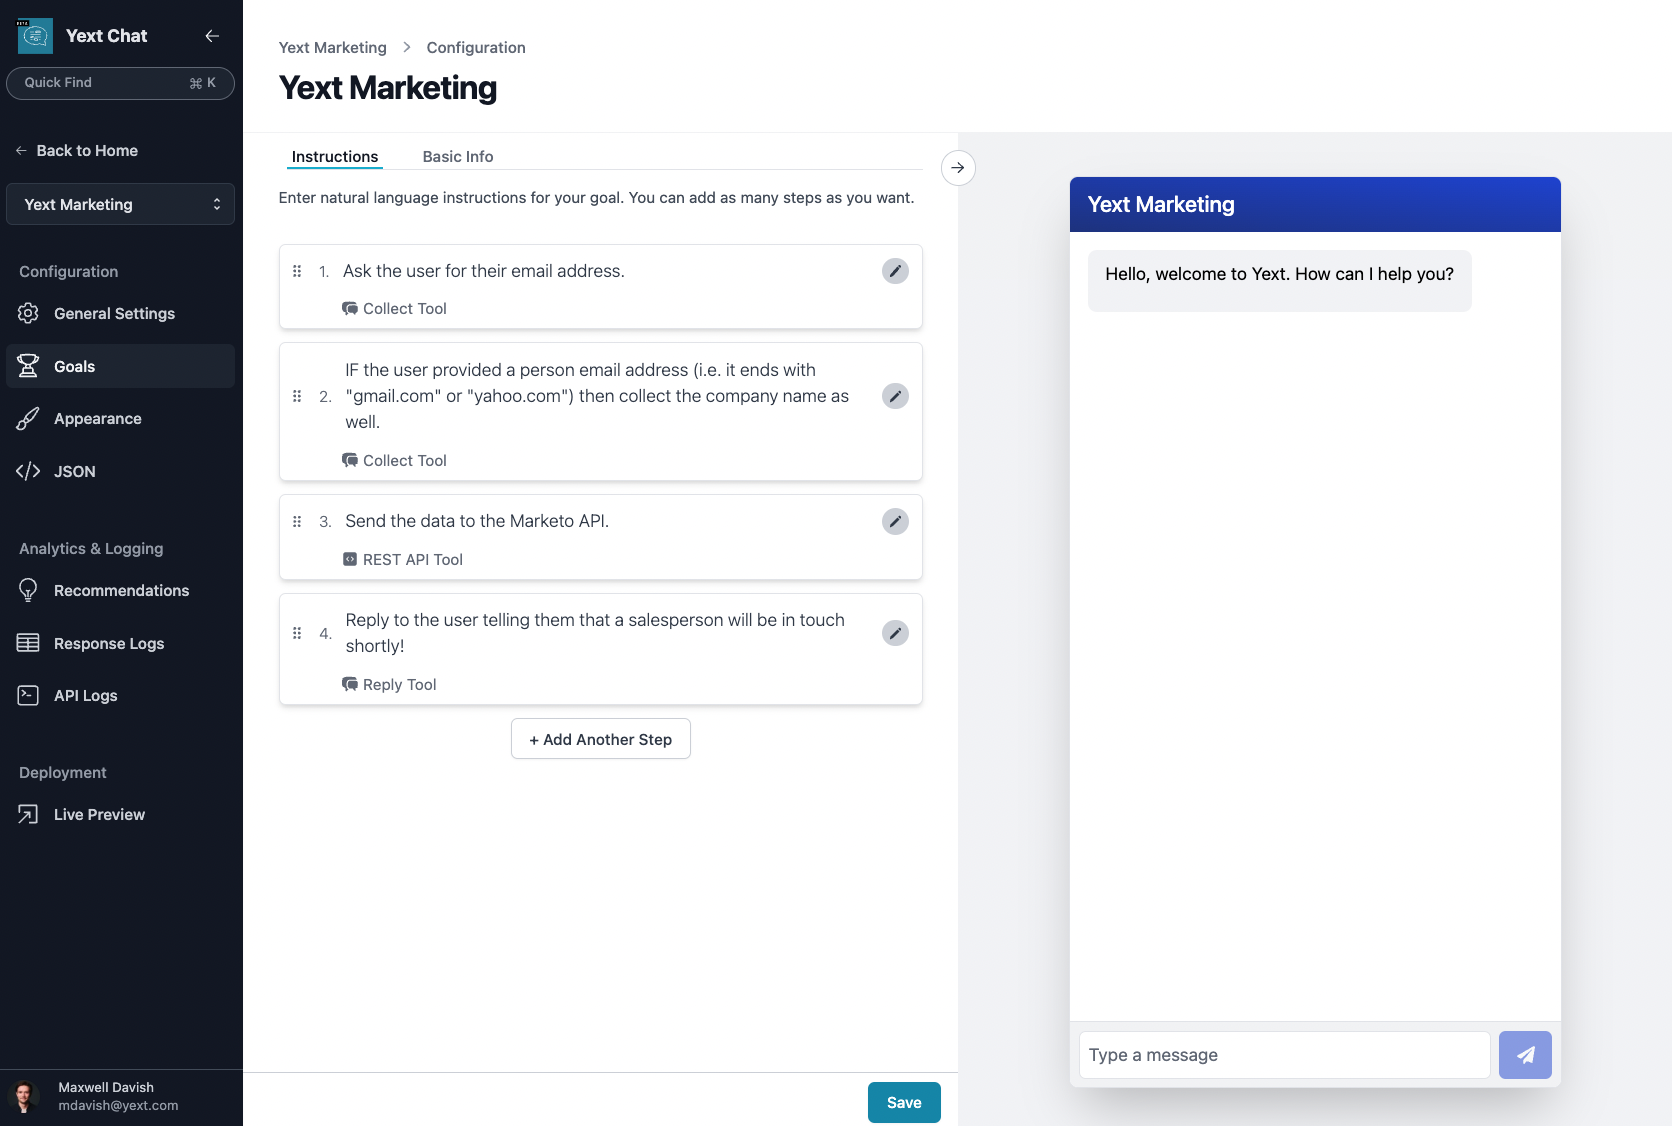
For a more complex example, the instructions for a lead generation goal might look like this:
Instruction Details
Each instruction in the list has a type. The types of instructions include:
- Collect: Ask the user for information.
- Search: Look up information from the Yext Knowledge Graph using Yext Search.
- Answer: Answer a user’s question based on the relevant result from the Search experience.
- REST API: Send a request to a REST API (possibly using collected data).
- Function: Execute a Yext serverless function (possibly using collected data).
- Reply: Reply to the user. This is typically the last step in the instructions.
Each type has slightly different configuration settings based on the action it will perform.
Create Instructions
- From the goals page click on the pencil icon next to the relevant goal to edit the goal.
- Enter relevant instructions in the first textbox. For example, if you were creating a goal to help users get a demo, your first instruction may be “Collect the user’s email address”.
- Select the relevant Type from the dropdown menu. In this same demo goal example, you would select Collect.
- Configure the setting for the Type you selected. This step will vary based on Type. For example, Search and Answer will not have any additional configuration options but the Collect type will require you to enter field details for the content you are trying to collect.
- Click + Add Another Step to add additional instructions.
Note: You can add conditional steps by adding “IF” in your instructions. This allows you to use conditional logic. It first evaluates if a condition is true and, if so, starts executing a series of nested steps. For example, in the demo goal example you could enter an instruction step that says “IF the user provides a personal email address (e.g., it ends with gmail.com or yahoo.com), then ask the user for the name of their company. Otherwise, proceed”.
Additional Configuration
Identify Context
Identity context can be used to provide the chatbot with additional instructions or contextual information about its purpose. (This is similar to the system message in GPT models, although it does not use the system message).
The identity context can be helpful for:
- Telling the bot what web page it’s located on
- Telling the bot what company it works for, or what product it’s selling
- Informing the bot about any unfamiliar concepts or acronyms that users might reference
- Dictating a certain tone of voice
For example, it’s common to use the identity context to encourage the bot to sell a particular product or nudge the user toward a particular objective, like so:
You are the bot for the Widget Store - a global chain selling Widgets.
Make sure to be very friendly and always speak positively about Widgets.
Occasionally, try to nudge the user toward purchasing a widget at this URL:[[URL]].
To add Identity Context:
- Navigate to your bot and click General Settings in the sidebar.
- Enter the relevant identity context for your bot.
- Click Save.
Context Entity
Similarly, you can supply a context entity to give the bot background information about your business without the bot needing to actively search the Yext Knowledge Graph for it. This is especially useful for single-location businesses, where users are almost always going to be asking questions about a single location entity. It can also be useful if you have a “site” entity in Yext Pages.
Deploy Bot
Once you’ve configured your bot, there are many places you can deploy it. The most common way to deploy a chatbot is on a website.
For this, you can use a simple script tag integration or you can build your own UI using the Chat SDKs. Reach out to your account team for additional details on deploying your chatbot.