Step 2: Edit Your Site
Edit Global Styles
Global styles are the branding and styling that apply to every page and, thus, every layout. From the Page Groups screen, click on the Edit Global Styles button.
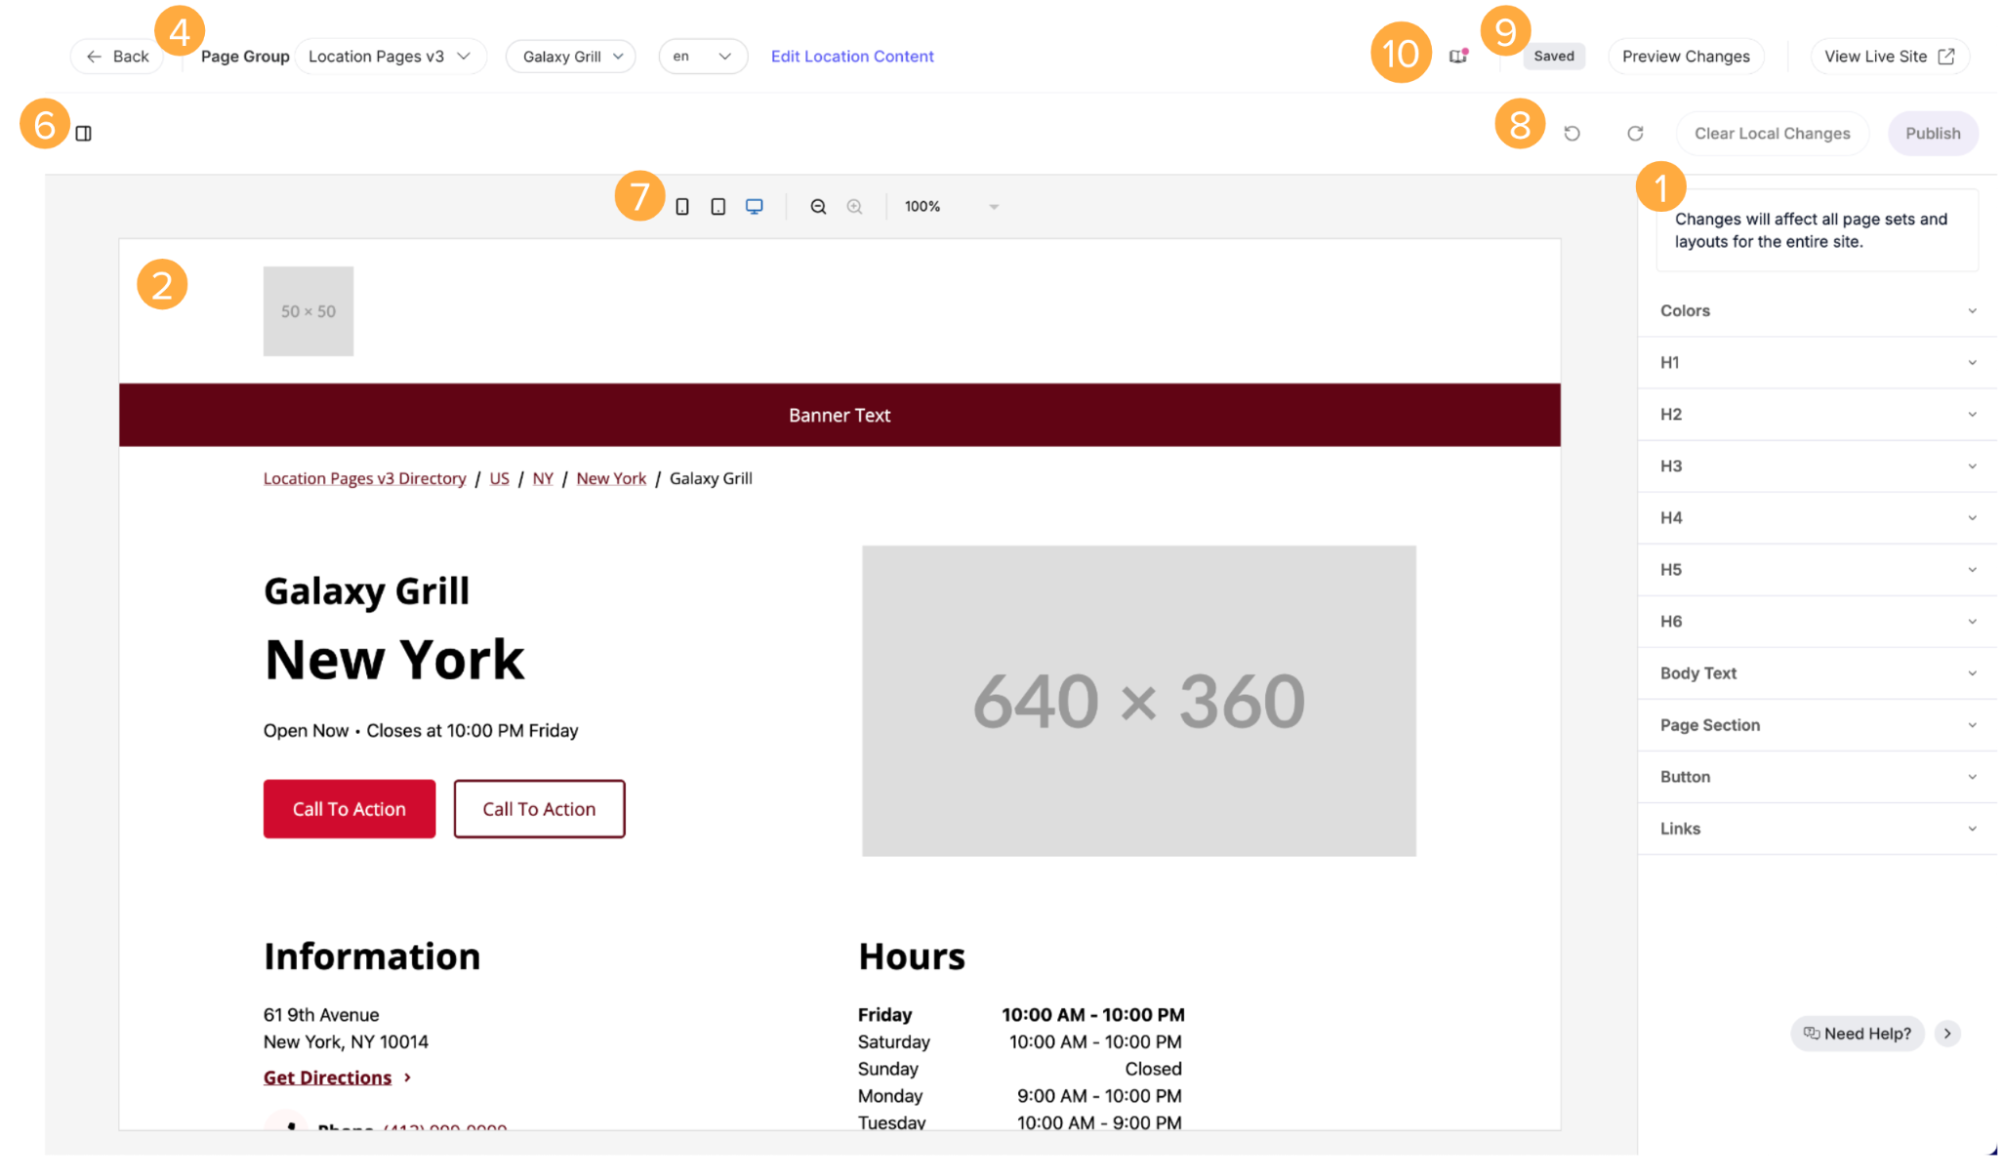
Here, you’ll see a visual editor you can use to edit the global styles across your entire site. The tools on this page are here to help you design your global styles.
- Make global styling changes, such as choosing the color palette and fonts, in the right panel. This is the primary function of this screen (1).
- All changes you make will be displayed on the page preview (2).
- Toggle the page group, entity from that page group, and locale you want to preview. You can also view the entity in the Knowledge Graph to make any content changes (4). This “Edit [entity type] content” button takes you to a filtered view within entity edit that only displays the fields actively used by your page layout.
- Collapse or expand the right panel to give yourself more space (6).
- Change the viewport between mobile, tablet, and desktop views, and zoom in and out on the preview (7).
- Undo, redo, discard, or publish your local changes (8). Once your pages are published (i.e., live), the Publish button will show as Update # Pages.
- Open the page preview and live site in new tabs, so you can view the layout as a full webpage (9). Every entity already has a live page, but clicking the Preview Changes button will generate a new preview page. The page preview will include all local changes, while the live page will only include published changes. You can share these links to get buy-in and feedback from others.
- Update your library (10) to pull in the latest product changes. This may change the structure and properties available on the tools above. This icon will only appear if you are not on the latest version.
Note that while you can toggle between page groups and entities here, you can not add, reorder, or remove sections. This is meant to show a preview of the layout in production.
Try it Out!
- Navigate to the Page Groups screen and click Edit Global Styles.
- Edit any aspect of the global styles.
- Toggle through different page groups and the entities in each set to validate that they all reflect your changes.
- Click Preview Changes. This will generate a new preview page. Validate that the preview reflects the changes you’ve made.
- Navigate away from the global styles editor by returning to the Page Groups screen. Then, go back to the global styles editor. You should see your changes persist.
- Click View Live Site. Notice that your changes are not shown here.
- Click Publish. This should make your changes go live for every page across all page groups.
- Back on your live page, refresh the page to validate that your changes have gone live.
Edit Layouts
A page group’s layout defines the look of each page in the page group. The layout will inherit the global styles, but you can also customize the design of individual sections. From the Page Groups screen, click Edit Layout next to the page group you want to edit.
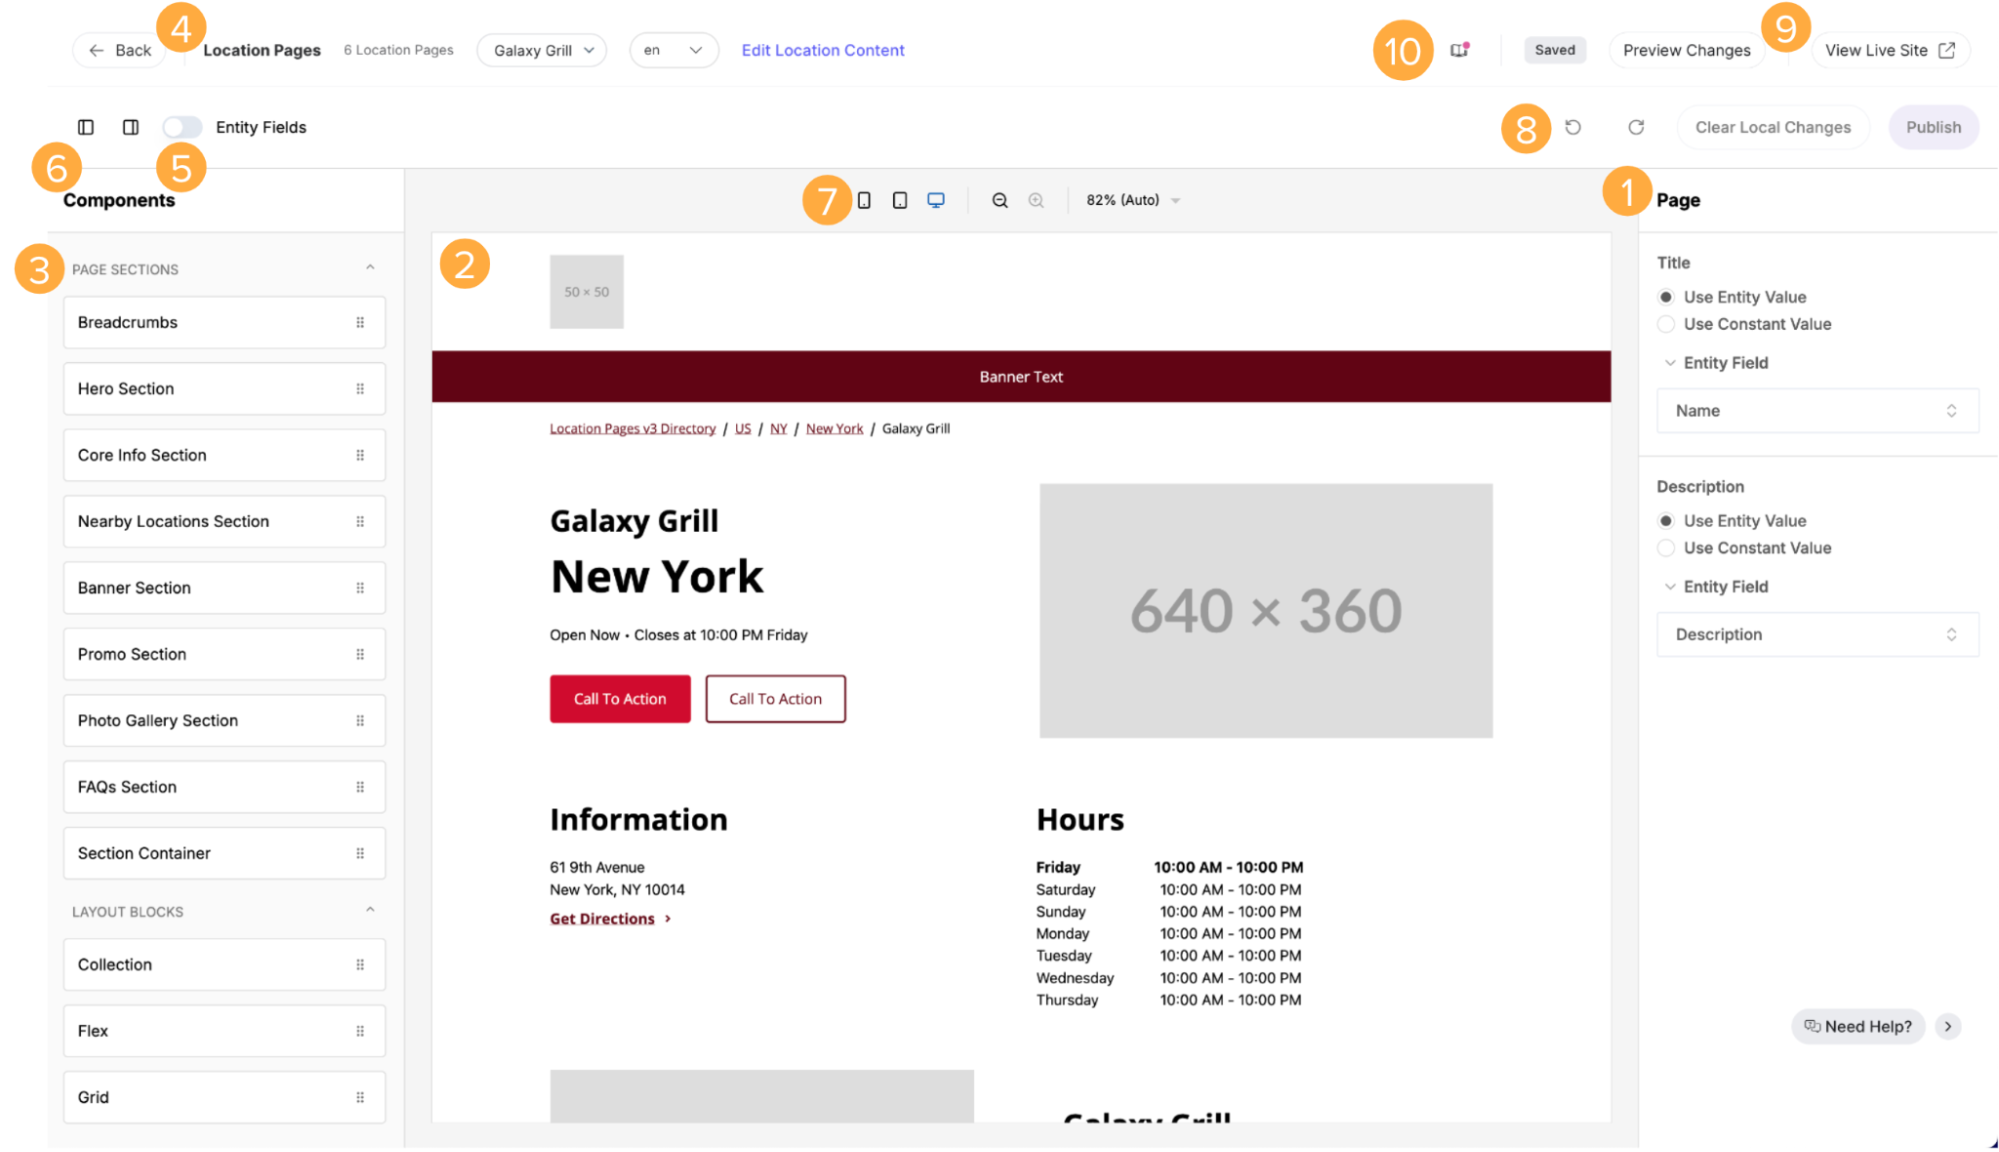
Here, you’ll see a visual editor you can use to edit the layout for this page group. There are similar tools here as on the global styles editor, with a few differences:
- Make changes to section properties in the right panel. Common actions are mapping content to an entity field or a constant value, changing fonts, and changing colors (1).
- In the left panel (3), view a list of available sections and an outline of the layout. Drag and drop available sections onto the preview, reorder them by dragging and dropping them, or delete them by clicking on them (in either the outline or the preview) and clicking on the trash can icon (2).
- Toggle on and off entity fields (5), which displays where fields are being pulled from Knowledge Graph entities on the layout (2).
- Close or expand the left and right panels to give yourself more space (6).
Try it Out!
- Navigate to the Page Groups screen and click Edit Layout next to the page group you want to edit.
- From here, try dragging a new section onto the page, reordering the sections by dragging and dropping them, and/or changing a section’s props.
- Toggle through the different entities in the page group and validate that they all reflect the changes you’ve made.
- Click Preview Changes. This will generate a new preview page. Validate the preview reflects the changes you’ve made.
- Navigate away from the visual editor by returning to the Page Groups screen. Then, go back to the layout editor. You should see your changes persist.
- Click View Live Site. Notice that your changes are not shown here.
- Click Publish. This should make your changes go live for every page across all page groups.
- Back on your live page, refresh the page to validate your changes have gone live.
Copy/Paste Sections
You can also copy the props from a section in one page group and paste them into the same section in another. This is especially useful for sections that need to appear the same on every page and have many props such as the header and footer.
To copy and paste a section:
- Navigate to the Page Groups screen and click Edit Layout next to the page group that has the section filled in.
- Click on the section you want to copy. An action bar will appear with the name of the section and icons for different actions you can take.
- Click the copy icon. This is the first icon in the action bar.
- Navigate back to the Page Groups screen and click Edit Layout next to the page group you want to copy the section to.
- Drag and drop the section into the layout if it is not already there. If it is, click on the section you want to paste into. An action bar will appear.
- Click the paste icon in the action bar. This is the second icon.
- All of the properties will copy over, including any translations. Preview, edit, and publish your changes as normal.
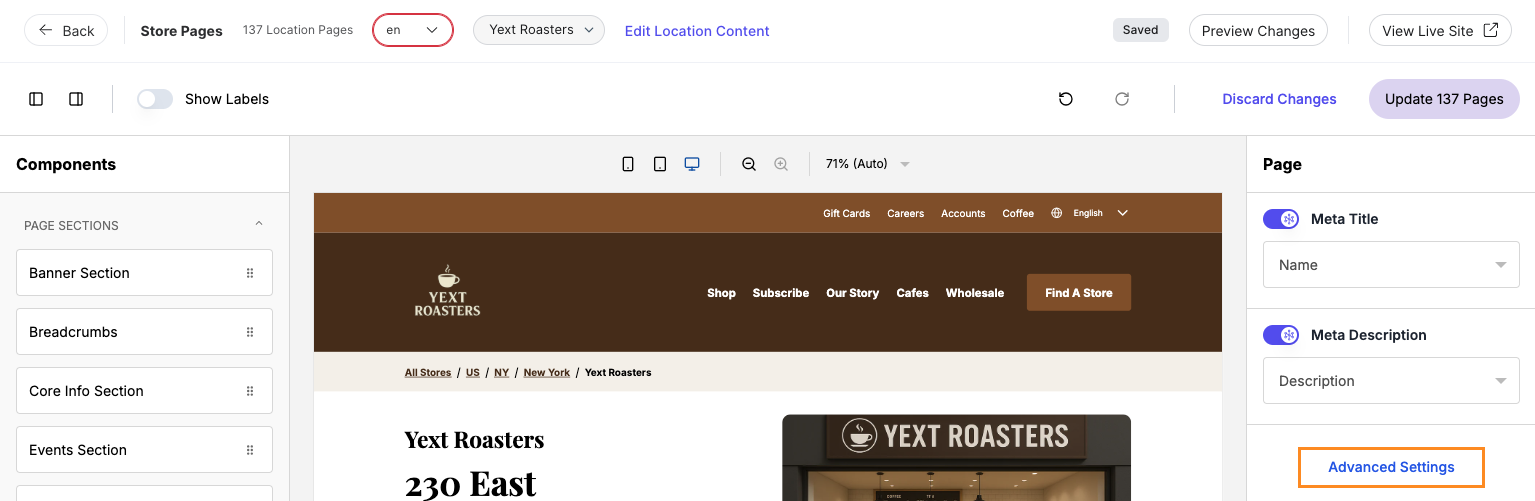
Mapping Properties
Sections can take in constant values or be mapped to an entity field. Constant values are the same across all pages, while entity fields will pull in the content for the corresponding entity. Turn on the toggle to map properties to Knowledge Graph content, and turn it off to enter a static value.
Mapping to Static Content
When the toggle is turned off, you can enter a static value for the prop. This value is the same for every page in the page group regardless of the underlying entity.
Certain text props are editable via a rich text editor on version 0.0.10 and above. This gives the user the same editing power that they have when they use rich text fields in entity edit. Keep in mind that not every text prop will be rich text eligible.
You can also embed entity field values into text and rich text static props, similar to the embedded fields function found in entity edit.
Mapping to Knowledge Graph Content
When the toggle is turned on, you can choose a Knowledge Graph field for the prop. Since the value of this field is specific to the entity, it can vary by page.
When selecting fields to map to, you will only see options on the entity type of the same field type as the section. For example, if you are mapping a URL field, you will only see URL fields as mapping options.
Updates to the content in the Knowledge Graph will automatically be reflected on your Pages. This emphasizes the importance of previewing the page for each entity to ensure that each page has the correct information.
You may decide you want content to appear that doesn’t exist on the entity yet. If so, you can add a custom field and fill in the values of that field. Note: If you add new fields to the entity type, the site will redeploy to show those new fields in the visual editor. Site deployments may take a few minutes.
Editing Multi-Language Sites
If you have a site that needs to be displayed in multiple languages, you can manage localized content directly from the layout editor. As shown above, you can select the locale you want to preview the global styles and layout editor in. There are a few more things you can do to set up your location pages in multiple languages.
Set Localized Content
As discussed in the Mapping Properties section above, sections can take in either constant values or be mapped to an entity field.
Properties that are mapped to an entity field will also pull content in other languages directly from the entity. You must set up language profiles on the entity to specify entity-specific content in other languages. Check out the Multi-Language Entity Profiles module for more information.
Properties that are mapped to constant values are set in the layout editor. To set localized static values, use the locale picker at the top of the editor to select the locale you want to preview and then add the translations in the relevant text fields. You’ll notice a warning sign next to the locale in the locale picker if there are missing translations.
Enable User-Facing Language Selector
Enable the user-facing language selector to allow your website visitors to switch between available languages and view the page in their preferred language.
To turn on the user-facing language selector:
- Navigate to Pages > [[Site Name]] > Page Groups.
- Click Edit Layout next to the page group you want to edit.
- Click on the Expanded Header section in either the outline or the preview. If this section is not yet in your layout, add it.
- Set the props to show the secondary header and show the language dropdown to yes.

The locale picker for the page preview will show “Missing translations” warnings to alert you to fill in content.
When viewing the page preview or live page, you can now select the desired page language from a dropdown selector.

Upload CSV for URL Redirects
Manage your site’s redirects by uploading a CSV file. To do so:
- Navigate to Pages > [Your Pages Site] > Site Configuration.
- Click on the URL Redirects setting.
- If no file is currently uploaded, you can download a template to see the required format. Otherwise, simply upload your CSV file.
Notes:
- You can only have one CSV redirects file uploaded at a time. To add new redirects, download the existing file, append your new redirects, and upload the updated file. This helps keep your redirects clean and prevent redundancy.
- Whenever you save a new redirects CSV, the site will automatically trigger a new deploy.
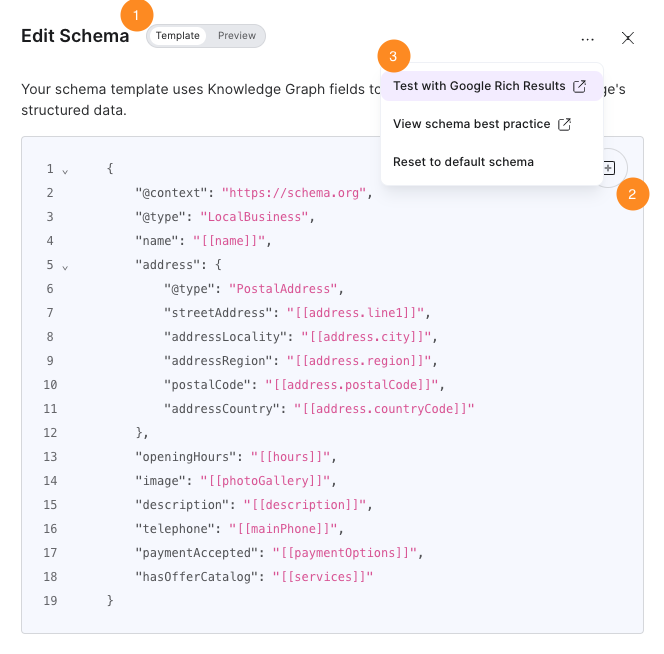
Edit Your Schema
Gain more control over your page’s technical SEO by editing the generated page schema in Advanced Settings.
- Toggle between the schema template and a preview populated with values for a specific entity (1).
- Use the field picker to easily embed Knowledge Graph fields (2).
- Test the schema with the Google Rich Results Test (3).