Module Assessment | Yext Hitchhikers Platform

Background
Turtlehead Tacos is ready to start adding their entities to the Knowledge Graph! They want to start with their restaurants and events.
Start by adding individual entities so you can make sure everything looks right. Then, make any necessary edits to fields and make sure you’ve created all the custom fields you need. Finally, upload two spreadsheets with Restaurant entities and Event entities, and save the upload configuration for your Restaurants upload.
If you get stuck during the upload process:
- Refer back to the Entity Upload unit
- See the Upload Entities to Yext help article for detailed steps
Your Challenge
Create a new Restaurant entity. Navigate to Knowledge Graph > Entities and click Add Data. Choose the Restaurant entity type and enter the information exactly as shown below:
- Entity ID: 1
- Name: Turtlehead Tacos
- Category: Set the Primary category to Mexican Restaurant
- Address:
- Address: 1313 S. 1st Street
- City: Austin
- State/Region: TX
- Postal Code: 78704
- Main Phone: 5125559331 (leave the +1 US country code as-is)
Go to Entity Edit for the restaurant entity you just created and find the Photo Gallery field. Click Select Photos and choose the Enter URLs option to add the photo. Copy and paste the URL below. When you’re finished, make sure to Save. https://a.mktgcdn.com/p-sandbox/iirNIyxQuGSw7OecmBP_zKSyU2l4aVreVPiPu43fkS4/1172x874.png
New message from the team: they categorize their Restaurant and Community Story entities by geographical areas that they call Territories. They forgot to ask you to add that field when you were initially setting up their entity schema, so you should do it now before you upload their data files. Navigate to Knowledge Graph > Configuration > Fields, click Create Custom Field, and enter the information exactly as shown below.
- Type: Single-line text
- Field Name: Territory
- Entity Type Availability: Restaurant, Community Story
Add the Territory field to the Internal Use Only field section on the field presentation for the Restaurant and Community Story entity types.
Go back to Entity Search. You should see two entities: a Community Story and the restaurant you created. Bulk edit both entities and set their Territory field value to “Texas”.
Now you’re ready to upload the entity data files! Start with the Restaurant entities. Download the Restaurants data file. Then, in the Knowledge Graph, click Add Data and choose Entity Upload.
When you get to the Configure File step of Entity Upload:
- Make sure all fields are mapped properly.
- Map the “DMA” column to the “Territory” field.
- Map the “Takes Reservations” column to the “Accepts Reservations” field.
- For the “Name” field, click to edit the data cleansing rules and select Capitalize Fully.
On the Fix Errors step, you might see a couple issues. Click Fix All Errors and input the correct values for any cells with errors. (Hint: the value for the “Restaurant Type” column should be “Food Truck,” not “Street Truck.”)
Confirm the file upload by acknowledging the changes for New Entities, Updated Entities, Unchanged Entities and Missing Entities.
On the Summary step, save this upload configuration under the name “Weekly Restaurant File.”
Before you upload your Events spreadsheet, you need to add one more new field to the Events entity type. Create another custom field using the information below. After you create the field, add it to the Additional Information section on the Events entity type.
- Type: Text > Text List
- Name: Featured Guests
- ID:
c_featuredGuests - Entity Type Availability: Event
Download the Events file. In the Knowledge Graph, click Add Data and choose Entity Upload.
Oops — you don’t have a column for Entity Type in your file! Since your default entity type in the Knowledge Graph is set to Restaurant, but you want to add Events, you need to make sure the entity type is specified.
- In the Configure File step, add an Additional Field.
- Choose Entity Type and enter Event as the value.
- Apply to All Entities in the File.
Fix any errors that come up. You can click Fix All Errors to go through all errors at once, or you can fix each error type individually by clicking Fix in Spreadsheet View next to each error category. (Hint: Search the address on Google to find the correct postal code.)
Complete the file upload by acknowledging the changes for New Entities, Updated Entities, Unchanged Entities and Missing Entities. You don’t need to save this upload configuration.
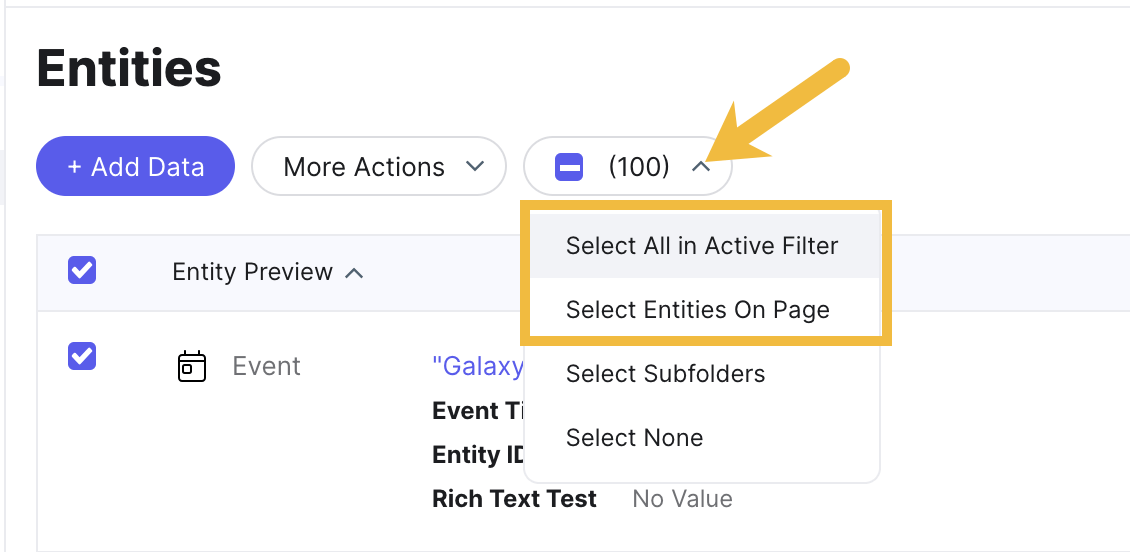
Make sure that you are selecting all of the right entities when you bulk edit. By default, clicking the checkbox to select all entities will only select the entities shown on the first page. To select more entities, click the dropdown menu displaying the number of entities selected. Then, choose to select all in active filter.