Module Assessment | Yext Hitchhikers Platform

Background
Turtlehead Tacos is expanding quickly! They are ready to further customize their entity schema for Restaurant and Community Story entities, and they need to streamline the process for adding new restaurant entities to the Knowledge Graph.
First, the team wants you to create these custom fields and add them to the Community Stories entity type:
- Theme
- Goal
- Primary CTA
- Promoting Events
- Local Non-Profits
Then, the team needs these fields created and added to Restaurants:
- Restaurant Type
- Delivery Disclaimer
- Restaurant Features
There are also some built-in fields they’d like you to add to each entity type.
Next, the team wants to create an entity template to make sure that all new Restaurant entities have the following fields:
- Description
- Featured Message
- Restaurant Promotions
- Price Range
- Attire
- Primary CTA
To standardize the data that’s already in the Knowledge Graph, you’ll need to apply the template to all the restaurant entities you’ve already created. Then, you’ll update your saved upload configuration for the Weekly Restaurant File so that all future uploads are also using the entity template.
Use these resources if you need help completing the challenge tasks:
Your Challenge
Start by customizing the entity schema for Community Stories. Navigate to Knowledge Graph > Configuration and click the Entity Types tile. Choose the Community Story entity type and go to the Fields tab.
Add these built-in fields to the Core Information section:
- Organizer Email
- Landing Page URL
Add these custom fields to the Core Information section:
- Theme
- Goal
- Primary CTA
- Promoting Events
- Local Non-Profits
Now update the schema for the Restaurant entity type. Add the Promoting Events and Primary CTA custom fields you created above to the Restaurant entity type schema in the Business Details section.
Create the following custom fields and add them to the Business Details section.
Restaurant Type
- Type: Option > Single-Option Select
- Field Name: Restaurant Type
- ID:
c_restaurantType - Field Settings > Available Options: Food Truck, Dine-in Restaurant
Delivery Disclaimer
- Type: Text > Multi-Line Text
- Field Name: Delivery Disclaimer
- ID:
c_deliveryDisclaimer - Field Settings > Validation: Maximum character count of 200
Restaurant Features
- Type: Option > Multi-Option Select
- Field Name: Restaurant Features
- ID:
c_restaurantFeatures - Field Settings > Available Options: Outdoor Seating, Live Music, Accepting Reservations, Dog Friendly, Breakfast for Dinner, Sells Merchandise
New message from the marketing manager at Turtlehead Tacos: while you’re at it, can you also add the Primary CTA field to the schema for the Event and FAQ entity types? Do this in one of two ways:
- Go to Knowledge Graph > Configuration and click the Fields tile. Find the Primary CTA field and update the Entity Type Availability settings to include Event and FAQ.
- Go to Knowledge Graph > Configuration and click the Entity Types tile. Update the field presentation for each entity type individually.
Now, you need to create the entity template to standardize new restaurant information. Navigate to Knowledge Graph > Configuration and click the Entity Templates tile (scroll down to the Entity Management section to find it). Create a new template and name it “New Restaurant Content.” Click Add Template.
On the Configure Fields screen, configure the following information:
- In the Select Entity Type(s) dropdown, select the Restaurant entity type (hint: it’s nested under the Location option). Click Apply.
- Click the Copy the data from an existing entity option. In the Copy Field Content module, select one of your Restaurant entities. (You can choose any of them since they all have the same data.)
- Click Deselect all fields, then select only the Description and Featured Message fields. (Hint: they are both under the Business Details section.)
- In the left sidebar, search for and select the Restaurant Promotions, Price Range, Primary CTA and Attire fields.
- Click to edit the Price Range field and set to
$. - Edit the Attire field and set to Casual.
- Edit the Primary CTA field. Set the Label to “Click to Order”, Link Type to URL, and set the URL to order.turtleheadtacos.com.
Bulk-edit all Restaurant entities to apply the template. In the bulk edit view, click the Select Action dropdown and choose Apply Template. Then, choose the template you just created and click Apply Template.
Test your entity template with just one new location before applying it to your spreadsheet upload configuration. Create a new restaurant entity and apply the New Restaurant Content template when you create the entity. (Hint: click Additional Settings in the Add Entity modal to see the template option and the Entity ID field.) Include the following information on the new entity:
- Entity ID: 1000
- Name: Turtlehead Tacos
- Address:
- Address: 1323 Kirby Rd
- City: McLean
- State/Region: VA
- Postal Code: 22101
Apply the New Restaurant Content entity template to the Weekly Restaurant File upload configuration you created in the last challenge, so that each time a file is uploaded with that configuration, all the fields in the template will be applied to any new restaurants.
- Navigate to Knowledge Graph > Configuration and click the Upload Configuration tile.
- Click to edit the Weekly Restaurant File upload configuration. Scroll to the bottom and add an Additional Action to apply the New Restaurant Content template to new entities.
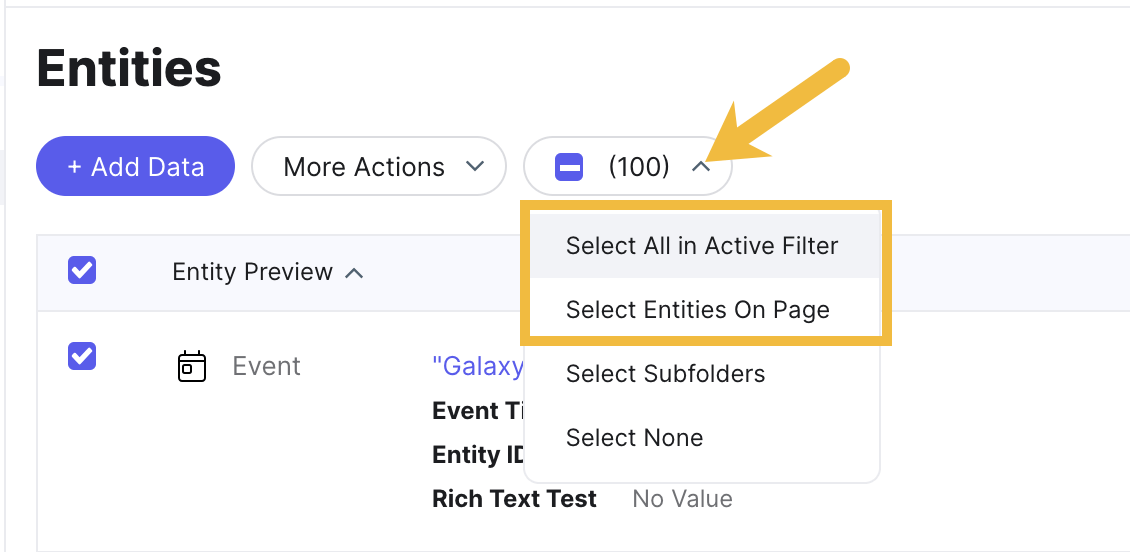
Make sure that you are selecting all of the right entities when you bulk edit. By default, clicking the checkbox to select all entities will only select the entities shown on the first page. To select more entities, click the dropdown menu displaying the number of entities selected. Then, choose to select all in active filter.