How to Create and Manage Assets | Yext Hitchhikers Platform
What You’ll Learn
In this section, you will learn:
- How to create an asset
- How to set asset availability for fields and entities
- How to create asset labels
- How to apply assets in various contexts
Asset Configuration Details
As you know, Assets can be of many types:
- Built-in Types: Photo, Text, Video
- Custom Types: Any custom field type you create in the account
The asset type you select is based on what content you have or the field you want to use the content for. If you don’t have a field structure that suits the content you have, create a new custom field type first. You’ll then need to create a custom field of that type in order to start adding to assets of that field type.
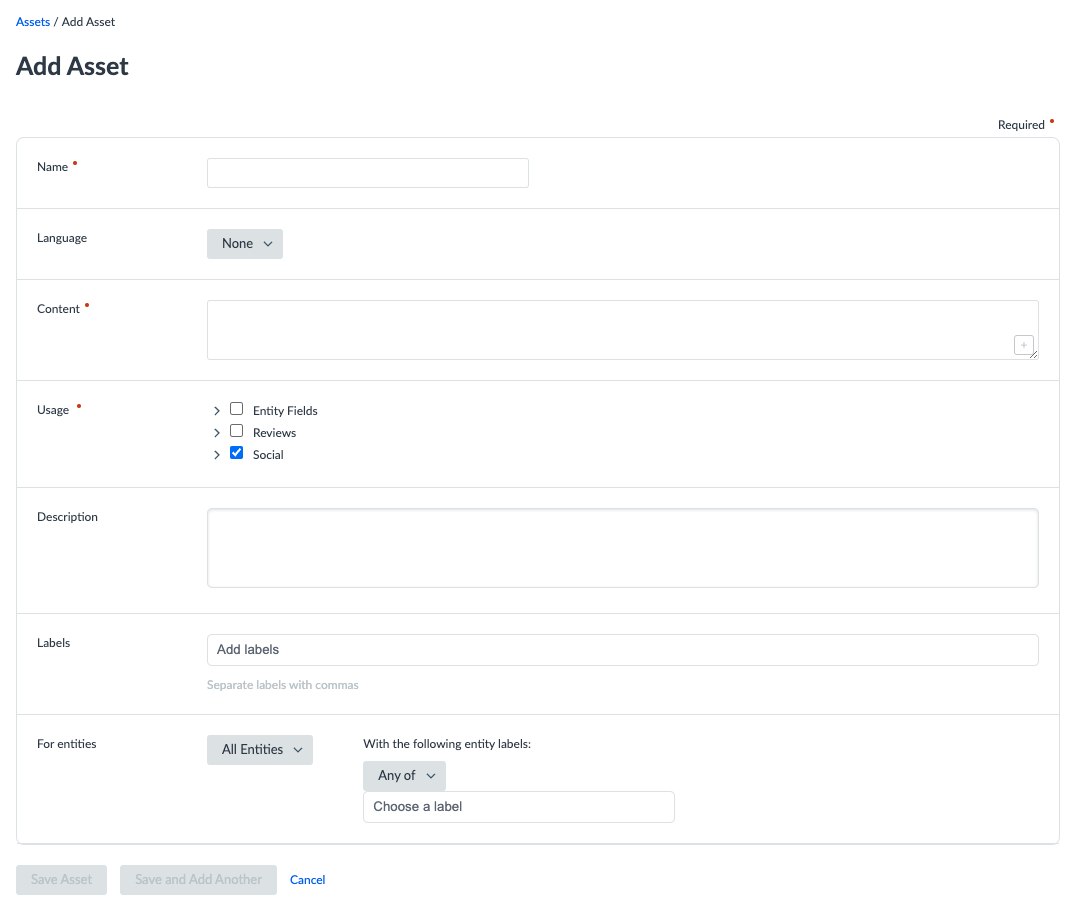
For each asset, you have a number of configuration options:
Name: The name of the asset. This should be used to make the asset easy to search for and identify. You can update this at any time.
Language: This is optional and controls whether the asset is available to apply on specific language profiles only. If you set it to “None” (default) it will be available for any language profile. If you set it to a specific language, it will only be available for that language. This is only relevant if you have Multi-Language Profiles enabled for your account.
Content: This is the actual content of the asset for that field type. This can be updated at any time – but remember that assets are static so updating the content will not update any profiles, posts, review responses, etc.
Usage: Here’s where you can control where this asset appears. The options are:
- Entity Fields (available for all asset types)
- Social Posting (for text and photo assets)
- Reviews (only for text assets)
This is one of the most important settings so that your assets are showing to users only when relevant.
Description: This is an internal-only description used to help explain to other users of the platform what the asset is, how it can be used, etc. This is simply helper text for a user when they are reviewing which asset to select or browsing the library. Users can also use this to search or filter through assets.
Labels: Asset labels help make it easier to search and filter the assets, especially if the library is quite large.
For Entities: This controls which entities the asset can be used for. You can select
- a single entity
- a group of entities
- a folder
- all entities
On top of that, you can also add an additional filter that further limits the selection to only those with a certain Entity Label (Any of or All of).
For example, let’s say you have Insurance Agents and Financial Advisors in an account and you want an asset only available to those that sell Business Insurance. You could apply an entity label to all agents who sell Business Insurance and then when setting up the Asset(s) you could select the Folder “Insurance Agents” and add a label for “Business Insurance”.

Create an Asset
To create an asset you:
- Click Knowledge Graph in the navigation bar and click Assets.
- Click + Add Asset button.
- Select the type of asset you want to create.
- Add a name that makes the asset easily identifiable.
- If applicable, select a language. If this option doesn’t appear, the asset language will be set to “none”.
- Fill out the relevant content.
- Set the usage(s) of the asset.
- Add a description to make the asset easily understood by other users in the account.
- If applicable, add any labels that you might be using to organize your assets.
- Select which entities the asset should be available for, if applicable.
Apply an Asset to an Entity
- Navigate to the Entity and the field you want to update.
- Click on the Asset icon on the whole field (near the field name) or on an sub-field (on the right side).
- View the assets available for the chosen entity, field and language combination.
- Easily search or filter through the assets if there are many to choose from.
- Select the asset you want to use.
Other Asset Applications
You’ll learn more about how to use an asset in a review response and in social posting in those modules.
You have a text asset that you want to be used only for the Description field on Job-type entities. Is this possible?
True or False: You cannot edit the content of an asset.
What are the different ways you can make it easier for users to sort, search for and filter assets? (Select all that apply)
Wahoo - you did it! 🙌

