

Step 3: Add the Search Bar to your Store’s Main Header
In this step, we will walk through how to add a Yext Search Bar to the main header of your online store to make search accessible to your customers no matter where they are on the site.
By default, the main header in the Dawn theme looks like this:

We’ll be replacing that default search icon on the right with a Yext Search Bar!
Instructions
Navigate back to the Shopify code editor.
In the list of files on the left, navigate to Layout > theme.liquid. Within the
<head></head>opening and closing tags, directly before the closing tag, add the following code snippet. Make sure you replace any of the properties prefixed withREPLACE_ME. Read more about where to find these properties in the Add a Search Bar integration guide. Then click Save. NoteIf you are hosting data in the EU cloud region, update the code snippet based on the callouts in the Hosting Data in the EU Cloud Region section.
<link rel="stylesheet" type="text/css" href="https://assets.sitescdn.net/answers-search-bar/v1.6/answers.css"></link>
<script src="https://assets.sitescdn.net/answers-search-bar/v1.6/answerstemplates.compiled.min.js" defer></script>
<script>
  function initAnswers() {
    ANSWERS.init({
      apiKey: "REPLACE_API_KEY",
      experienceKey: "REPLACE_EXPERIENCE_KEY",
      experienceVersion: "PRODUCTION",
      locale: "en",
      businessId: "REPLACE_BUSINESS_ID",
      templateBundle: TemplateBundle.default,
      cloudRegion: "us", // to use EU cloud region, check out the Add a Search Bar integration guide linked above
      cloudChoice: "multi",
      onReady: function() {
        ANSWERS.addComponent("SearchBar", {
          container: ".search-form",
          name: "search-bar",
          redirectUrl: "REPLACE_SEARCH_RESULTS_PAGE_URL",
          placeholderText: "Search...",
        });
      },
    });
  }
</script>
<script src="https://assets.sitescdn.net/answers-search-bar/v1.6/answers.min.js" onload="initAnswers()" defer></script>
Now, navigate to Sections > header.liquid file. Search the file to find this line of code:
<div class="header__icons">Inside of the above
divtag, you’ll see a<details-modal>element with a class of “header__search” and lines of search-related code inside.Delete the entire
<details-modal>element and replace it with the following line of code. Then click Save:<div class="search-form"></div>
Your code should now look something like this:
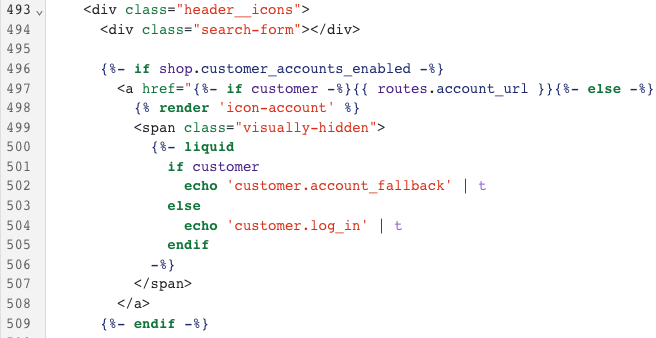
Note: this step is based on the Dawn theme. If you have a custom theme that has different header code, you’ll simply need to add the code snippet from this step wherever you want the Yext Search Bar to appear!
Feel free to customize the appearance of the search bar by adding CSS within the <style> tag in the header.liquid file. For example, we added the following styles:
.yxt-SearchBar-container {
      border: 1px solid #dcdcdc;
      border-radius: 0;
  }

  .yxt-SearchBar-container:hover, .yxt-SearchBar-input:focus-visible {
    box-shadow: none;
  }

  .yxt-SearchBar-input, .yxt-AutoComplete-option--item {
    font-size: 14px;
  }
With all of the above code implemented, we now have a Yext Search Bar in our store’s header:

Congratulations, you’re good to go!
When a search is made via the Yext Search Bar, the customer will be redirected to your newly created search results page to find answers to all of their questions.