

Step 3: Install the Olo Restaurant Connector
You may use this connector to either bring in net new entities or update existing entities.
Add New Entities Using Olo Data
If you’re bringing in new entities, follow the steps below.
Confirm that you have been provisioned access to your brand’s Olo Vendor Export (follow Step 1 if this has not been done).
Navigate to the App Directory and locate the Olo Restaurant Connector.
Review the app description, installation instructions, and integration details
- Note: the fields specified on the Olo Restaurant Connector’s App Directory listing contain only the custom fields that the app adds to the account, and neglects a number of built-in fields that data is still mapped to.
Click Install.
Review the first page of the installation flow and click Install On Yext. The next page will show all of the resources added to your account upon installation. Click Authorize.
Enter your Internal Names and click Import Restaurants to automatically install and run the connector.
- Ensure you have the correct Internal Name by consulting your brand point of contact. If they are unsure, your Olo CSM will know.
You will be redirected to the Connectors overview page. Click View next to your Olo Restaurant Connector.
Wait a few minutes and refresh the page. You should see a summary of the entities pulled in. Return to the Knowledge Graph to see all the entities!
Update Existing Entities with Olo Data
If you already have entities that you would like to update with Olo data, read the considerations below and then follow the steps accordingly:
Before You Start
You can use the Olo Restaurant Connector to update either restaurant or location entities, however, the connector is pre-configured to update restaurant entities. Location entities will require a slightly more complex setup, which is detailed below.
There must be a field in the API response we receive from Olo that matches the Entity ID in Yext. Typically, the best options are the
idproperty or theextrefproperty. See a full list of fields returned in the API response in the Additional Details section of this guide.In addition to Entity ID, Name and Address are also required fields in the connector. Therefore, your Olo account must contain the proper restaurant names and addresses. If all of your restaurants have the same name in Yext, you can use the “Add Column” transform in the connector to map the same name to every entity.
Steps
If you are updating Restaurant entities, first confirm that your restaurant Entity IDs in Yext do not match your restaurants’ Vendor IDs in Olo. If these do match, as soon as you download the connector, all Olo data will overwrite Yext data, when you likely only want certain pre-populated fields to be updated.
- If you are updating Location entities, you don’t have to worry about ID matching.
Navigate to the App Directory and locate the Olo Restaurant Connector.
Review the app description, installation instructions, and integration details.
- Note that the fields specified on the Olo Restaurant Connector listing contain only the custom fields that the app adds to the account. It does not include the built-in Yext fields that data is mapped to.
Click Install.
Review the first page of the installation flow and click Install On Yext.
The following page shows all of the resources added to your account upon installation. Click Authorize.
Enter your Internal Name(s) and click Import Restaurants.
- Note that triggering this run will import a duplicate set of restaurant entities, which we will delete in Step 9.
You will be redirected to the Connectors overview page. Cick View next to your Olo Restaurant Connector.
Wait a few minutes and refresh the page. You should see a summary of the entities pulled in. Go to the Knowledge Graph and delete the entities you just imported. You can sort by “Date Added” to isolate the restaurants you just added.
Return to the Olo Restaurant Connector configuration and click Edit.
- If the pre-existing entities in your account are Locations, go to the last step of the connector (called Map Data) and switch the entity type mapping to Location. A warning will pop up, click “Remove Mappings and Change Entity Type”. If the pre-existing entities in your account are Restaurants, don’t worry about this.
On the last step of the connector configuration (Map Data), map only the fields you wish to bring in. As mentioned above, Entity ID, Name, and Address are required, but you should map any additional fields you wish to import from Olo to Yext. If you map any fields that you do not wish to bring in, data will be overwritten.
Click Save in the bottom right corner, and the next time the connector runs, only those fields which you mapped will be updated on your Restaurant or Location entities!
Filter to a Subset of Restaurants
If you would like to import some but not all of your Olo restaurants, you can add a filter transform to your connector before running it.
After installing the connector, but before running it, click Edit Configuration on the Connector overview page.
Scroll down to the second-to-last step of the connector, and click Add Transform. Select the Filter Rows option and select the condition on which you would like to filter your restaurants.
- Example: if you only want to import the restaurants located in New York, your configuration would look like this.
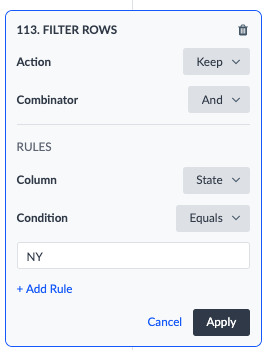
- Example: if you only want to import the restaurants located in New York, your configuration would look like this.
Click Apply, save the connector, and click Run!