Step 1: Set Up a Reverse Proxy
Overview
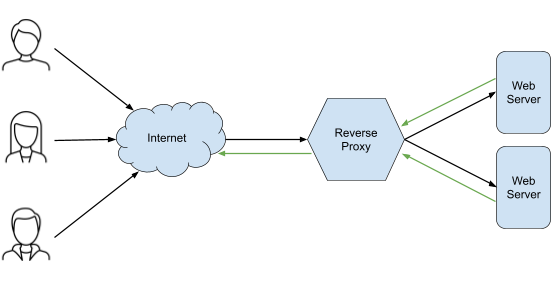
A reverse proxy is a server that exposes local data by generating an endpoint users can access via the internet.
When a client requests data from such an endpoint, the proxy server passes the request details onto the web servers it has access to, retrieves the data, and passes it back to the user. The reverse proxy thus acts as a middleman between clients looking for data and the web servers that store it locally.

Reverse proxies are also used to relay requests from Yext pages hosted on subdirectories. See the Reverse Proxy reference to learn more about that process.
Reverse proxies offer one of the simplest solutions to pulling on-premise data through developer platforms like the Yext Connector framework. There are many reverse proxy servers available to download for free, and you can use any of them to facilitate data exchange with Yext.
ngrok Setup
The steps below detail how to pull local data using ngrok , a server found to be consistently reliable:
First, head to ngrok and sign up for a free account.
Once your account is created, see the Setup and Installation Overview to learn how to download the required software on Windows, Mac, Linux, or FreeBSD.
After your software has been installed and unzipped, you’re ready to generate the URL required to pull your local data. Visit the ngrok Getting Started page, which will teach you how to spin up a local web service for your on-premise data.
- You may already have a local web service for the reverse proxy to connect to—if you can visit a URL like
http://localhost:1234to see your local data associated with the port 1234, skip to Step 2 in the Getting Started guide.
- You may already have a local web service for the reverse proxy to connect to—if you can visit a URL like
Once you enter a command like
ngrok http 8000in Step 4 of the Getting Started guide, your command line interface will return a block of information that includes a line labeled Forwarding, next to a value that looks like a URL ending inngrok.io. This is your API endpoint that you can use to pull local data with a Yext connector.
At this point, you can continue to the next step of this guide, where you will add authentication to your new endpoint, or follow the steps below to test your endpoint.
Test Your Endpoint
In your Yext account, navigate to Knowledge Graph > Connectors and click +Add Connector.
Choose Pull from API as your source, and paste the Forwarding URL from ngrok into the Request URL field.
Click Pull in the upper right corner and see your local data.
Continue building the connector (if you need a refresher, check out the Create a Pull Connector guide ) and once you’re finished, click Save and Run to pull your local data into your Knowledge Graph as entities.
Note that if you wish to run this connector more than once (or on a schedule), you will need to regenerate the ngrok endpoint after it expires every hour. Or, you can purchase a paid plan with ngrok to maintain the same forwarding URL over time.

