Step 1: Option 1: Script Tag Integration
To integrate Yext Analytics using a script tag, navigate to the Analytics > Integrations screen and click Embed Code.
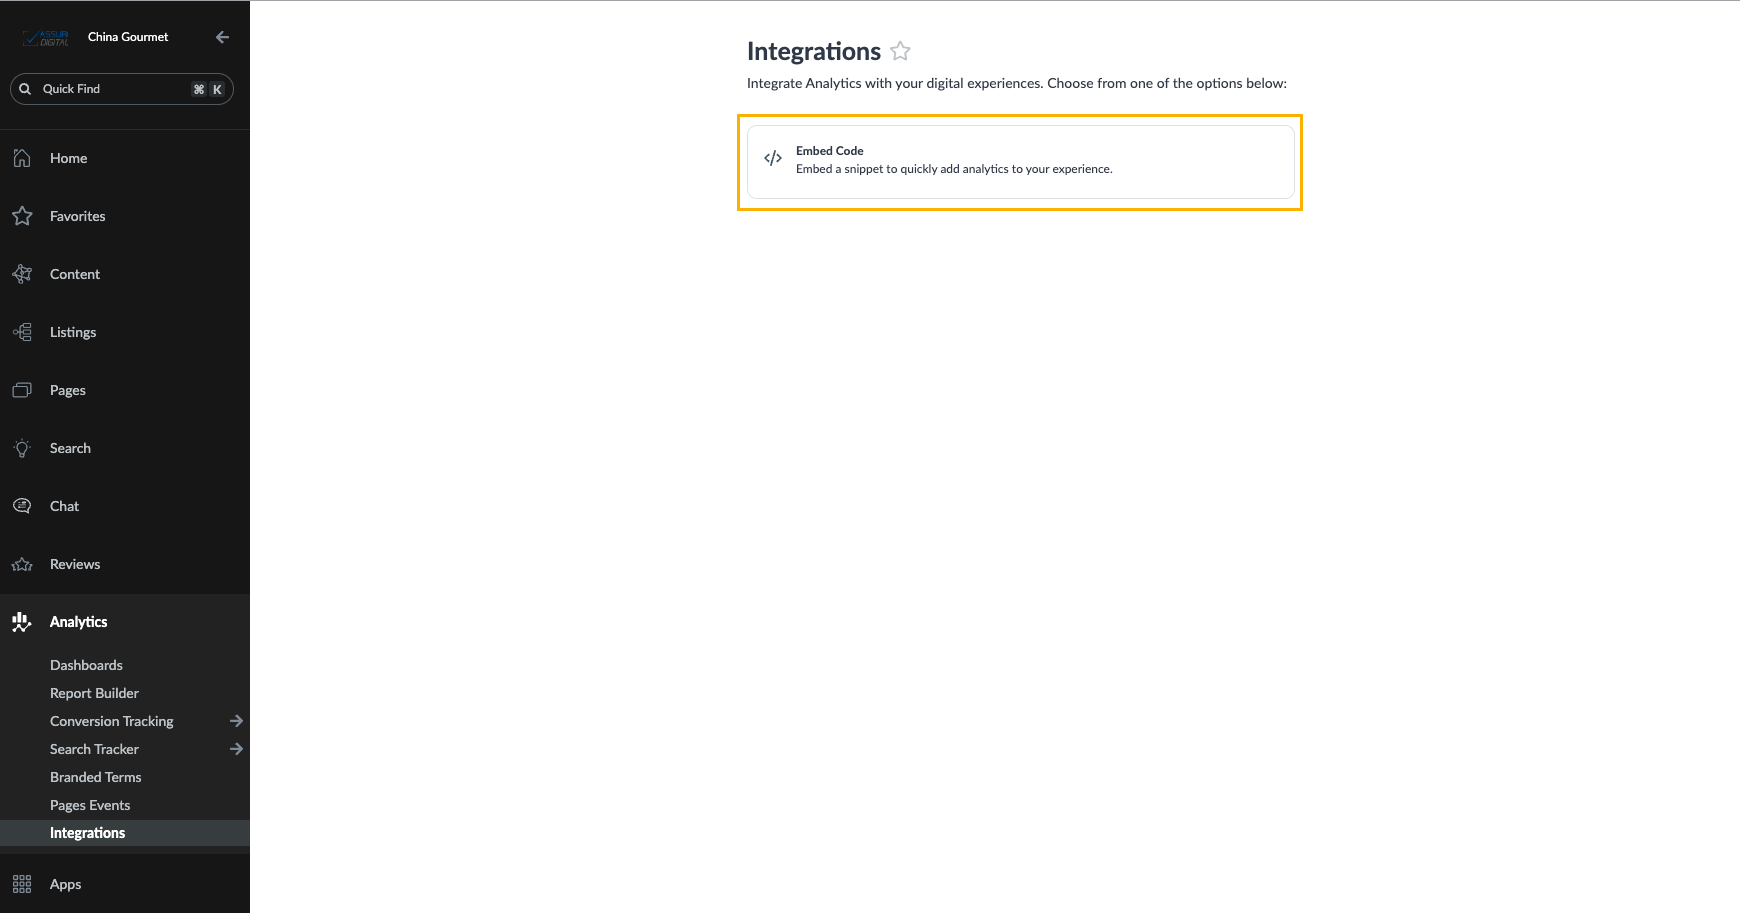
This opens up the pop-up modal, where you will find the script tag you need to add to your site HTML. This can be done on the site directly or through the usual process you take to add content to your website.
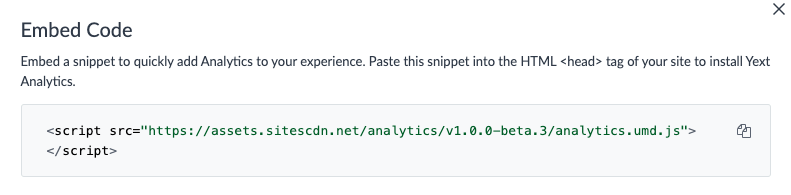
Below the script tag snippet, the modal also includes tabs containing code samples for two main use cases for tracking analytics events – integrating basic analytics events and integrating conversion events.
The script is slightly different based on the type of event that is being tracked. We’ll go into each use case below.
Script Tag for Basic Events
The Script Tag Integration tab contains code samples for tracking a “basic” analytics event. A basic analytics event can be any generic action performed by a user, such as a page view, CTA click, or link click, without a conversion associated with it.
Yext Analytics offers a wide range of predefined standard actions that can be viewed in full
here
. You can also define your own custom action by prepending C_ to the action name, such as C_MY_CUSTOM_EVENT.
analyticsEvents table using the
Logs API
. This table contains a log of all your analytics events, including any Custom Actions.
Below there are two code samples showing the most common ways to fire an analytics event – on a page view and on a click or interaction with some other event handler.
API Key
Each code snippet comes with a populated key. This is a real API key that has the correct permissions to the Events API endpoint.
If there is an existing API key with such permissions in the account, that API key will appear. If there isn’t an existing API key, we will automatically generate one for you in the code sample.
The advantage of using the auto-generated API key is that it has a very limited set of access roles so it isn’t an issue that it is public.
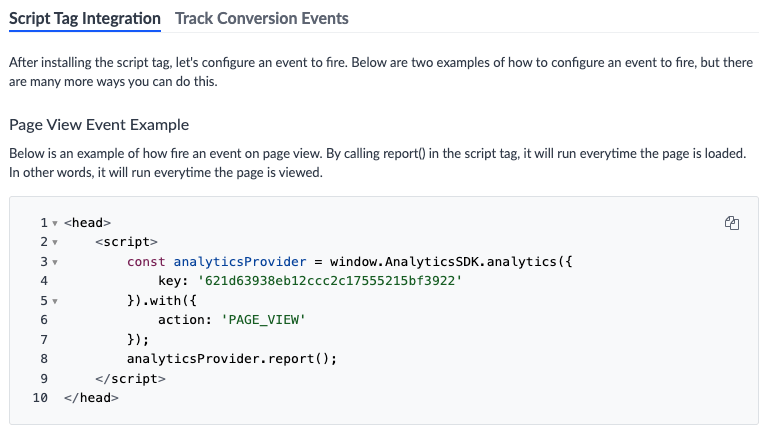
Fire Event on Page View
To fire a basic event on page view, copy and paste the following code into your site, or whatever tool you use to manage your website content:
<head>
 <script>
  const analyticsProvider = window.AnalyticsSDK.analytics({
    key: '621d63938eb12ccc2c17555215bf3922'
     }).with({
// You can also replace this with any other standard or custom action you'd like.
      action: 'PAGE_VIEW'
    });
    analyticsProvider.report();
  </script>
</head>
That’s all you need. Now, an analytics event will automatically be fired whenever a user visits the page.
Fire Event on Click
To fire a basic event on a click, copy and paste the following code into your site, or whatever tool you use to manage your website content:
<head>
  <script>
    const analyticsProvider = window.AnalyticsSDK.analytics({
      key: '621d63938eb12ccc2c17555215bf3922'
    }).with({
    // You can also replace this with any other standard or custom action you'd like.
      action: 'WEBSITE'
    });
    // Call the function below to report Analytics data
    function fireEvent() {
      analyticsProvider.report();
    }
  </script>
</head>
<body>
  // Replace Fire Event with whatever you'd like to name the button
  <button onclick=fireEvent()>Fire Event</button>
</body>
This use case is slightly different from the one above. Rather than fire an event immediately when the user views a page, here we are firing an event only once a user interacts with a particular element of the page, such as a button or form submission.
The fireEvent() function makes a simple .report() call to the Events API. By calling the fireEvent() function when the user clicks on the “Fire Event” button, the component is sending a request to the Events endpoint and recording the user event in Yext Analytics.
You can also modify the above code snippet to fire when a user interacts with a different element of the page by simply replacing the button HTML with the code for that event handler.
Script Tag for Conversion Events
In some cases, you’ll want to keep track of when users make a conversion on your site. For example, if someone completes a booking or a transaction on your page, it’s important to record how much that transaction was worth.
You can also view examples of how to track a conversion event by clicking on the Track Conversion Events tab. As with the Script Tag Integration tab, it contains sample code for tracking a conversion event on a page view and on a click or interaction with some other event handler.
Fire Event on Page View
To fire a basic event on page view, copy and paste the following code into your site, or whatever tool you use to manage your website content:
<head>
  <script>
    const analyticsProvider = window.AnalyticsSDK.analytics({
      key: '621d63938eb12ccc2c17555215bf3922'
    }).with({
    // You can also replace this with any other standard or custom action you'd like.
      action: 'PAGE_VIEW',
      value: {
        // The amount can be 0
        amount: 21.0,
        currency: 'USD'
      }
    });
    analyticsProvider.report();
  </script>
</head>
As a reminder, you must specify a value.amount and a value.currency in order for a conversion event to be valid. You can set the amount to equal zero dollars (for example, if you just want to record a page view with no actual exchange of money as a conversion), but the amount field cannot be empty.
Fire Event on Click
To fire a conversion event on a click, copy and paste the following code into your site, or whatever tool you use to manage your website content:
 <head>
    <script>
      const analyticsProvider = window.AnalyticsSDK.analytics({
        key: '621d63938eb12ccc2c17555215bf3922'
      }).with({
      // You can also replace this with any other standard or custom action you'd like.
        action: 'WEBSITE',
        value: {
          // The amount can be 0
          amount: 21.0,
          currency: 'USD'
        }
      });
      // Call the function below to report Analytics data
      function fireEvent() {
        analyticsProvider.report();
      }
    </script>
 </head>
 <body>
  // Replace >Fire Event< with whatever you'd like to name the button
    <button onclick=fireEvent()>Fire Event</button>
  </body>
You can also modify the above code snippet to fire when a user interacts with a different element of the page by simply replacing the button HTML with the code for that event handler.
Debugging
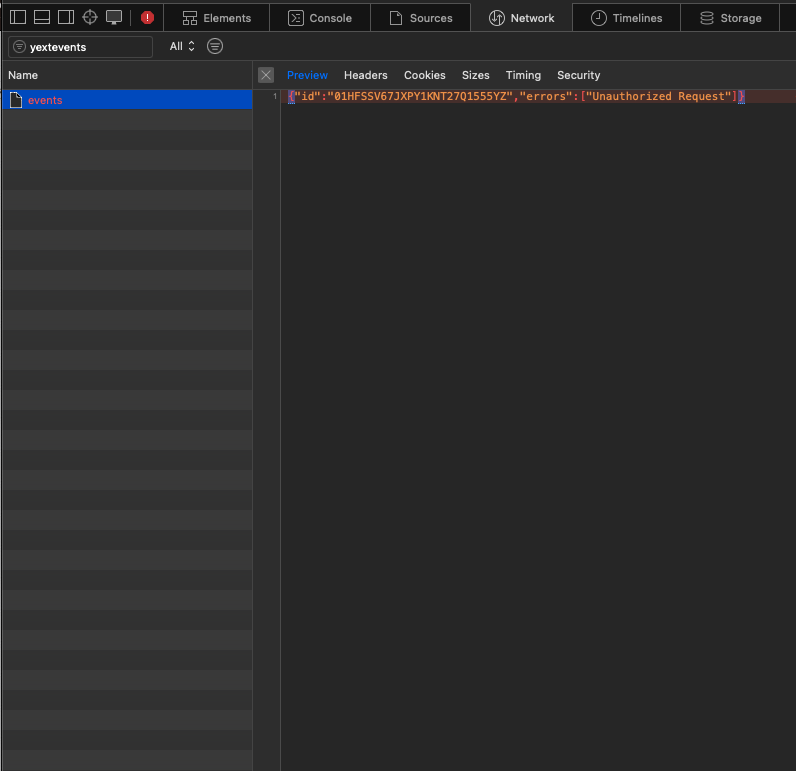
You can debug the script tag implementation by using the developer console of your browser.
In your browser, first right-click on the screen and click “Inspect”. This should open your browser’s developer console.
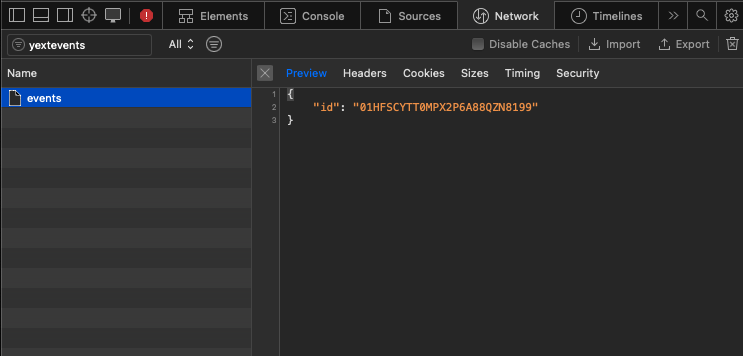
Click on the “Network” tab as shown below, and search for events. You may need to refresh the page and re-trigger the event for it to appear here.
A valid analytics event will return an analytics event ID in the “Preview” tab.
You can also see the request body, which may be useful for your debugging.
An invalid analytics event will return an analytics event ID and an error message containing a description of the error.