
Collect Instructions | Yext Hitchhikers Platform
What You’ll Learn
By the end of this unit, you will be able to:
- List use cases for setting up a collect instruction
- Create a goal that utilizes a collect instruction
- Explain how the enum field type differs from the other field types
Overview
Collect instructions are used to gather information from the user. This data is commonly used to inform another step within the same goal. It can also be stored for your team to use outside of Chat.
This instruction action type can be useful for asking the user:
- For their name, email, phone number, or other personal information
- For their order number, confirmation ID, etc. to look up details on the order status
- To choose between one of several predefined options and later trigger conditional logic
Generally, you’d want to create a goal of this type when a user asks a question or makes a request from the bot and you need to collect additional information from the user to provide them with a response.
Once you gather the information needed to respond to the user, Chat will need another instruction to respond to the user. At a minimum, you should add a Reply instruction following a Collect instruction. However, you can also create a more advanced goal that collects information, searches data to find an answer, and then replies with that answer to the user.
Setting up a Collect Instruction
Once you are in the Add/Edit an instruction modal, you have the following inputs to complete:
- Instruction: A description of what you want the bot to do. Collect Action Instructions are usually something like “Gather the user’s personal information”.
- Require User Confirmation: Toggle off or on. This asks the user to confirm the information submitted.
- Enable Suggestions: One field type has to be set to Enum. When this toggle is on, the bot will generate suggested replies for the user. This will be displayed as clickable messages at the bottom of the preview.
Field Configuration: The bot collects information as fields. You must specify the fields that will be collected. There must be a minimum of one field added but you have the option to add multiple based on what information you are trying to gather. For each field, you must define the following properties:
- Field Type: This will be the format of how the user data is stored. Choose from one of the predefined options in the dropdown: String, Number, Boolean, Enum.
- Field ID: Each field you collect needs a unique ID. The ID for this field can be referenced in other steps of your bot by using the “collectedData” property of chat with the following format:
collectedData.[[fieldId]]. We recommend using something that is simple and easy for you to understand such as “email” or “phone”. - Marked as Required: You can designate whether the field you are collecting is required for the users to submit.
- Description: Include a description of the field. This helps the bot understand what the field is and how to ask for it. The bot also uses this description in parsing the conversation to extract data.
Enum Values (if Enum field type is selected):
Value: A predefined value or element. This will be displayed to users as a field value they can choose from to be collected by your bot.
Description: An explanation of what that value or element is.
Using Collected Data Outside of Chat
When you set up a Collect instruction, Chat will only use that data to complete your bot goal. The collected data is stored in the notes.collectedData object of the message, which can then be referenced in subsequent steps. However, the notes object clears if the goal switches.
If, for example, the goal is to answer a question, the collected data will be used and ingested by Search to give the user the information they are looking for. Once that task is complete, the collected data won’t be used for anything else.
The data collected can also be viewed with Chat analytics which you will learn about in the Optimize and Monitor module . However, that data will not be stored anywhere else unless you use another instruction like Function or REST API to send it somewhere (e.g., a third-party integration such as Marketo).
Basic Example
Below we’ll walk through an example of how you can use the collect instruction if you have a “Get a Demo” goal on your bot.
In this example your goal would be “Get a Demo” and your example phrases would be things like “I want a demo” or “I’d like to speak to a salesperson”.
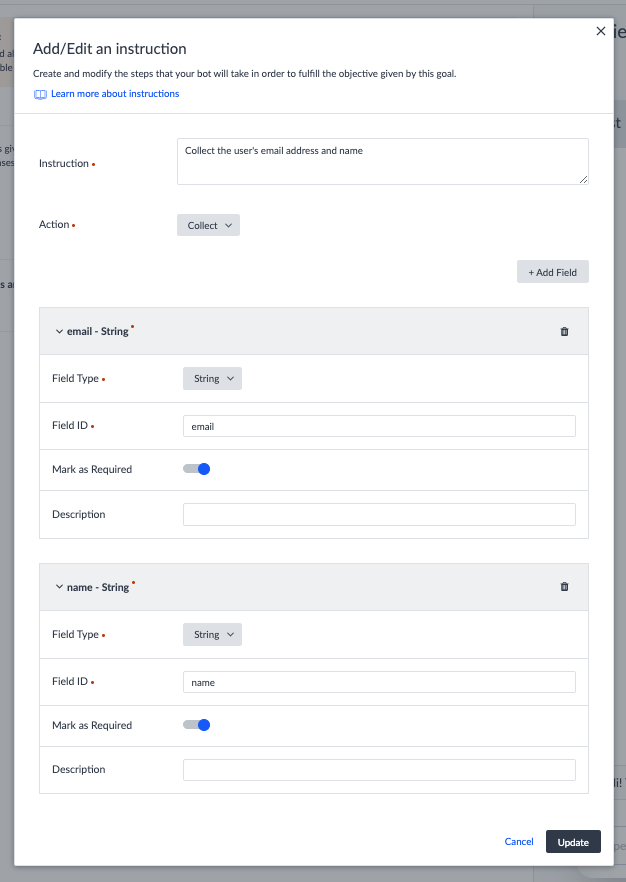
Then you will need to add your collect instruction as the first instruction with the following settings:
- Instruction: “Collect the user’s email address”
- Action: Collect
- Field Configuration:
- Field Type: String
- Field ID: email
- Mark as Required would be toggled on, as this is the required piece of information we are collecting in this step.
- Description: The user’s email address
You could also add other relevant fields to collect such as the user’s name or phone number within the same collect instruction.
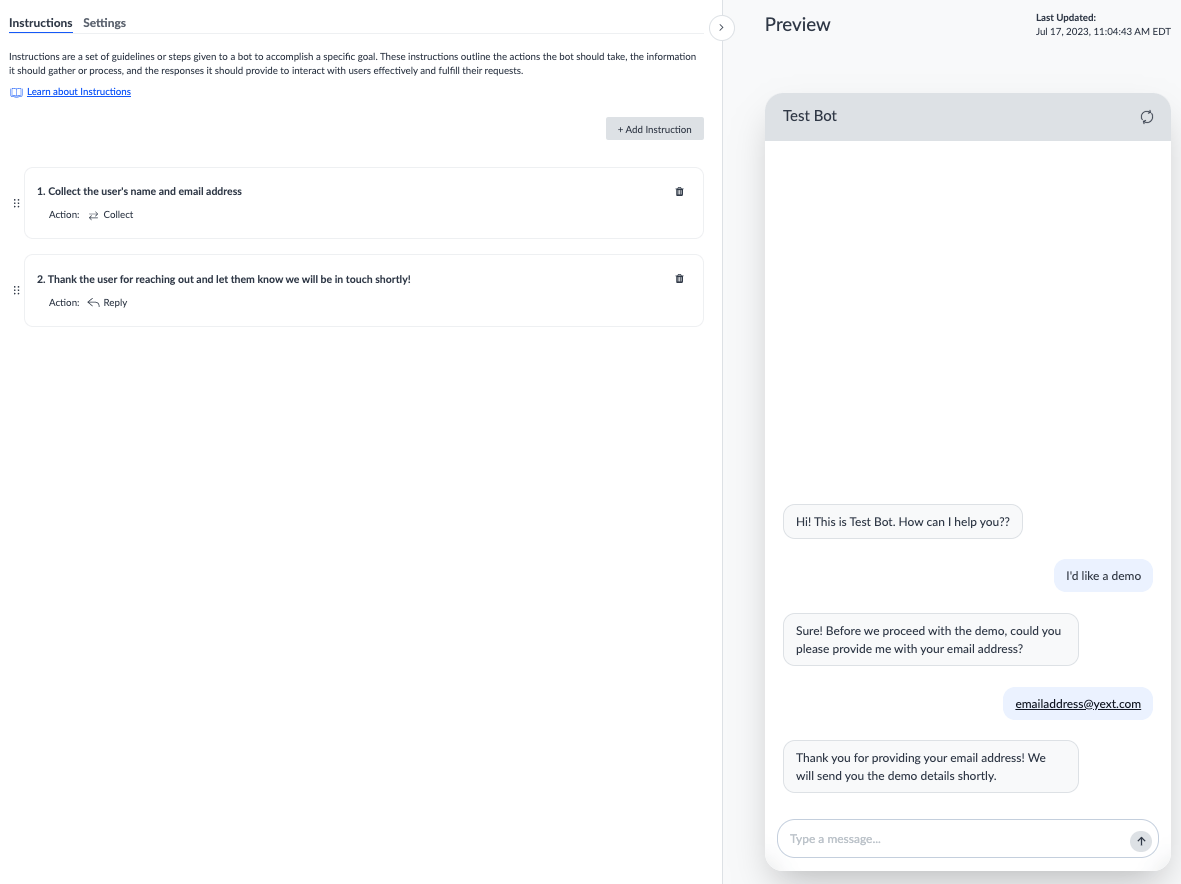
Once you save the collect instruction, add a reply instruction to respond to the user thanking them for requesting a demo, your bot will be able to have a conversation like this:
Static List Example (Enum)
You can use the collect instruction if you want to gather information that comes from a static list of options. You will add an Enum field type to configure the options for the bot to display.
For example, if users want to know more details about the insurance providers that your office accepts, you can allow them to choose from a static list of providers. This can help guide the user in the goal flow since users can see which options are available to them. To set this up you will use the following settings:
- Instruction: “Ask users what insurance they have”
- Action: Collect
- Enable Suggestions: Toggle on so user’s can click on an option rather than type it in
- Field Configuration:
- Field Type: Enum
- Field ID: insurance-provider
- Mark as Required would be turned on, as this is the required piece of information we are collecting in this step.
- Description: The user’s insurance provider.
- Enum Values:
- Value: Aetna, Description: Aetna
- Value: BCBS, Description: Blue Cross Blue Shield
- Value: Cigna, Description: Cigna
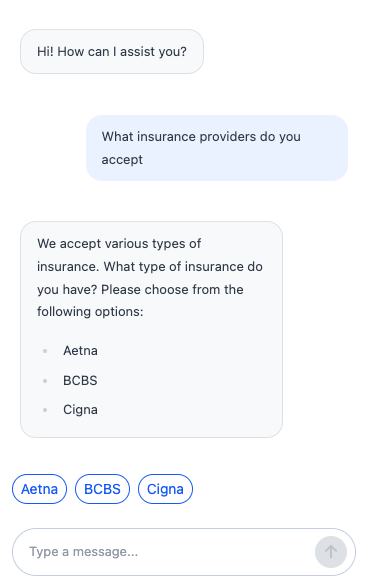
Once the user selects their insurance provider from the list of options, you can add a reply instruction to provide them with more information about the provider selected or direct users to the web page with specific doctors that accept their provider.
When might you want to use a collect instruction? Select all that apply.
True or False: You can set up the collect instruction to store the information gathered directly to third-party integrations (e.g., Marketo, Zendesk).
What type of information might you want to gather using the collect instruction? Select all that apply.
Wahoo - you did it! 🙌
