Configure Multi-Lang Entity Profiles | Yext Hitchhikers Platform
What You’ll Learn
In this section, you will learn:
- How to set up language profiles in the Knowledge Graph
- How to configure slugs for multi-language pages
- How to edit content on an alternative language profile
Overview
To power a multi-language site on Pages, entities in your Knowledge Graph will require a language profile.
These language profiles in the Knowledge Graph allow you to:
- Configure the Slug field to dynamically manage localized URLs
- Store the localized content that will appear on your pages
In this section, we will add a Spanish language profile to the location pages for the Turtlehead Tacos site, which ships in the locations starter repo . The principles of language profiles apply even if you have different data in your Knowledge Graph, but it will be easier to follow along if you have the Turtlehead Tacos data.
Create an Alternate Language Profile
In this tutorial, we are going to add a Spanish profile to every location entity. The first step required to start adding localized content is to create the profile for the relevant languages in the Knowledge Graph. This module assumes that you already have this set up. If not, you can follow these steps to spin up the relevant additional languages profiles for your account:
- Turn on the account feature “Multi-Language Profiles” in your account.
- Navigate to Knowledge Graph > Entities, and then click “Location” under “Entity Types” on the left sidebar to filter for location entities.
- Click the checkbox in the top left of the entities results table to select all the entities.
- Under the “More Actions” dropdown, select Edit.
- Add Spanish as an Alternate Language Profile .
Manage Content in Alternate Language Profiles
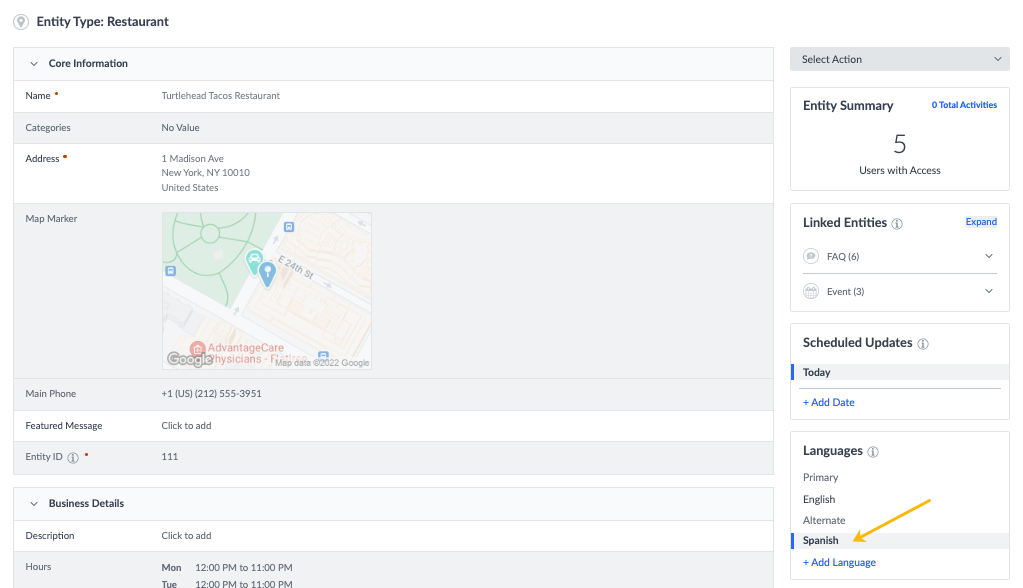
Once the language profile has been set up in your account, you can start editing fields with the content in the corresponding language! To do this, when you select an entity or set of entities to edit, click on the relevant language in the sidebar of the account.

When a given profile is selected (in this example, Spanish), all edits that you make will only apply to that language profiles, and the other language profiles will remain untouched.
This content can then be used to power the localized content on your Pages.
Manage URL Paths
One key component of multi-language profiles is the ability to manage localized URLs through the Knowledge Graph. For each entity that is being powered on Pages, you will see a built-in Slug field in the Knowledge Graph. This can be edited for each language profile so you can store the localized URL.
Using slugs is the recommended practice for naming URL paths in Pages. It is important to configure your slugs correctly to prevent URL collision errors when you are using multiple languages. Each URL path must be unique and we recommend using this form:
[[localeCode]]/[[entityId]]
localeCode is an entity field which contains a string representation of the currently selected language profile.
By using double square brackets in the Knowledge Graph, you can reference the values of other fields and use those values in any field you like! The functionality of referencing other fields values is called “embedding fields”. Here is a quick tutorial.
With this format, our Spanish slugs will have the form:
/es/[[entityId]]
Every Spanish language page will have “es” prepended to its URL path to avoid any collisions with other URL paths.
Bulk Edit the Slug and Name Field
We want every Spanish language profile to have the same slug format, so we will apply a bulk edit to the Spanish-language profiles for all location entities.
From the Entity Edit page (see above about how to bulk edit), ensure you have selected the Spanish language profile in the Languages window on the right.
Click into the “Slug” field, and type:
[[localeCode]]/[[entityId]]- To recap, we are constructing our slug out of the
localeCodeandentityIdfields, by embedding those field values into our slug. This will ensure we have unique slugs across all our language profiles.
- To recap, we are constructing our slug out of the
Once you have added your slug, click “Save for [X] profiles”. Now every Spanish-language profile on your location entities, will have the correctly formatted slug.

Now that we have added an appropriate slug, add a Spanish translation for the location name by changing the name field to “Restaurante Turtlehead Tacos” and clicking save.
Now that you have added the appropriate slug, you can make updates to the entity content and see that reflected on the localized URL. Every Spanish location will be accessible at es/[[entityId]] and the title will read “Restaurante Turtlehead Tacos”.
Edit Description of an Individual Entity
Until this point, we have been applying bulk edits to all Spanish language profiles.
However, just like when editing information on the primary language profile, you can choose to edit entities in bulk, or individually, as you may want to have unique, entity-specific content stored in certain fields.
When editing content on an entity you can easily switch between the profiles to view the different field values for the different languages.
If you want to test out adding Spanish content to one entity, you can add the following description to a single Location entity within your account:
¿Tienes hambre de tacos? ¿Fan de "Chips and Guac"? Turtlehead Tacos es el destino para ti. Con ubicaciones en todo el mundo, nos enorgullecemos de ofrecer a nuestros clientes los tacos más deliciosos a diario. Visítanos en [[City]] [[address.region]] hoy mismo.Now you can add loads of Spanish content to your entities to ensure a rich and idiomatic experience for Spanish-speaking visitors.
Next, we’ll learn how to access the language profile data from your Pages front-end using streams.
What is the recommended slug for the location entity with entity ID 'location-1' and locale code 'es-MX'?
You're out of this world! 🌎

