Overview of Verticals | Yext Hitchhikers Platform
What You’ll Learn
By the end of this unit, you will be able to:
- Define vertical, universal search, and vertical search
- Give examples of verticals and how to define them based on intent
- Add a new vertical
- List settings that can be configured in the Additional Vertical Settings section
Overview
Now that you’ve created your Search config, started editing it, and can run test searches to test it out, let’s get into all the different features you can configure. Throughout the next two modules, we will walk through:
- Verticals: Searchable Fields, Facets and Filtering, Sorting, Direct Answers, Vertical Ranking
- Search-Level Configurations: Synonyms, Query Rules, Query Suggestions, General Settings
Since we’re focusing on verticals in this module, we’ll stick to the Verticals screen of the Search configuration.
Universal vs. Vertical Search
Before we go any further, it’s important to define universal search and vertical search. You’ll see this concept in both the backend and frontend. In short, universal search searches across multiple verticals, while vertical search searches across a single vertical.
When we refer to a vertical, we’re talking about a class of results that is searched in its own way. When users run a vertical search, they are only running a search on that one vertical. You will often times want the entity types in your Knowledge Graph to be represented as separate verticals, because different types of content need to be searched in different ways. However, there is nothing keeping you from combining multiple entity types into one vertical. For example, you could combine Branch and ATM entity types into a Locations vertical.
Universal search (the “All” tab), on the other hand, shows results across all verticals. Universal search runs simultaneous searches in each vertical, applying the algorithms configured for each of those verticals, and then aggregates all the different vertical searches in order of relevance in one screen to give users a preview of each vertical. Each vertical is still independent. Read more about how this works in the Federated Search reference doc.
From universal search, users can click into any vertical to get more detailed search results, using either the “View All” button at the bottom of each vertical section or the tabs right below the search bar. Once on the vertical search, you have the ability to further refine results through facets, sorting, or other vertical customizations. Check out the Universal vs Vertical Search reference doc for a comparison of features supported in each.
Add a New Vertical
In the last module, you created a Search configuration (see the Create a Search Configuration help article). Once you add a vertical, you will have some searchable fields filled in by default, but you’ll need to do more to configure verticals to your brand.
Edit via the Platform UI
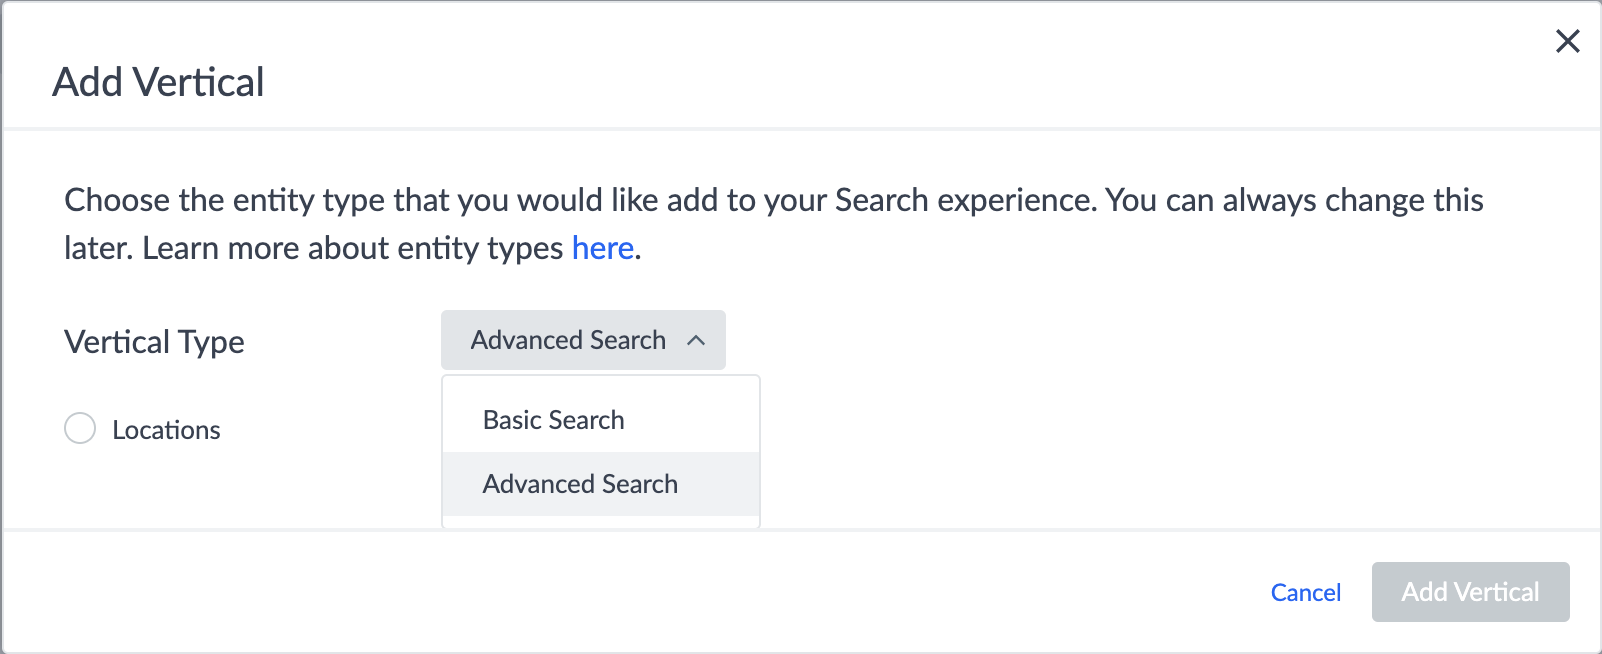
To add a new vertical via the UI, navigate to the Verticals screen of your experience. Then click + Add Vertical. Fill out the key information for the vertical, including vertical name, vertical key (this will fill in as you type the name, but you can customize it if you’d like), entity type(s), and saved filter. You can edit these later (you’ll learn how below), but keep in mind that editing the vertical key may have downstream effects. Once this looks good, click Save and Configure.
For entity type(s), you will be presented with the entity type options that are enabled in your account. If you’re not seeing an entity type that you would like to add to your Search experience, follow the steps in the Enable Entity Types help article to enable more entity types.
If your account has both Basic Search and Advanced Search subscriptions, you’ll also see an option to select Basic or Advanced for the vertical type. Check out the Search Tiers reference doc for more information.

Edit via the JSON Editor
All vertical-level configurations are specified within the top-level verticals object. Within this, each vertical has its own object using the vertical key as the object key. This is where all the settings for a particular vertical live. Check out the
Verticals
reference doc for the full list of properties available in the verticals object.
To add a new vertical via the JSON editor, it is easiest to copy another vertical, paste, and then make any changes. At the very least you’ll want to change the additional vertical settings described below.
Verticals - Settings
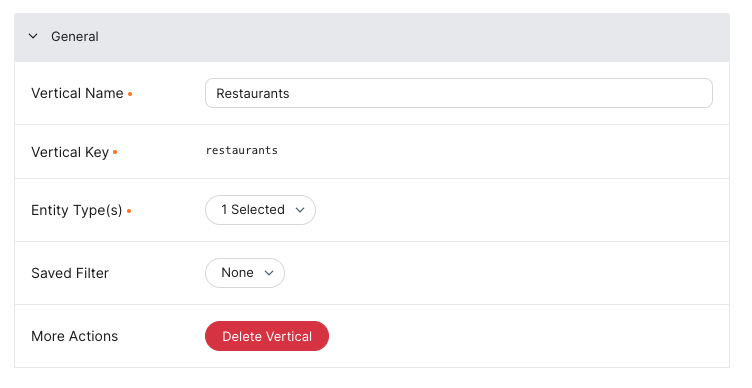
The General Settings for a vertical are the key settings that define that vertical. Each vertical will have its own respective settings. The following settings are currently available for each vertical via the UI and JSON editor. These are the fields you filled out when creating a new vertical. Let’s break down each one (check out the Search Config - Verticals reference doc for the property schema):
- Name: This is a display, pretty-printed name for the vertical (e.g. “Offices”).
- Entity Types: Supported entity types within a given vertical.
- Saved Filters: This value references a saved filter which will specify the entities that are allowed to be returned in a given vertical. Each vertical may only have one saved filter. You’ll want to include this if you need to limit the entities returned for a vertical in some way, for example only those locations that are open, FAQs that have the Answer field filled out, or events that are in the future. To obtain the ID for a saved filter, follow the View Saved Filters help article.
- Vertical Key: This is an internal name for the vertical and will be used to uniquely identify the vertical. You will also use this value to reference the vertical in the frontend. We recommend using something customer-friendly, plural, and lowercase (e.g. “offices”). You should avoid changing this key unless you change it everywhere it’s referenced, or else you’ll have unintended downstream effects.

Edit Vertical Settings
Edit via the Platform UI
To configure additional vertical settings in the UI, navigate to the Verticals screen, select the vertical you want to edit, and then click on the Settings tab. Use the Settings for: dropdown to select the vertical you want to view or edit. Find the General Settings section at the bottom.
To make changes to these properties, edit the relevant text box or click the relevant dropdown and make the desired changes.
Edit via the JSON Editor
In the JSON instance of the Search configuration, the configuration above would look like the following (be sure to use the API name of each entity type):
  "verticals": {
    "events": {
      "entityTypes": [
        "event"
      ],
      "name": "Events",
      "savedSearchId": "125019244"
    }
  }
Delete a Vertical
Edit via the Platform UI
On the same Verticals Settings tab, you can delete a vertical by clicking Delete Vertical at the bottom of the screen to begin the removal process. You’ll get a warning that deleting a vertical is irreversible to confirm you are sure.
To learn more about deleting verticals from search, see the Delete a Vertical from Search guide .
Edit via the JSON Editor
If you want to delete a vertical via the JSON editor you need to locate the vertical object for the vertical you want to remove. Make sure to erase all lines of JSON for that particular vertical.
What is the difference between universal and vertical search?
Which of the following is true of verticals? (select all that apply)
You want your Search experience to bring customers to your locations. What kinds of verticals may meet this intent? (select all that apply)
Your Search results surface locations that have been permanently closed. What should you configure to not show them anymore?
You're out of this world! 🌎

