
Search Merchandiser | Yext Hitchhikers Platform
What You’ll Learn
By the end of this unit, you will be able to:
- Define the Search Merchandiser
- Demonstrate how to navigate to the Search Merchandiser
- Explain the actions you can take to optimize your experience with the Search Merchandiser
Overview
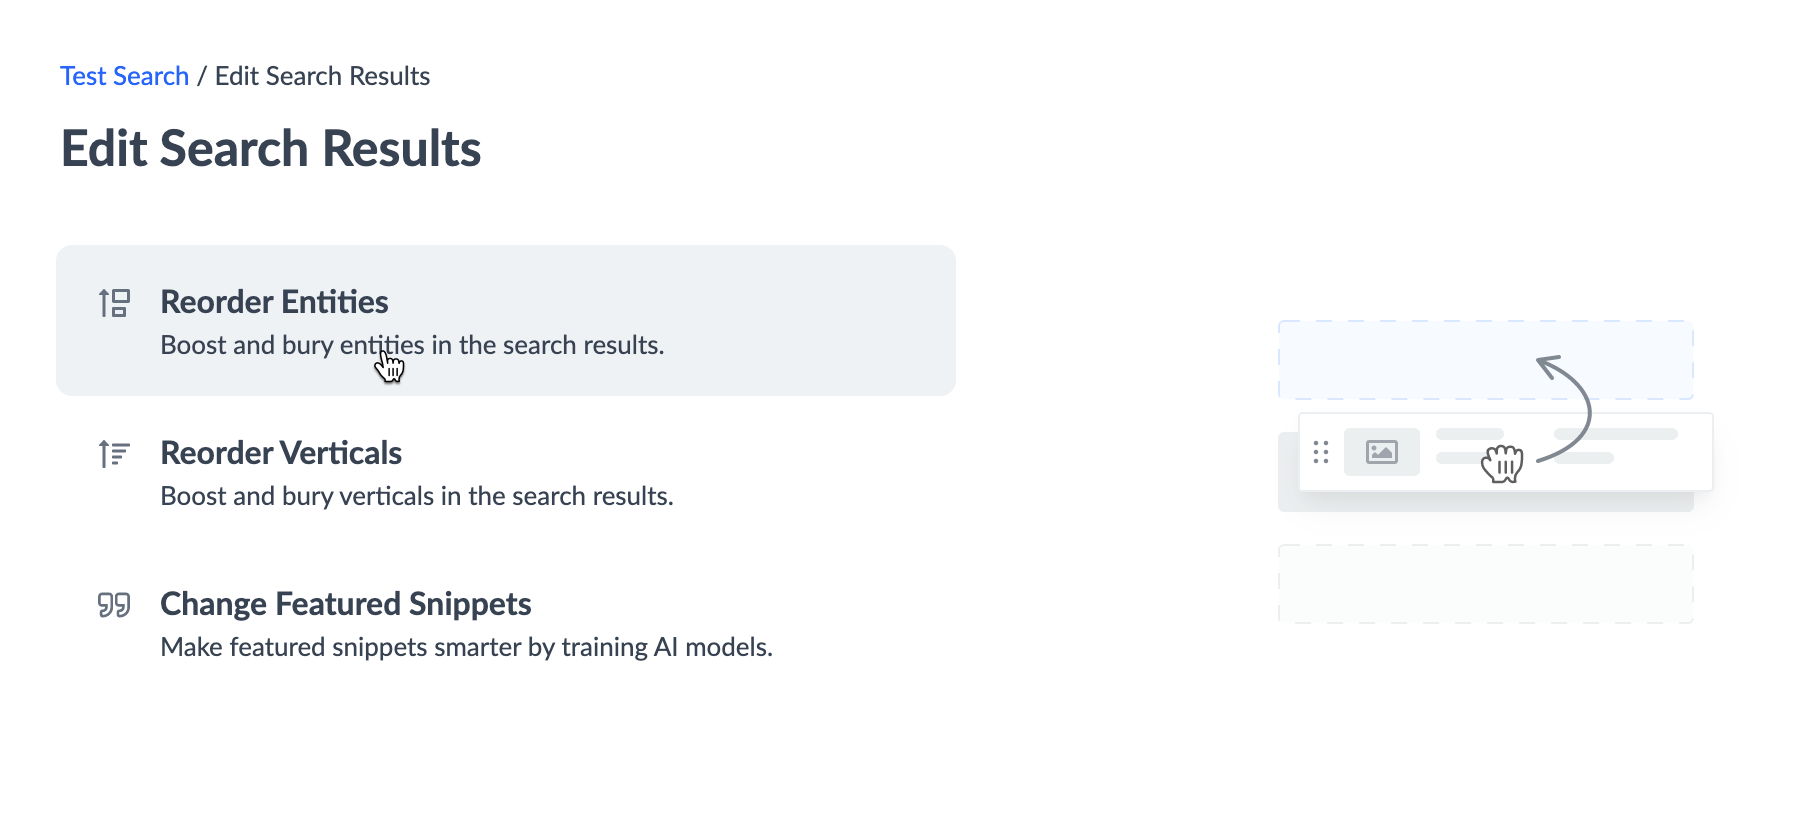
While Search automatically returns results based on relevance, you might want to adjust the search results for specific queries. The Search Merchandiser is an in-platform tool to modify search results using a drag-and-drop, point-and-click interface. This tool allows you to make changes directly within the search results with three modes:
- Reorder Entities
- Reorder Verticals
- Change Featured Snippets
Making changes in the reorder entities and reorder verticals modes will create or edit Query Rules under the hood. Changing featured snippets will add to Experience Training . Thus, Search Merchandiser will be particularly useful for those who aren’t familiar with query rules and Experience Training, or who simply prefer to modify results through a quick and easy visual interface.
Navigating Search Merchandiser
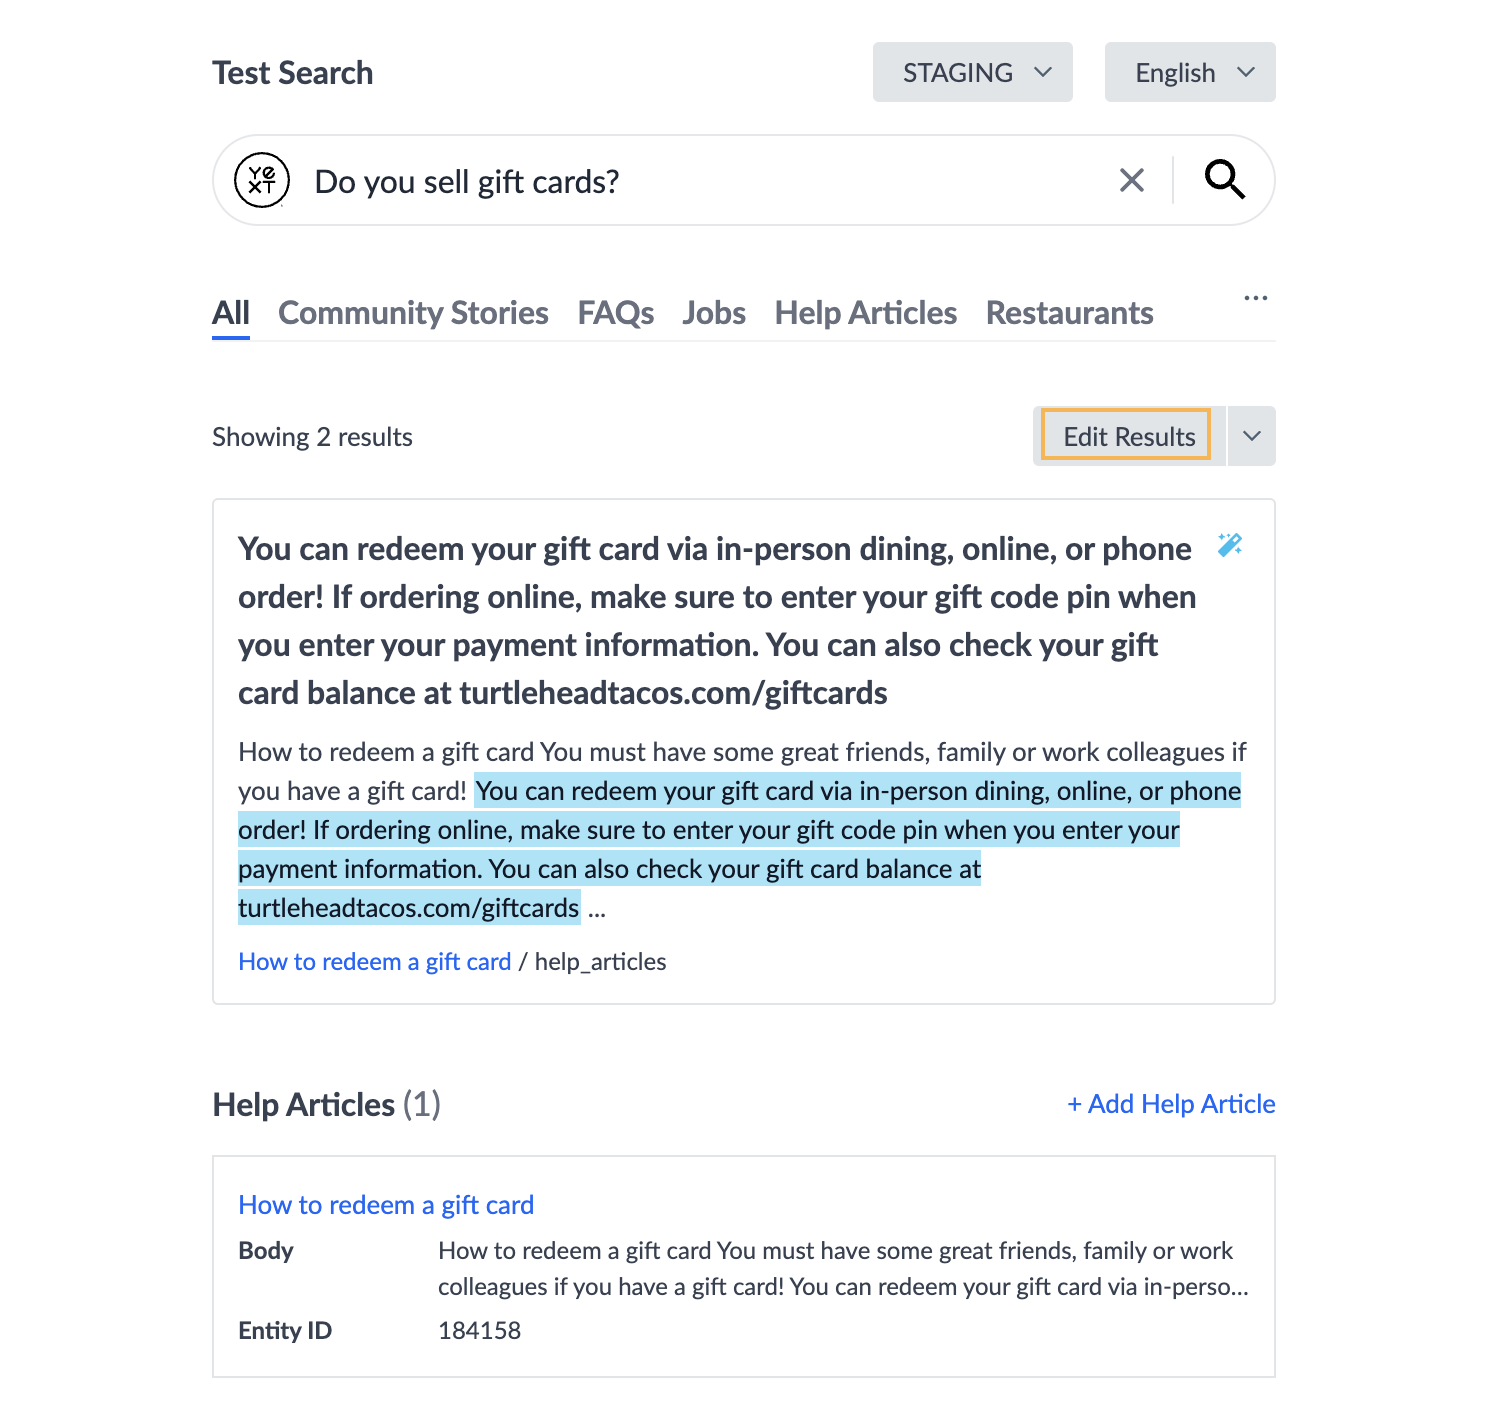
Access the Search Merchandiser for a particular search query via Test Search, either full screen or the side bar, by clicking on the Edit Results button after running that search query.
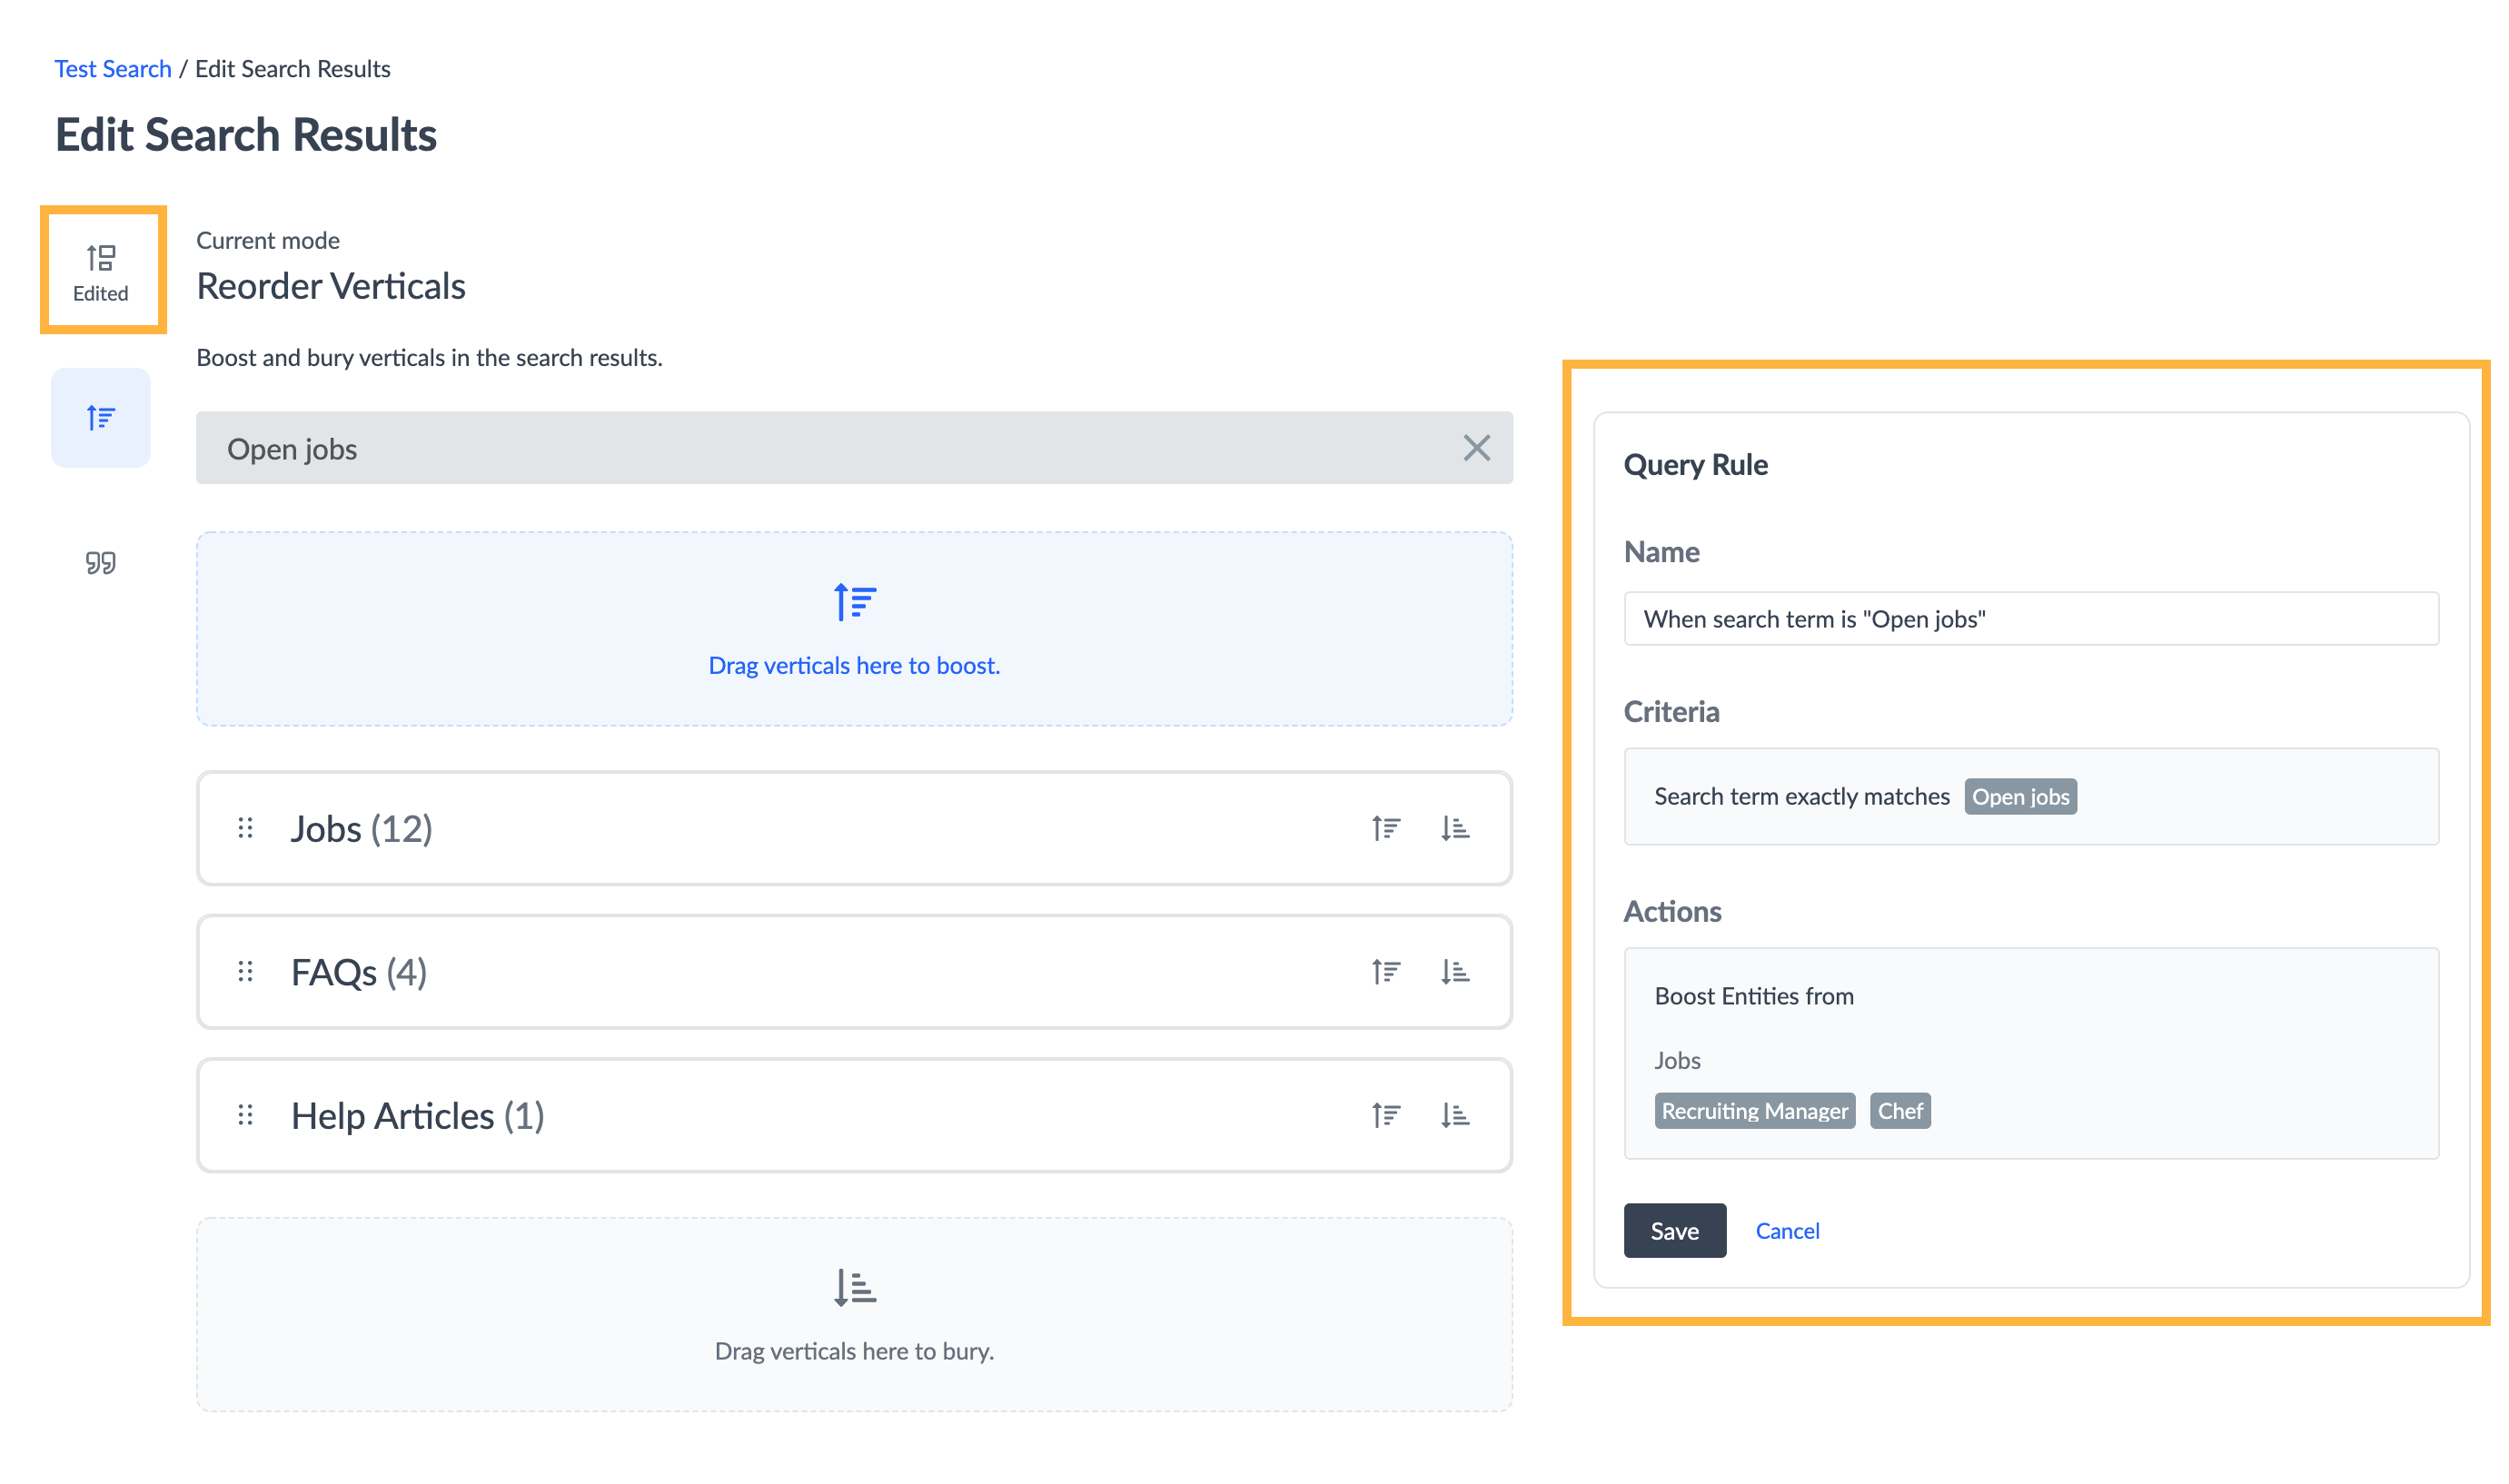
You’ll be dropped into the Reorder Entities mode. Each of the three modes has a separate page for you to make changes on, which you can access using the icons on the left. You can move between modes when making changes.
Making changes on the Reorder Entities mode and Reorder Verticals mode will build on the same query rule and will only be added to your Search config when you hit save. On the other hand, the Change Featured Snippets mode adds new experience training, so it gets saved automatically within that screen.
Reorder Entities Mode
In the Reorder Entities mode, you’ll see an interface to move entities to the top or bottom of each vertical’s results.
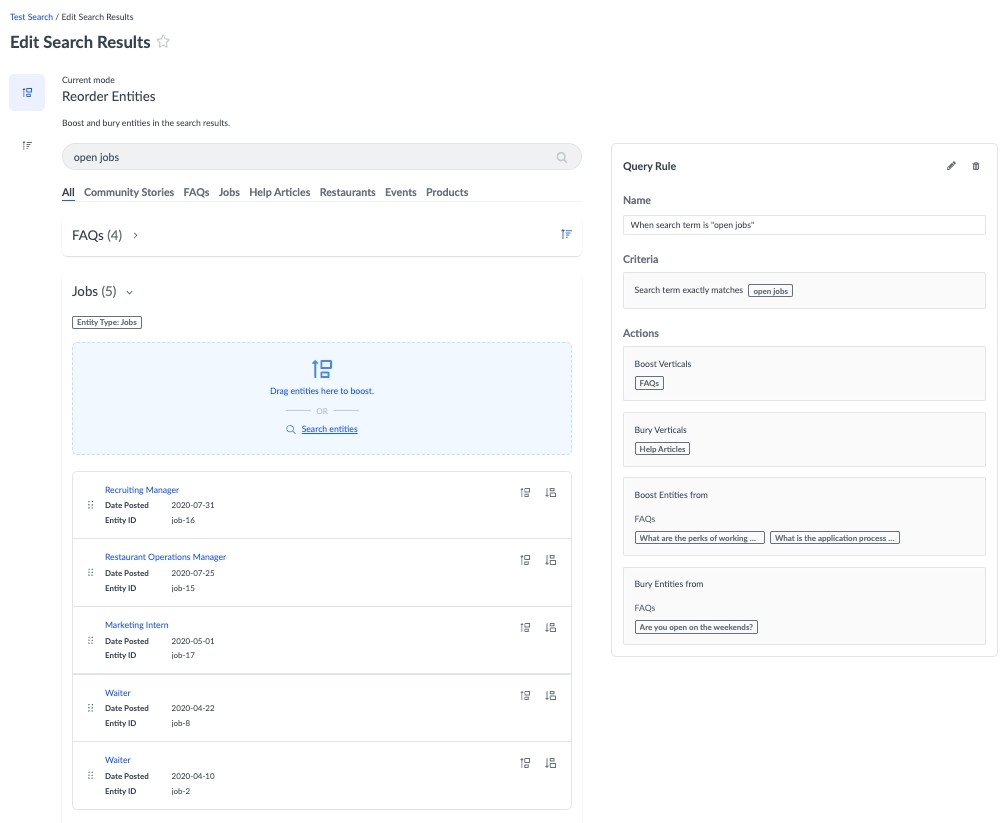
Move entities into the blue boosted zone or gray buried zone for each vertical and change the order by either dragging and dropping them or using the boost and bury icons. You can only set the order of entities in the boosted or buried zones.
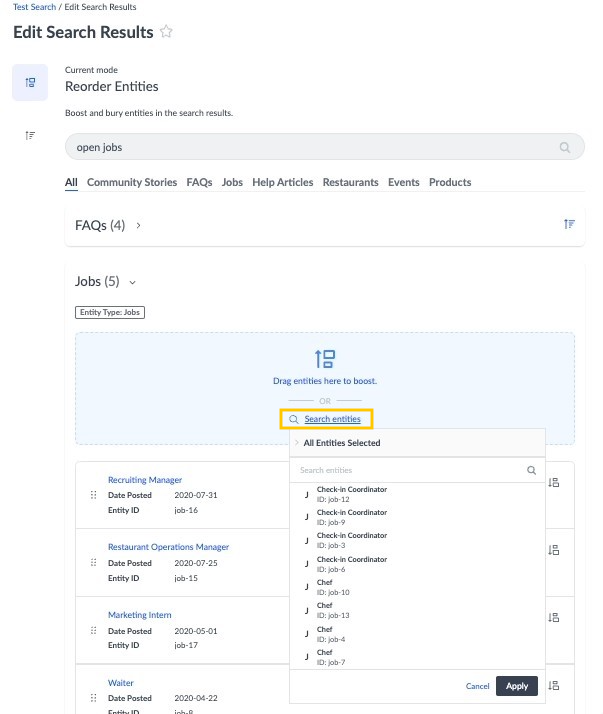
You can also add new entities to the result set by clicking “Search entities” in the blue boosted zone and using the entity picker to select entities to add. Only entities that are included in this vertical will be shown. In other words, the entity picker respects any entity types and saved filters set in the backend config for this vertical. Added entities may only show in the boosted zone and removing it causes it to be removed from the results altogether.
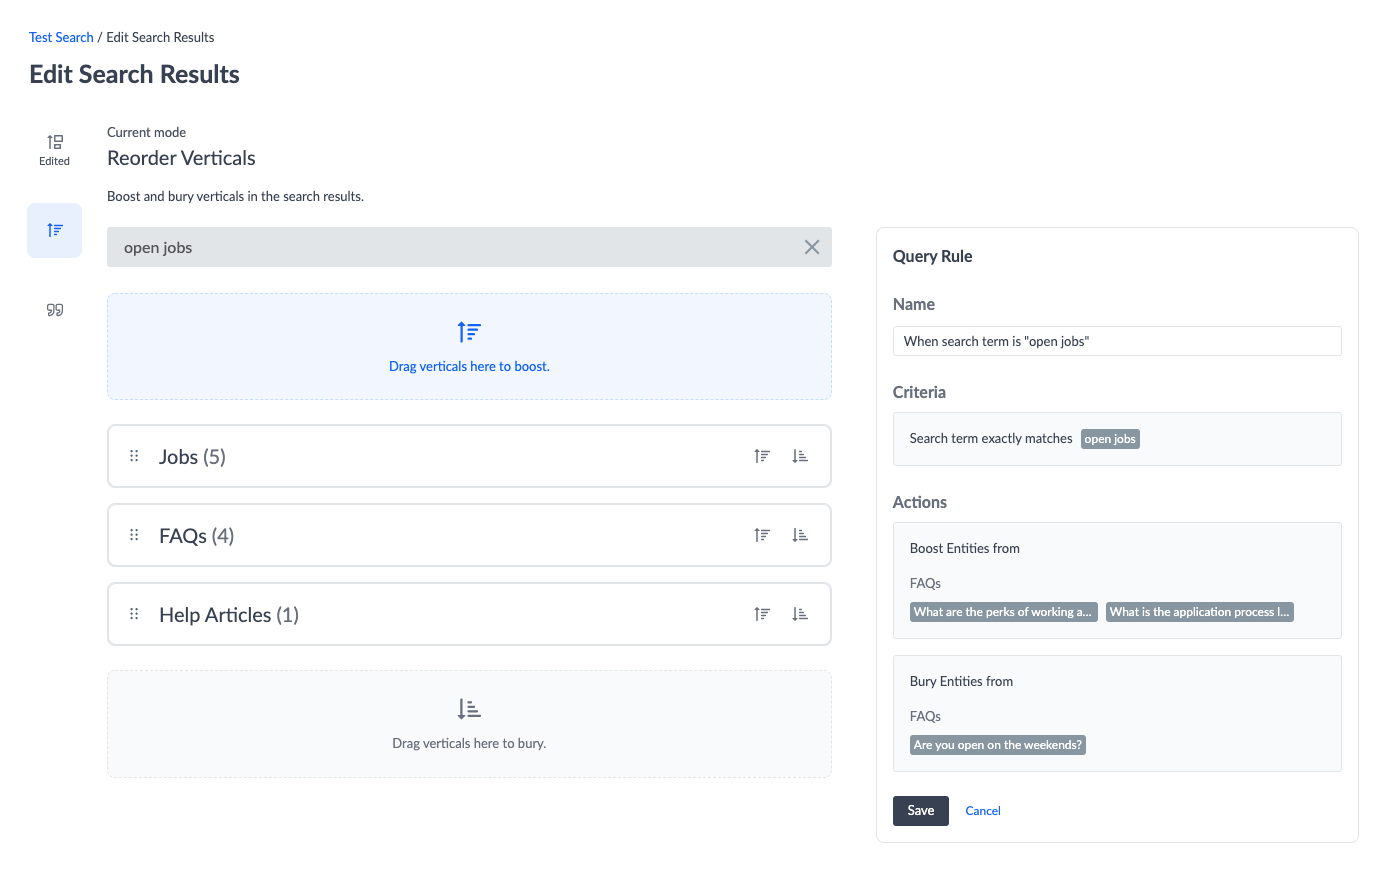
In the example below, we edit the results of the FAQs vertical for the query “Open jobs.” The FAQ “Are you open on the weekends?” is returning due to the word “open” in the search query, but it is irrelevant, so we bury it. We want to make sure the FAQs “What are the perks of working at Turtlehead Tacos?” and then “What is the application process like?” always show up in that order, so we boost it and rearrange it to that order.
Reorder Verticals Mode
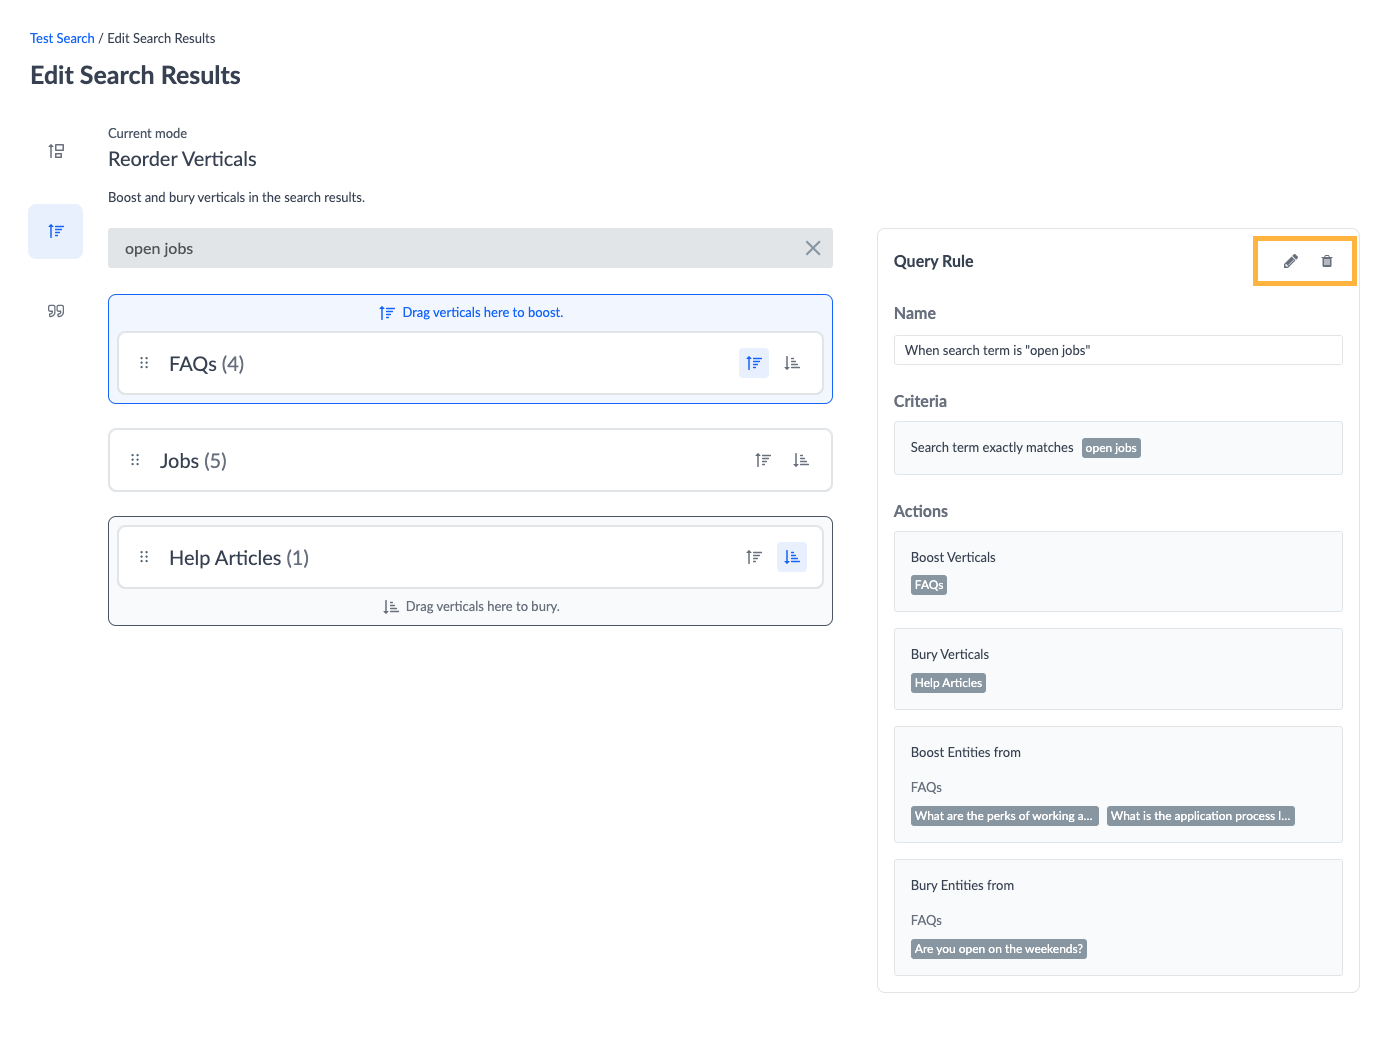
The Reorder Verticals mode is similar to the Reorder Entities mode, except it involves reordering verticals instead of reordering entities. In this mode, the user cannot see individual results. They only see the list of verticals and result counts, like so:
You’ll notice that the changes we made in the Reorder Entities mode are still there! You are able to switch modes while making changes. All edits in Reorder Entities mode and Reorder Verticals mode will appear in the same query rule.
Similar to Reorder Entities mode, move verticals into the blue boosted zone or gray buried zone and change the order by either dragging and dropping them or using the boost and bury icons. You can only set the order of verticals in the boosted or buried zones.
Back to the same example, let’s say we want users looking at open jobs to read some job FAQs before diving into the job entities. We can boost the FAQs vertical and then the Jobs vertical, and set it in that order. We also noticed earlier the Help Articles vertical only had one result (“How to place a new order online”) that was not relevant, so we want to bury that vertical and make sure it shows up last. Since we covered all the verticals in the results, we actually don’t need to boost the Jobs vertical, so we return that to the normal verticals section.
Query Rules for Reorder Entities and Verticals
Editing the order of entities and verticals returned creates a query rule, shown on the right side, that updates as you move entities and verticals around. The rule has:
- Name: ”When search term is “[search term]“” by default. You can edit this name before saving the query rule.
- Criteria:
searchTermExactlyMatchesset equal to the query entered - Action:
BOOST_ENTITIESfor any boosted entities, listing the entities in the order they appear in the boosted zoneBURY_ENTITIESfor any buried entities, listing the entities in the order they appear in the buried zoneBOOST_VERTICALSfor any boosted verticals, listing the verticals in the order they appear in the boosted zoneBURY_VERTICALSfor any buried verticals, listing the verticals in the order they appear in the buried zone
If you make changes on both the Reorder Entities mode and Reorder Verticals mode, they will be added to the same query rule. Once you make a change, you’ll notice the icon for that mode will say “Edited”. The query rule you create will be shown on the right side of the results.
The query rule won’t save until you click the Save button. This will create a new query rule in your backend config. From here, you can continue to edit the query rule. Click the pencil icon to edit directly in the query rules page. Click the trash can icon to delete the rule entirely.
Opening the Search Merchandiser for any search terms that already have a query rule will show the existing query rule on the right hand side.
Query Rule Support in Search Merchandiser
Currently the Search Merchandiser only supports:
- One query rule
- Criteria
- Search term exactly matches (
searchTermExactlyMatches)
- Search term exactly matches (
- Action
- Boost entities (
BOOST_ENTITIES) - Bury entities (
BURY_ENTITIES) - Boost verticals (
BOOST_VERTICALS) - Bury verticals (
BURY_VERTICALS)
- Boost entities (
If you enter the Search Merchandiser for a search term with multiple query rules or with a single query rule that has criteria or actions that are not supported, you’ll see a warning message (or multiple) in the Query Rules sidebar. Click the pencil icon to edit the query rule on the query rules page.

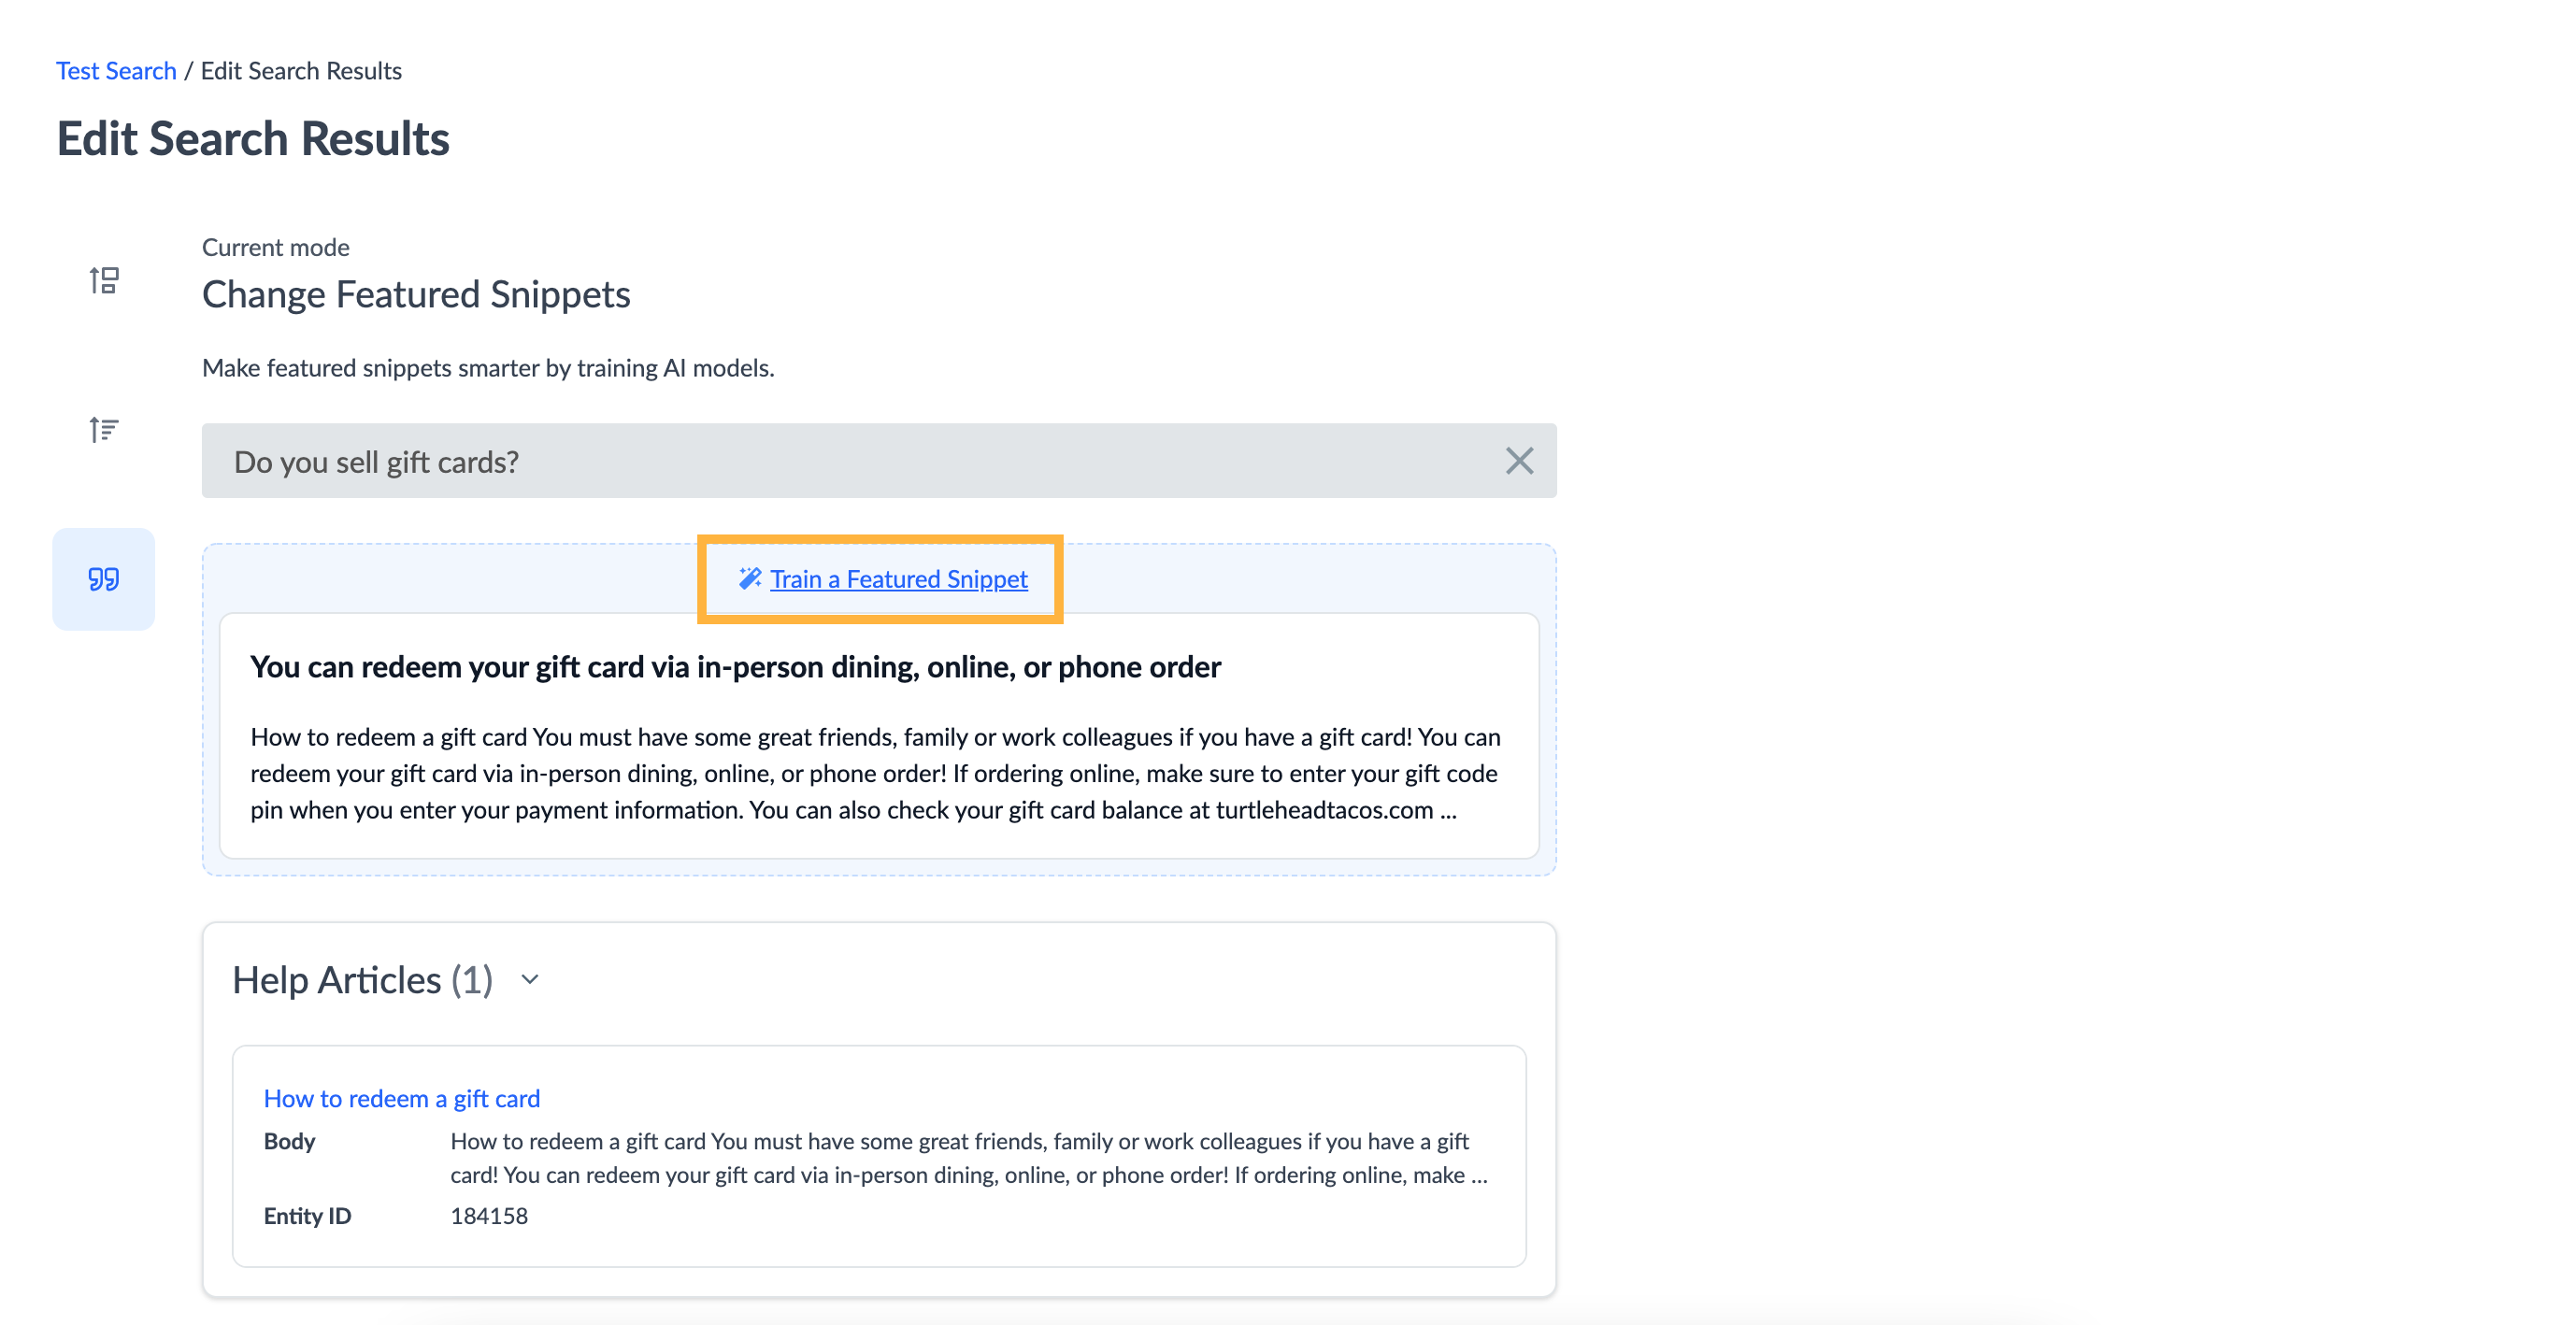
Change Featured Snippets Mode
The Change Featured Snippets mode uses Experience Training (not query rules like the first two modes), so it is independent of the other modes. You’ll only see this mode if the experience has a vertical with document search turned on. Otherwise there would be no featured snippets to train!
Similar to the Test Search screen, you’ll see a wand icon that allows you to train the featured snippet. This opens up the Featured Snippet modal where you can edit the snippet predicted by the algorithm. Check out the Experience Training unit to refresh your knowledge on how to use the featured snippet modal.
How do you navigate to the Search Merchandiser?
Which of the following is true about the order entities/verticals will appear using the boost/bury actions?
The Change Featured Snippets mode is not showing up in your Search Merchandiser. What is the most likely reason?
You're a star! ⭐
