

Step 1: Create a Calendar
To add a calendar to your site, follow the steps below.
Import eventcalendartags.js
This script should go right before your closing head tag. It can go anywhere, but we recommend putting it in the page’s head to avoid clutter.
<script src="https://assets.sitescdn.net/events/events.js"> </script>Import Bootstrap for Styling (Recommended)
We’ve built the calendar using Bootstrap elements. Importing this script will make your calendar look great out of the box.
<link rel="stylesheet" href="https://maxcdn.bootstrapcdn.com/bootstrap/4.0.0/css/bootstrap.min.css" integrity="sha384-Gn5384xqQ1aoWXA+058RXPxPg6fy4IWvTNh0E263XmFcJlSAwiGgFAW/dAiS6JXm" crossorigin="anonymous">

<script src="https://maxcdn.bootstrapcdn.com/bootstrap/4.0.0/js/bootstrap.min.js" integrity="sha384-JZR6Spejh4U02d8jOt6vLEHfe/JQGiRRSQQxSfFWpi1MquVdAyjUar5+76PVCmYl" crossorigin="anonymous"></script>
If you want to use Bootstrap more natively, follow the download instructions on Bootstrap’s site.
Initialize Calendar
Add the snippet below to the bottom of your page’s body.
NOTE: Be sure to enter your Content Delivery API key in the apiKey field.
Ideally, this script should be the last script tag on your page. Placing it at the bottom ensures that it will work with all other scripts and tags associated with the calendar.
<script>
    EventCalendar.Initialize({
        apiKey: 'ADD YOU API KEY HERE',
        resultsTemplate: '#result-template',
        resultsElement: '#results',
        filters: [
            EventCalendar.Filters.Date({
                startDateElement: '.start-date',
                endDateElement: '.end-date'
            }),
            EventCalendar.Filters.Location({
                element: '.location-filter'
            }),
            EventCalendar.Filters.LiveApiFilter({
                element: '.name-filter',
                query: function(value) {
                    return {
                        name: {
                            contains: [value]
                        }
                    }
                }
            })
        ]
    });
</script>
Build Calendar HTML
The template below defines what each event tile looks like:
<script id="result-template" type="text/template">
<div class="row row-inset pt-3 pb-3 border-bottom border-primary">
<div class="col-sm-9 d-flex ">
<div class="flex-column-centered calendar-item">
<div class="text-primary date-month"> {{formatDate Event.startDateTime month="short"}}</div>
<div class="date-day"> {{formatDate Event.startDateTime day="numeric"}} </div>
</div>
<div class="flex-column-left">
<div>{{Event.name}}</div>
<div>{{ Event.description }}</div>
<div> <i class="fa fa-map-marker mr-2 text-primary"></i> {{Event.venueName}} - {{Event.address}} - {{Event.city}} </div>
</div>
</div>
<div class="col-sm-3">
<a href="{{Event.websiteUrl}}" target="_blank" class="btn btn-outline-primary "> View Details</a>
</div>
</div>
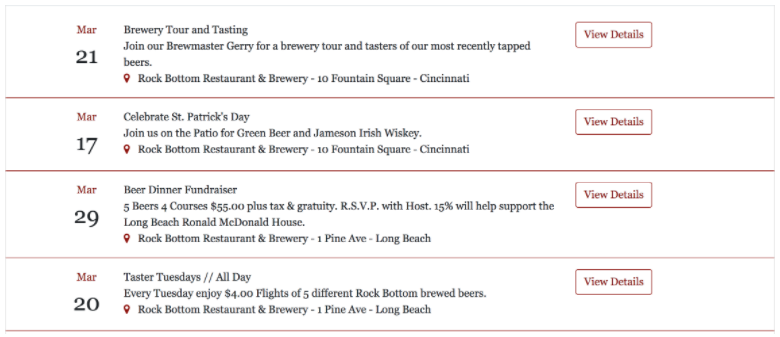
</script>The tile will look similar to the example below:

The template can go anywhere on your page, and you can customize the HTML however you like.
Place the results in the page’s HTML
Next, copy the code below to build the list of events. Copy it where you want the list to appear.
<!-- Other HTML on your page -->

<div id=“results”> </div>

<!-- Other HTML on your page  -->
The list will look something like the example below.
You’re all set. Your page will load a calendar containing all of your Yext Events.