Step 2: Integrate the Taxonomy with your Doctors
Overview
Now that your account has been populated with the taxonomy, you can associate your doctors with these entities. Choose the method that best suits your use case to assign specialties (and other terms, if you selected the doctors-to-terms data model) to your doctors.
If your doctors already have categories assigned, you can use a function connector to automate this process.
If your doctors do not have categories assigned, you will have to assign specialties and other terms to doctors manually. Both of these approaches are outlined below.
Automated Specialty and Term Assignment
If your doctors have categories assigned for Listings or other purposes, you can use pre-built plugins built by the Yext healthcare tea. to automatically assign a related specialty and/or terms to your doctors. Note that if a doctor has multiple categories assigned, only the primary category will be used to determine the associated specialty.
- Navigate to Developer > Developer Console.
- In the top right corner, click + Add an App.
- Name your app (something like “Taxonomy API Key”). Click Create App.
- Under the API Credentials tab, add an API Permission for the Management API > Entities endpoint. Under Permissions, select Read-Only. Click Save, and then confirm by clicking Change Permissions.
- On the same page, click the eye symbol to view the API Key related to your new app. Copy this API Key down, as you will use it soon.
- Navigate to one of the following GitHub repositories, depending on whether you’d like to add specialties or all terms (specialties, subspecialties, procedures, conditions, and reasons for visit) to your doctors, and whether you are working in a production or sandbox environment:
- To auto-populate specialties: Use the Category to Specialty repository ( production / sandbox )
- To auto-populate all terms: Use the Category to Specialty With Terms repository ( production / sandbox )
- On therepository you selected, click the green <> Code button and then select Download ZIP.
- On your computer, unzip the file and save the folder.
- Open up your command line interface (Command Prompt for Windows, Terminal for Mac).
- Enter one of the following commands, based on the type of account you are using:
- If you are using a production account:
yext init - If you are using a sandbox account:
yext init -u sandbox
- If you are using a production account:
- If you have connected to this Yext account before via the CLI, select Use existing credential and select the account that hosts taxonomy data. Otherwise, select Create new credentials and input the business ID for the account where you downloaded the taxonomy solution.
- Your business ID can be found in the URL of any page in the Yext platform, e.g.
https://www.yext.com/s/[business-id]/homeorhttps://www.yext.com/s/[business-id]/search/overview
- Your business ID can be found in the URL of any page in the Yext platform, e.g.
- You will need to authorize your account if you haven’t used the CLI recently. A window will open in your browser. Click Authorize in this window.
- Return to the CLI and select Yes.
- Type in the following command:
yext resources apply /filepath, replacingfilepathwith the file path where you saved your GitHub files on your computer in Step 8.- For example, if you downloaded the production repo named
categoryToSpecialtyConverter-prodand saved it in yourDocumentsfolder, type inyext resources apply /Documents/categoryToSpecialtyConverter-prod-main.
- For example, if you downloaded the production repo named
- When asked to confirm whether you’d like to add these resources to your account, select Yes.
- You will then be prompted to input the API Key you generated in Step 5 above. Paste it in the CLI and click return.
- Close the CLI and open your Yext account once again.
- Navigate to Knowledge Graph > Connectors, where you will see a new connector called Category to Specialty Converter or Category to Specialty Converter With Terms, depending on the options you selected above.
- Click View on the connector.
- Click Run Connector in the top right corner.
- Wait for the connector to finish running, and all of your doctors’ related taxonomy fields should be populated on your entities.
Manual Specialty and Term Assignment
If your doctors do not use categories, you can manually integrate the taxonomy with your doctors in the Knowledge Graph, or via export and file upload. The former method is easier if you manage only a few doctors in Yext, while the latter is recommended for larger sets of healthcare professionals.
Manual Assignment in the Knowledge Graph
- Navigate to Knowledge Graph > Connectors and confirm that all of your entities have been added to the account by finding the “Last Run” dates on each taxonomy connector.
- Go to Knowledge Graph > Entities and filter your entities to only the Healthcare Professional entity type.
- Select any entity and scroll down to the taxonomy solution fields (e.g. Related Specialties, Related Procedures, etc.)
- Populate the fields in this section appropriately for your chosen healthcare professional.
- If you selected the doctors-to-specialties model in the installation flow, your doctors will only have the Related Specialties field in this section.
- If you selected the doctors-to-terms model, you should also fill out the fields labeled Related Conditions, Related Procedures, etc.
- Repeat this process for all of your doctors.
Manual Assignment via Data Upload
- Navigate to Knowledge Graph > Entities. Filter your entities by Entity Type.
- If you selected the doctors-to-specialties model during the app installation flow, filter to include Healthcare Professional and Specialty.
- If you selected the doctors-to-terms model, include Healthcare Professional and all other entity types you installed with the connector (e.g. Specialty, Procedure, Condition Treated, etc.)
- Check off all the entities in the filter. Make sure they’re all checked off by selecting the dropdown containing a checkbox at the top of the list, and clicking Select All in Active Filter.
- Click on the More Actions dropdown and select Export Entities.
- Click Continue.
- On the left-hand side, select the fields you’d like to include in the export, based on your chosen data model.
- Always include Entity ID, Entity Type, and Name.
- Doctors-to-specialties model: select Related Specialty > Entity ID
- Doctors-to-terms model: select all of the “related” fields available on the Healthcare Professional entity type, e.g. Related Specialty > Entity ID, Related Procedure > Entity ID, etc.
- * When finished, click Continue. An export of your selected entity data will download automatically. When the download is finished, open the file.
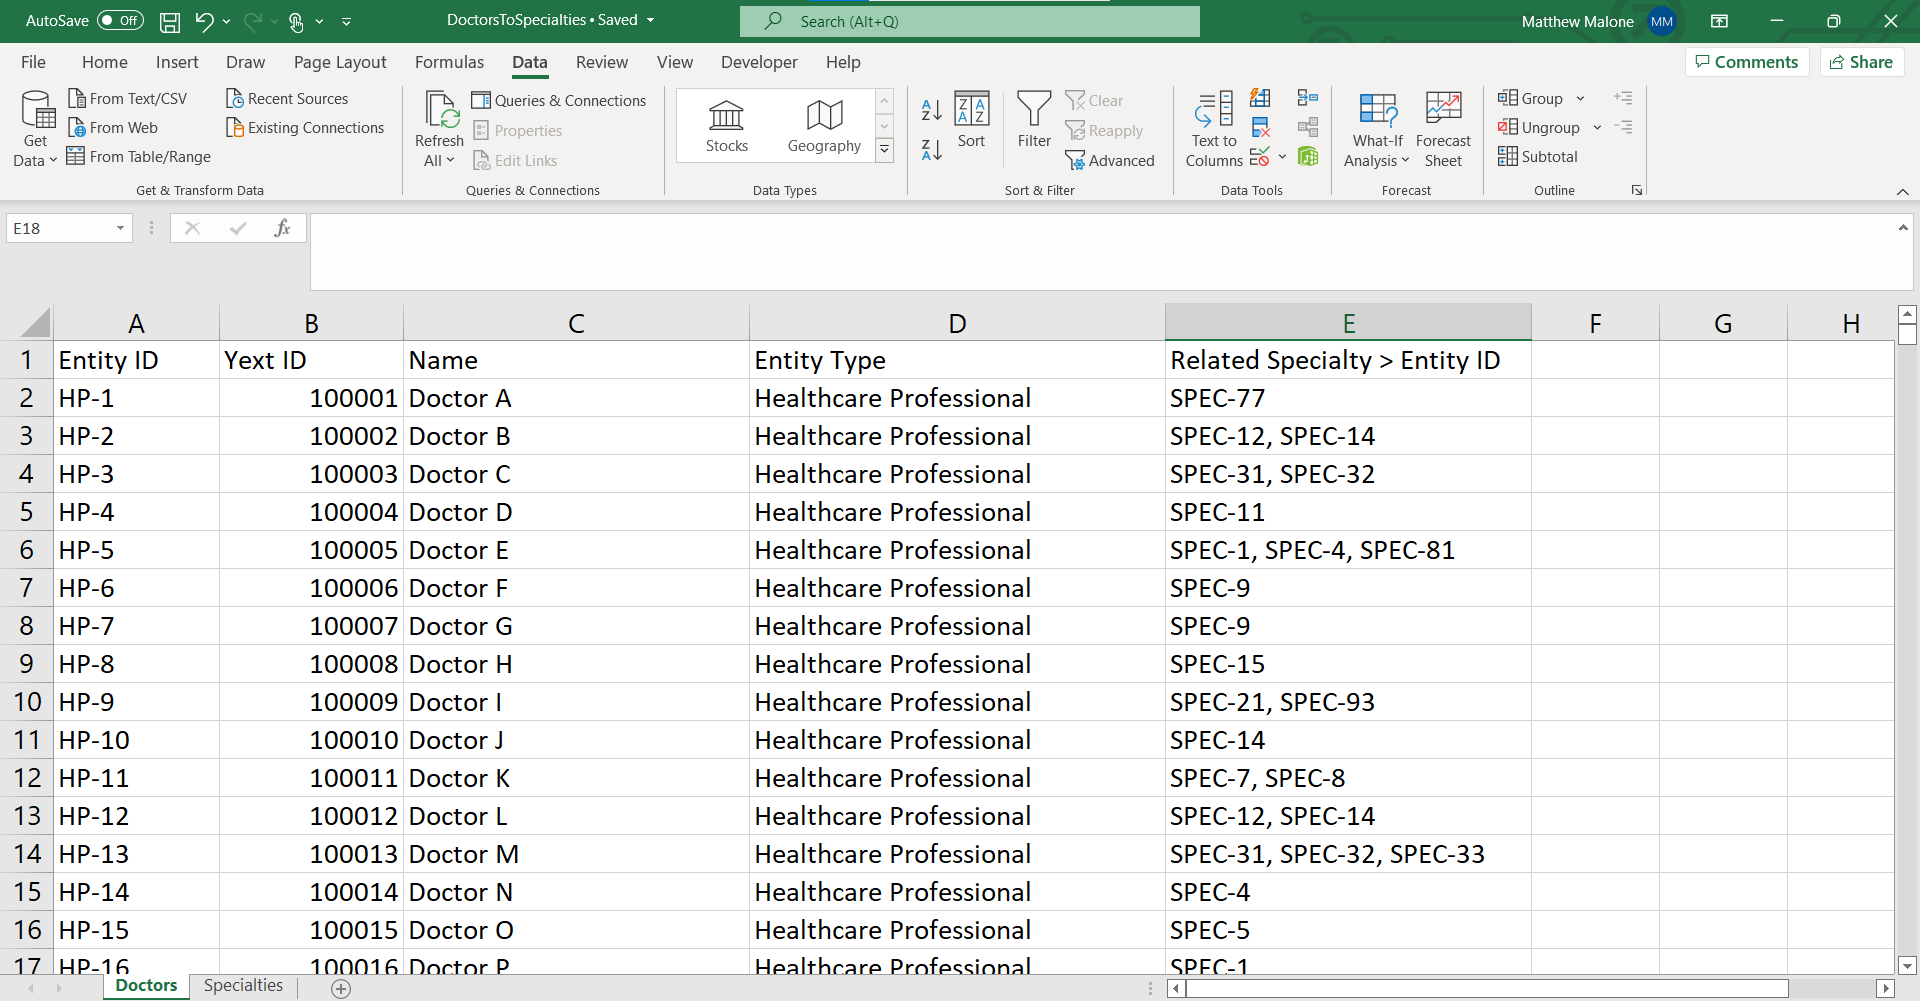
- One by one, add a comma-separated list of every specialty and/or term associated with each doctor in the relevant column. These must be listed as the entity’s ID, not its name.
- To do this more easily, you can cut and paste the specialty and/or term entities you exported into a new Excel tab, and use a VLOOKUP function to cross-reference names and IDs. The Specialty and Term entities were only exported for reference purposes, and you should only be making changes to the Healthcare Professional entities.
- Because this process will likely take a while, make sure to save periodically!
- Once this is complete, your sheet should look something like the screenshot below. Save the file.
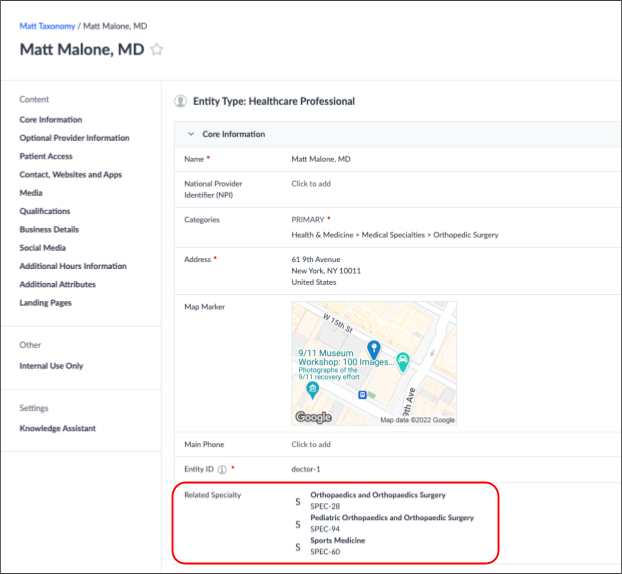
- In Yext, go back to Knowledge Graph > Entities and click +Add Data.
- Under Other Options, select Upload File.
- Choose the file you just saved with the doctor entities and go through the upload flow to add related specialties and/or terms to your doctor entities. A final doctor entity should look something like this: