

Step 2: Create a Yext Search Results Widget for your Service Portal
Overview
Most help sites have a dedicated search results page that all search bars across the site will redirect to when a user makes a search. Generally this lives on a URL like https://yourdomain.com/search or https://search.yourdomain.com/.
In this step, we will walk through how to embed your Yext Search experience into a Service Portal search page. If you would like to host the Search Results page using Yext, a CMS, or different system, you can certainly do so.
Prepare your Frontend Repository for the ServiceNow Integration
In the Yext Platform, navigate to your repository via Pages > All Sites > Your Experience.
Navigate to the *Code Editor**. Then, click on the pen icon on the desired branch to view and edit the repository code.
In the files on the left-hand side, navigate to config >
global_config.jsonand make sure theinitializeManuallyproperty is set totrue.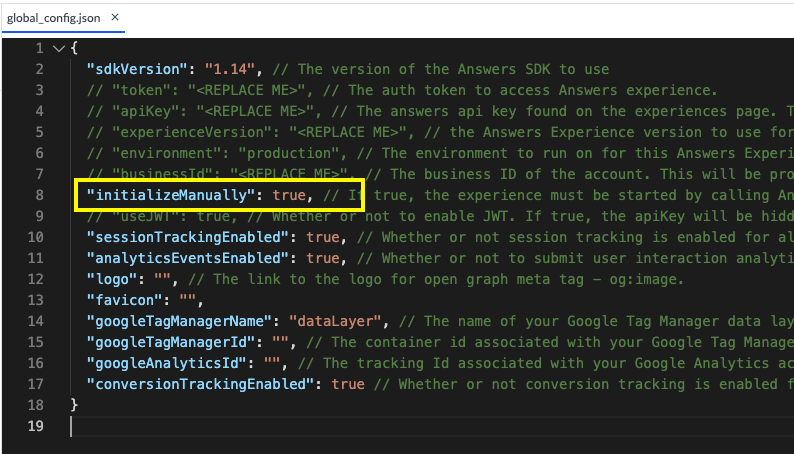
Now, navigate to layouts >
headincludes.hbsand add the following script:<script> function bindEvent(element, eventName, eventHandler) { if (element.addEventListener) { element.addEventListener(eventName, eventHandler, false); } else if (element.attachEvent) { element.attachEvent('on' + eventName, eventHandler); } } // Listen to messages from parent window and handle accordingly bindEvent(window, 'message', function (e) { try { var obj = JSON.parse(e.data); if (obj.action === 'setQuery') { ANSWERS.core.setQuery(obj.value) } if (obj.action === 'passConfig') { const snPageParams = obj.value.querySource; const parsableParams = new URLSearchParams(snPageParams); const snPageId = parsableParams.get('id'); const querySource = snPageId === 'search_yext' ? 'HELP_SITE' : snPageId === 'sc_cat_item' ? 'CASE_DEFLECTION' : 'DEFAULT'; AnswersExperience.runtimeConfig.set("querySource", querySource); AnswersExperience.runtimeConfig.set("visitor", obj.value.visitor); AnswersExperience.init({}); } } catch (e) {} }); </script>NOTE: In the script shown above, the
querySourceis being set conditionally depending on the ID of the particular Service Portal page where the experience is embedded.The above code assumes the ID of the search results page is
search_yextand the ID of the incident / case form page issc_cat_item. If you utilize different IDs for these pages within your Service Portal Configuration, you’ll need to update the above script accordingly.Commit and publish your changes. Now your frontend search experience repository is ready to be integrated with ServiceNow Service Portal!
Create a Custom Search Results Widget
Navigate to Service Portal > Widgets. Click New to create a new widget.
Fill in the widget name as
Yext Search Resultsand the widget ID asyextsearchresults.Replace all of the code in the Body HTML template box with the following code:
<div id="answers-container"></div>Replace all of the code in the Client controller box with the following code. Note: make sure you fill in the placeholder with your search experience production URL on line 3 of the code snippet below. Make sure to remove any trailing slashes from the URL.
 api.controller=function() {
 var c = this;
 var url = ‘REPLACE_ME_PRODUCTION_URL’;
 var userId = c.data.user;
 var sourceUrlParams = window.top.location.search;

 generateIFrame(url);

 var targetNode = document.getElementById('answers-frame');
 var config = {attributes: true};
 var callback = function() {
    initializeExperience(userId,sourceUrlParams);
 }
 var observer = new MutationObserver(callback);
 observer.observe(targetNode, config);

 };

 function generateIFrame(domain) {
  var containerEl = document.querySelector('#answers-container');
 if (containerEl == null) {
 containerEl = document.createElement('div');
    containerEl.setAttribute('id', 'answers-container');
 }
 var iframe = document.createElement('iframe');
 var pathToIndex = containerEl.dataset.path;
 iframe.allow = 'geolocation';

 domain = domain || '';
 var queryParam = queryParam || 'query';
 var urlParam = urlParam || 'verticalUrl';

 var calcFrameSrc = function() {
 var paramString = window.location.search;
 paramString = paramString.substr(1, paramString.length);

 // Decode ASCII forward slash to avod repeat encodings on page refreshes
 paramString = paramString.replace("%2F", "/");

 // Parse the params out of the URL
 var params = paramString.split('&'),
             verticalUrl;
 var referrerPageUrl = document.referrer.split('?')[0].split('#')[0];

 if (pathToIndex) {
  verticalUrl = pathToIndex;
 }

 // Don't include the verticalUrl or raw referrerPageUrl in the frame src
 var new_params = params.filter(function(param) {
   return (param.split('=')[0] !== 'verticalUrl') &&
    (param.split('=')[0] !== 'referrerPageUrl');
 });

 for (var i = 0; i < params.length; i ++) {
  var kv = params[i].split('=');
  if (kv[0] === 'verticalUrl') {
    verticalUrl = kv[1];
  }

  if (kv[0] === 'referrerPageUrl') {
    referrerPageUrl = kv[1];
  }
 }

 new_params.push('referrerPageUrl=' + referrerPageUrl);

 // Build the Iframe URL
 var iframeUrl = domain;
 if (verticalUrl) {
  iframeUrl += '/' + verticalUrl;
 }

 iframeUrl += '?' + new_params.join('&');
 return iframeUrl;
 };

 iframe.src = calcFrameSrc();
 iframe.frameBorder = 0;

 // For dynamic iFrame sizing
 iframe.style.width = '1px';
 iframe.style.minWidth = '100%';
 iframe.id = 'answers-frame';

 containerEl.appendChild(iframe);

 // For dynamic iFrame resizing
 window.iFrameResize({
 checkOrigin: false,
 onMessage: function(messageData) {
  var message = JSON.parse(messageData.message);
  if (message.action === "paginate") {
    var iframeOffsetTop = iframe.offsetTop;
    document.documentElement.scrollTop = iframeOffsetTop;
    document.body.scrollTop = iframeOffsetTop; // For Safari
    return;
  }
  var params = message.params;
  var pageTitle = message.pageTitle;
  if (pageTitle) {
            iframe.title = pageTitle;
        }
  iframe.iFrameResizer.resize();
  // var currLocation = window.location.href.split('?')[0];
  // var newLocation = currLocation + '?' + params;
  // if (window.location.href !== newLocation) {
  //  history.replaceState({query: params}, window.document.title, newLocation);
  // }
 }
 }, '#answers-frame');
 }

 function initializeExperience(user,src) {
    var visitorObj = {
        id: user,
        idMethod: "sn_user_id"
    }
    var configObject = {
        querySource: src,
        visitor: visitorObj
    }
        var msg = JSON.stringify({
            action: "passConfig",
            value: configObject
        });
        var frameEl = document.getElementById("answers-frame");
        frameEl.contentWindow.postMessage(msg, "*");
    };
Replace the code in the Server script with the following code.
(function() { data.user = gs.getUserID(); })();Click Submit.
Navigate back to the widget and scroll to the bottom of the page to the Dependencies table. Click New to create a new dependency
Fill in the content for the widget dependency:
- Fill in the Name as
iFrame Resizer JS. - Check off
Include on page load. - Click Submit.
- Fill in the Name as
Scroll back down to the Dependencies table and click on the iFrame Resizer JS dependency you just created.
On the JS Includes tab, click New.
- Fill in the Name with the URL https://cdnjs.cloudflare.com/ajax/libs/iframe-resizer/4.3.1/iframeResizer.min.js.
- Change the Source to URL.
- For the JS file URL, click the lock icon to unlock. Paste the same URL in the text box: https://cdnjs.cloudflare.com/ajax/libs/iframe-resizer/4.3.1/iframeResizer.min.js. Then click the lock again.
- Click Submit.
Congratulations, you’ve now created your search results widget! Next, we’ll walk through creating a Yext Search Results Page with your new widget.
Replace Your Current Service Portal Search Page With a Yext-Powered Search Results Page
Navigate to Service Portal > Pages.
Click New to create a new page. Title the page
Yext Search Resultsand change the ID of the page tosearch_yext.Click Submit to save the page. Then, navigate to your new search results page by clicking on it.
Open the Page Designer. Scroll to the bottom of the page. In the Related Links section and click Open in Designer.
Set up the page for the search results container. The Service Portal Designer application will open in a new browser tab.
We recommend adding a one-column container (12) and dropping in both the
breadcrumbswidget to help users navigate as well as theYext Search Resultswidget you just created.If you are using an existing page, delete widgets and containers on the page or reorganize them to make room for the search results container. To delete a widget or container, select it (the dotted lines will become a solid line) and click the trash can icon in the upper right corner.
Click Preview to see your new page; it should look something like the screenshot below.
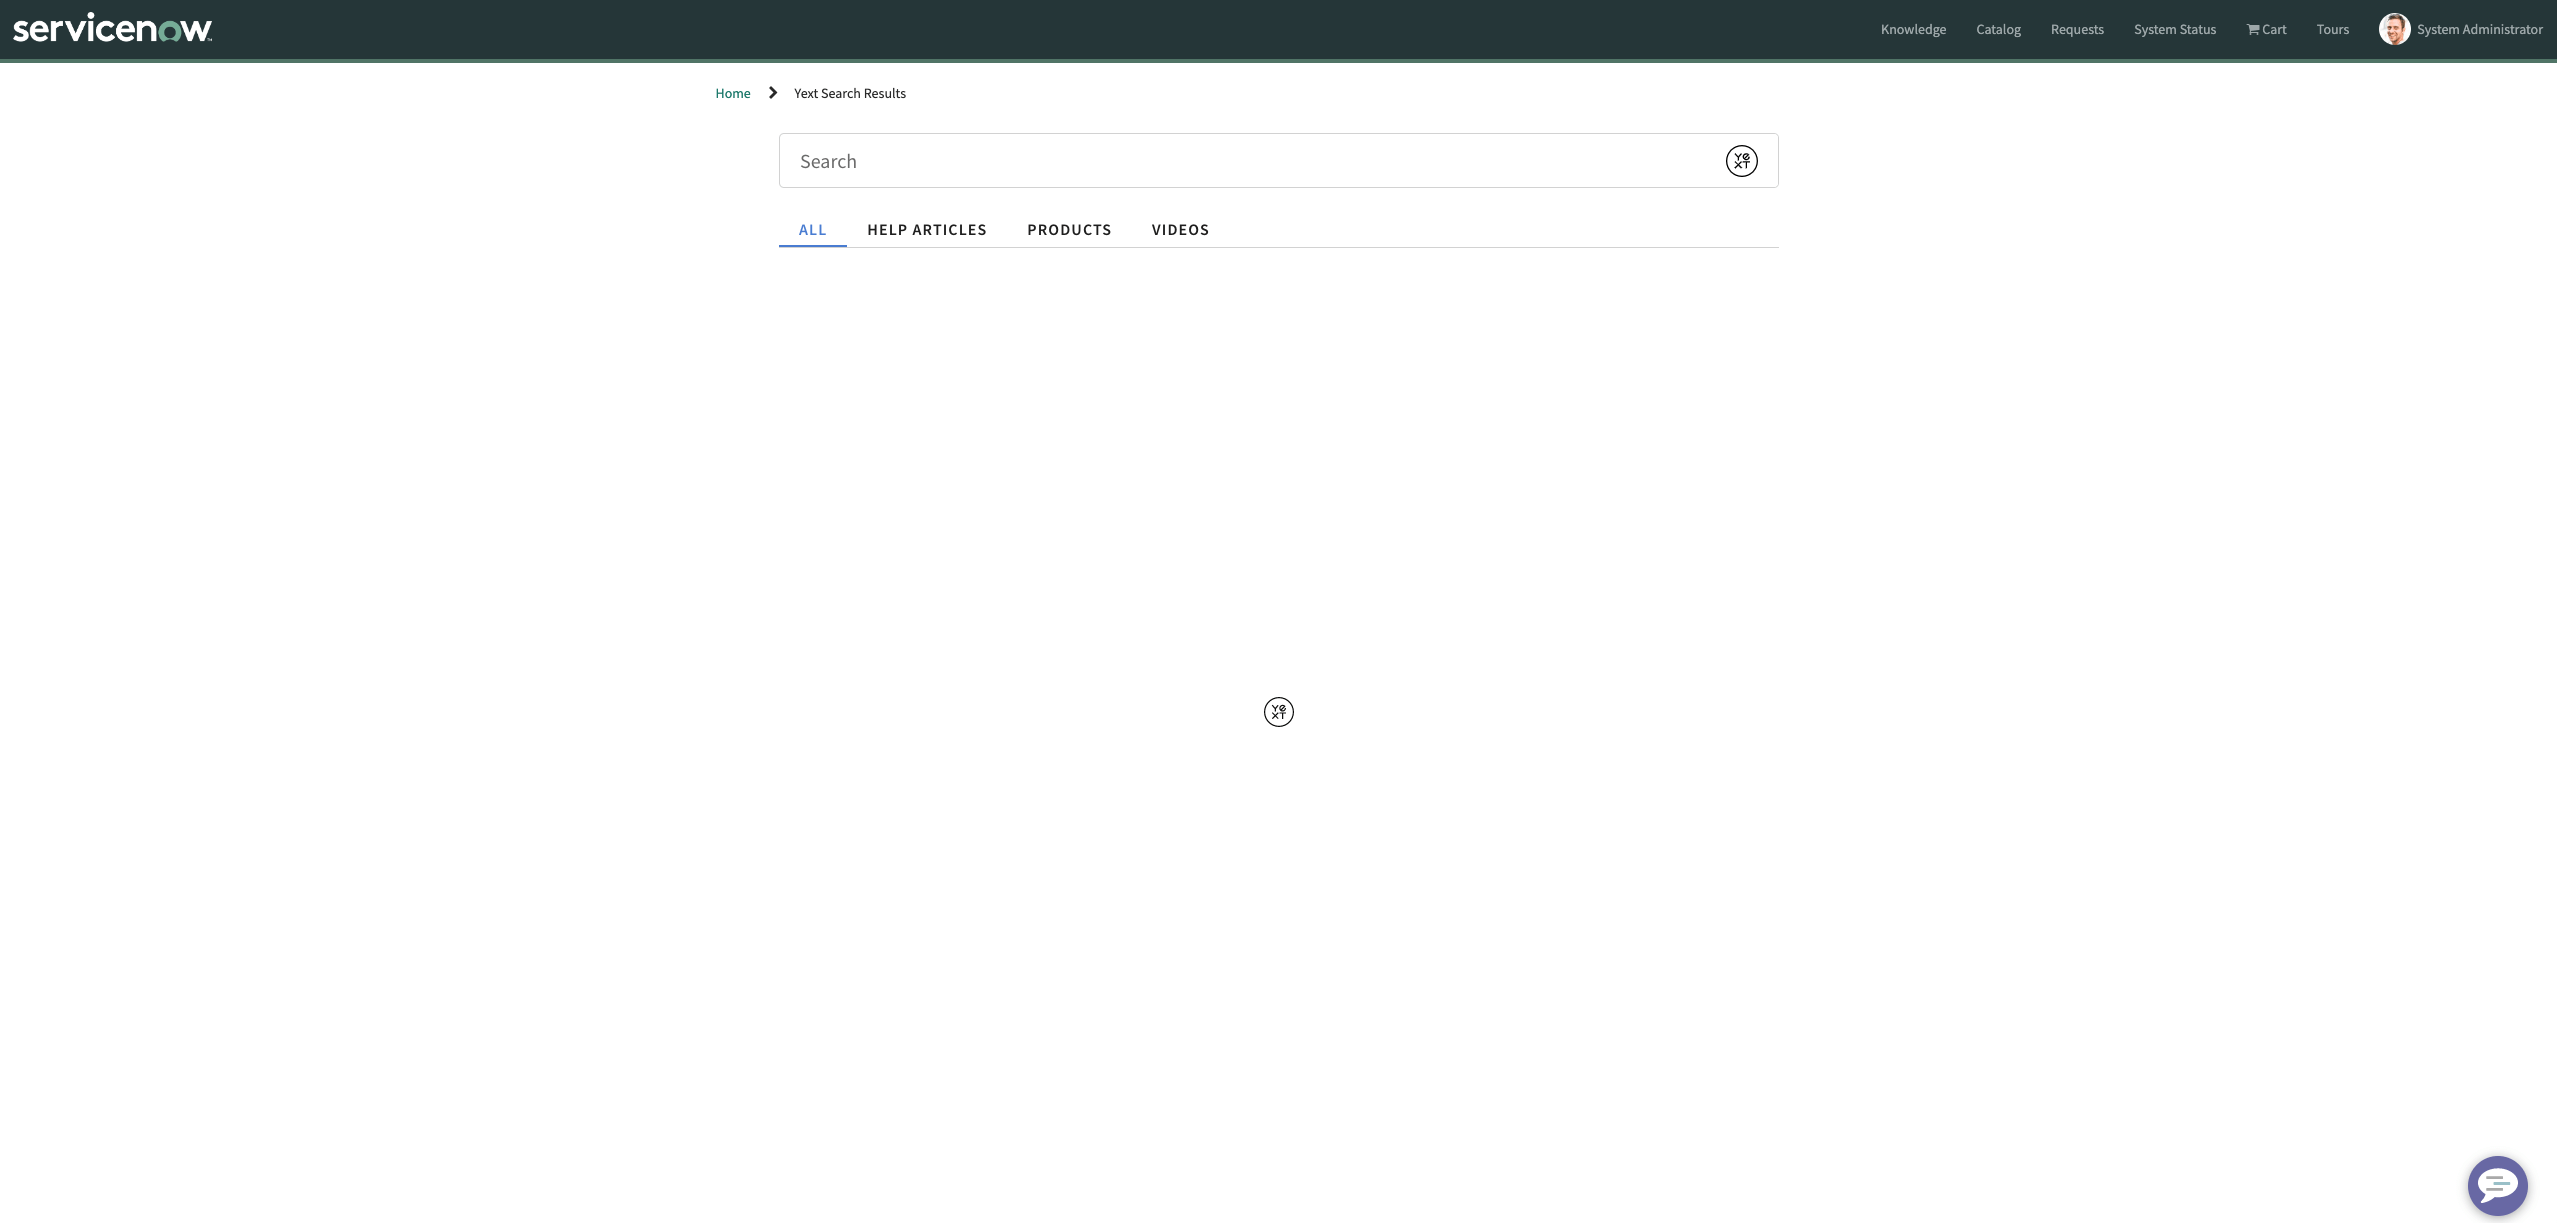
Now you’ve got your search results page ready to go! The Relative URL associated with this page will be your redirectUrl when you initialize the Search experience in your search bar widget as part of the next step. Note that if you choose to not host the Search Results page in ServiceNow, simply make sure you use that alternate URL instead.