
How to Upload a File | Yext Hitchhikers Platform
What You’ll Learn
In this section, you will learn:
- Details on each section of the upload
- More about data cleansing rules
Upload Process Overview
As we covered in the last unit, there are 5 main steps of the upload.
- File Configuration
- File Checking
- Fixing Errors
- Confirming Changes
- File Processing
In this unit, we will take you through the file upload process, providing guidance for best practices along the way. We’ll cover troubleshooting and fixing errors in the next unit.
You’ll upload two different files as part of the assessment for this module. If you’d like to follow along with the upload process using a sample file, feel free to open up the challenge (you can always restart the challenge later to make sure you complete all the steps).
Initiate an Upload
Here’s how to get the file upload started:
Navigate to the Upload File page. You can do this from Entities > + Add Data > Upload a File or by going to Knowledge Graph > Configuration > Data File Uploads > Upload a Data File.
If you have a saved Upload Configuration already, you will see the option to select it here. If not, this option will be hidden. If applicable, select a saved Upload Configuration. (You’ll learn more about how these work in the Saved Configurations Unit )
Choose the appropriate heading language so the system can try to read and auto-map your column headers to Yext fields. It should default to your account language. If you aren’t sure or if it’s a mix of languages, you can always manually map the fields in the next step.
Choose the file to upload. The file must be a CSV or XLSX file. If the file is XLSX, the data must be in the first tab.
Click Continue.
Configure File
In the Configure File step, you will:
- Map the fields from your file to Yext fields
- Apply any applicable Data Cleansing Rules
- Optionally move entities to a folder, apply a label, or apply a template
This step is critical for telling the system how to process your file. You can later save these preferences as part of a Saved Upload Configuration.
Before we get into the details, there are three features to cover:
- Data Cleansing Rules
- Additional Fields
- Additional Actions
Data Cleansing Rules
Data Cleansing Rules are a helpful tool to save you time preparing the file. You can set these up on a per-field basis in the File Configuration step of the upload. As you learned in the Data Cleansing Module, you want to make sure your data is clean and optimized for Search. Our system can provide some basic cleansing.
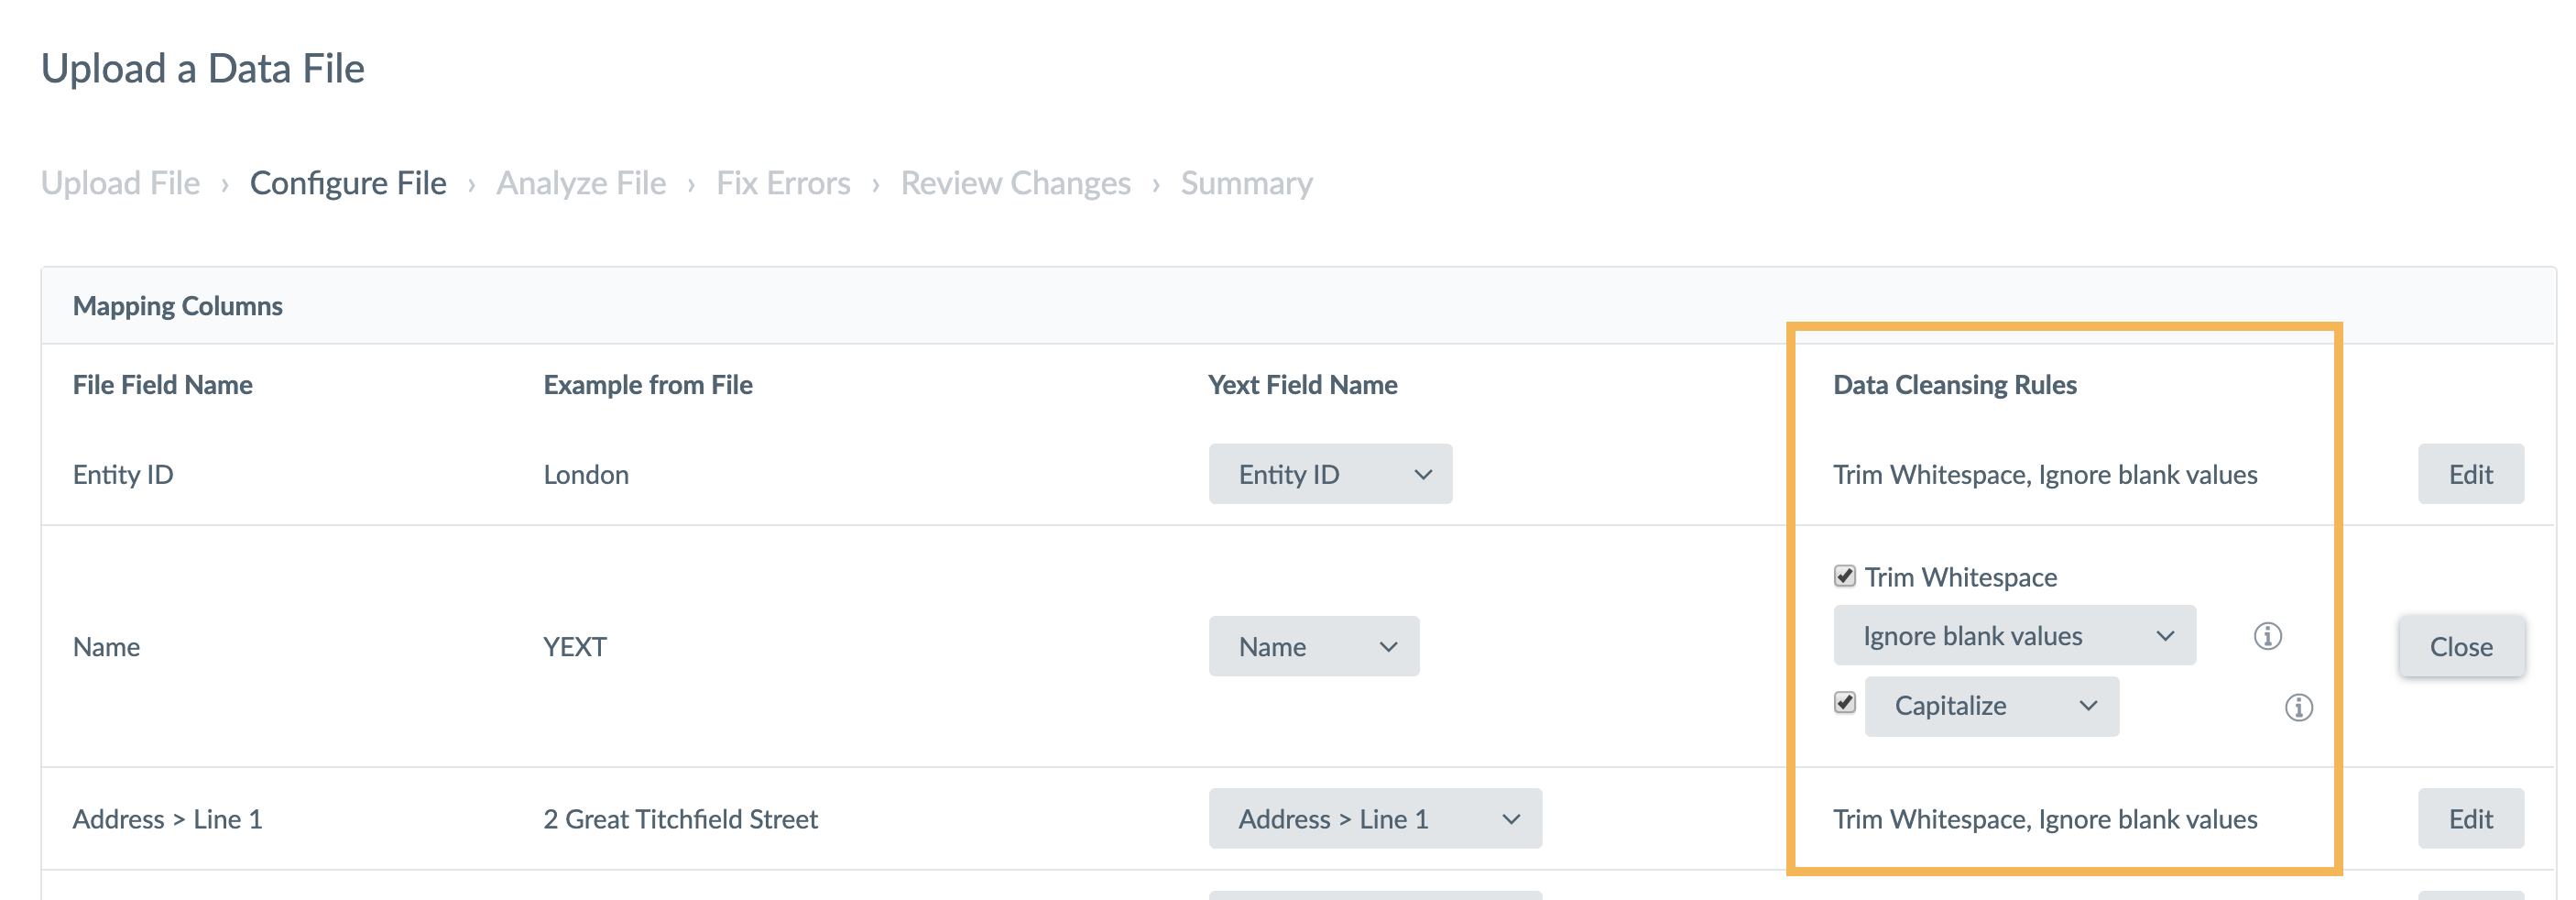
Here’s what all of the Data Cleansing Rules mean:
| Rule | Description | Applicable Field Types |
|---|---|---|
| Trim Whitespace | Removes extraneous spaces at the beginning or end of a string, similar to the trim() function in Excel | Strings |
| Ignore vs. Clear Blank Values | Ignore Blank Values: If no data is provided, the system will make no change. Clear Blank Values: If a field value is left blank, the system will clear the field’s values. Defaults to Ignore blank values. | All |
| Capitalization | Capitalize: Capitalizes the first letter of every word that is separated by a space. this iS an EXample -> This IS An EXample. Capitalize Fully: Capitalizes the first letter of every word (that’s separated by a space) AND lowercases the rest of the word. this iS an EXample -> This Is An Example | Strings |
| Delimiter | Allows users to explicitly set what character should be used as a delimiter for list-type fields. The options are: comma, tab. Defaults to comma. | List-type fields |
| Add to Existing | If you select “Add to Existing”, adds the list-item to the existing data in the system. Otherwise, will override the existing field’s value with value in spreadsheet. Defaults to Replace Existing. | List-type fields |
| Convert Letters to Numbers | Some businesses have vanity phone numbers, like 1-800-BUY-TOYS. This system will convert the letters into the appropriate number. Defaults on. | Phone Number fields |
| Infer Country Code | With this checked, the system will infer the country code based on the entity’s country if a country code is not provided. Defaults on. | Phone Number fields |
| Rich Text Detection | You can choose between Interpret as Markdown or Interpret as HTML based on what’s in your file. | Rich Text fields |
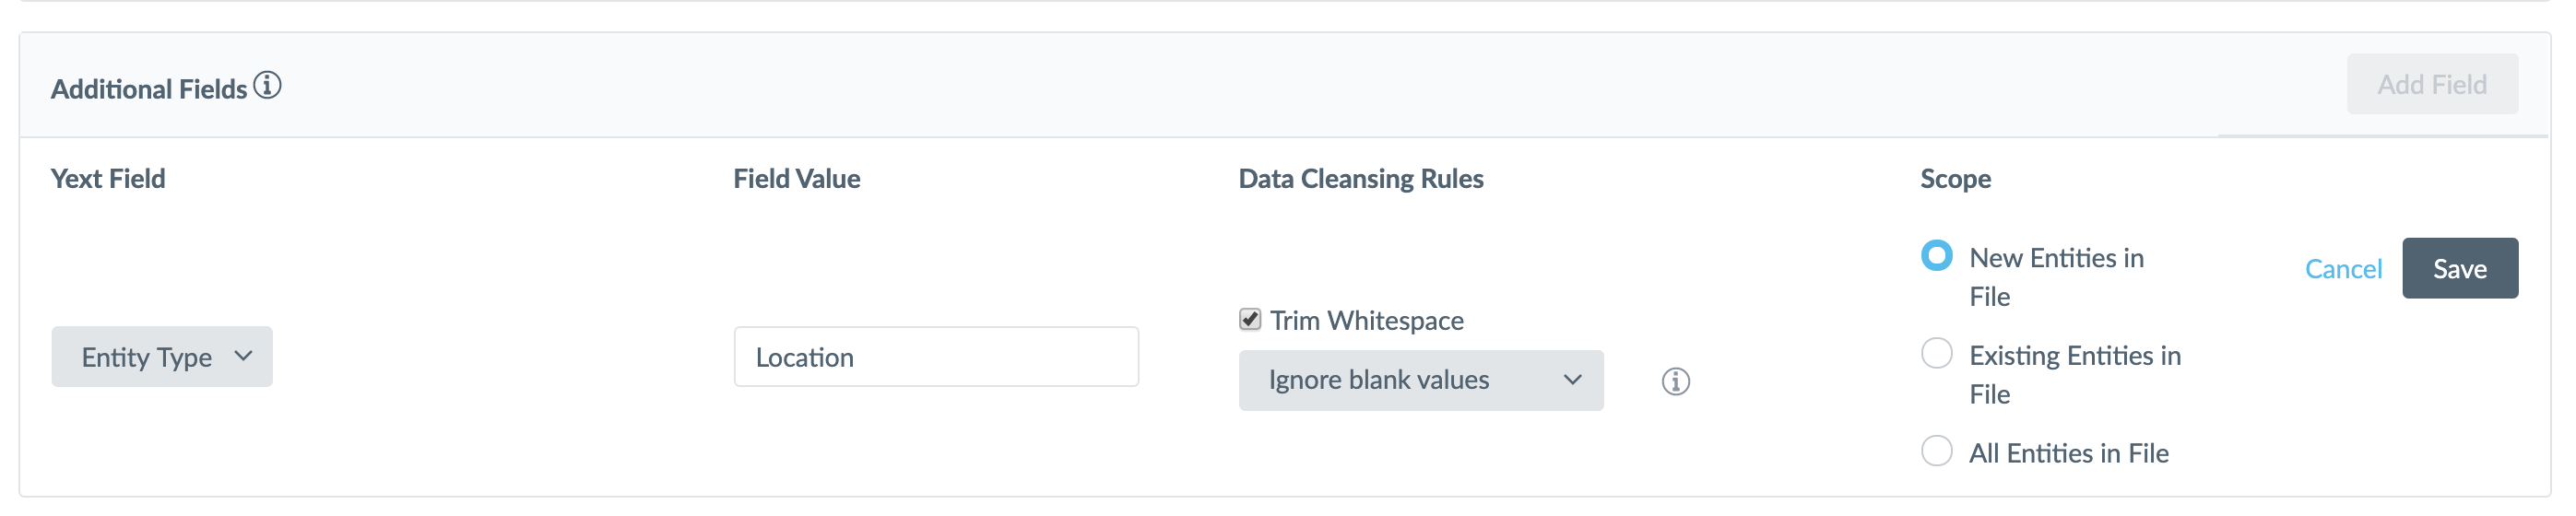
Additional Fields
If your file is missing a data field, like Country or Entity Type, you can add the field synthetically to your file from this screen, without having to go back to the spreadsheet. Select a field that you would like to add data for and the value you would like to apply to that field. Then select the scope to which you would like to apply that value: New Entities in the File, Existing Entities in the File, or All Entities in the File. Note that under the Additional Fields section, you cannot specify a unique value for each row in the spreadsheet. For that level of granularity, you would need to edit your original spreadsheet directly and reupload.
Additional Actions
As a convenience to you, we allow you to apply templates, add labels, or folder entities directly from the Upload via Additional Action Rules.
For each, you can set rules of what you want to do based on entity groupings or “Scope”. The Entity “Scopes” are defined as:
New Entities - this means any new Entities added as part of this upload. A common case here is to apply a template with default content, or put the entity in a New Stores folder.
Missing Entities - this means that any Entities that aren’t in this file will have the action applied. For example, if you upload a file with your open locations every week, you might want to apply a “Closed Store” template to any locations missing from the file and move to a Closed Store folder.
Entities in File - this is any entity in the file, regardless of whether the entity is new or existing in the account. If you have a set of entities that you want to add to a folder, apply a label or apply a template to but you aren’t able to isolate these entities using Advanced Filters + Bulk Edit, this is a great way to take a list of Entity IDs and take one of those actions. For example, if you decide you want to apply a seasonal promotion to a randomly assigned set of entities, you can upload a file with just the Entity IDs and apply a template that contains the seasonal promotions. You could also apply a label “Seasonal Promotion pilot” so you can easily filter to those entities across the platform, including in Analytics.
All Entities in Account - this will update all entities in the account. Only use this in limited scenarios and when you really need to make a change that can’t be made using bulk edit for any reason.
Once you select the action, you can select the desired folder, label or template. You can set multiple rules or none at all.

Configure File Process
Here’s how to go through the Configure File step.
Review the mappings. If the system mapped a field automatically, review to make sure it was properly mapped. For any fields the system was not able to map (indicated by “Map this Column”), search for and select the appropriate field. If you do not wish to process a column, you can set it to “Ignore this Column”. You can also do this in bulk by clicking the “Ignore All Unmapped Columns” button at the bottom of the fields table.
Apply any data cleansing rules. Click the edit button on the row and select options as needed. This can help save you a lot of time if used properly. Many systems provide data in all caps or all lowercase. These rules can help automate some parts of the data cleansing process.
Choose whether to add any additional fields that aren’t specified in your original file. Common examples here are Country or Entity Type.
Choose whether to apply a folder, label, or template and if so to which entities.
Click Continue.
Analyze & Fix Errors
Once you’ve told the system how to interpret your file, the system will go to work to identify if there are any issues. If there are no issues, you’ll proceed immediately to the Review Changes step.
However, often times, there are going to be issues you’ll need to review and address before proceeding. We’ll cover common errors and how to troubleshoot in the next unit.
Review & Confirm Changes
We want to make sure you are only making intended changes to your data so we will make sure you review:
New Entities - Does this number seem right to you? Sometimes customers switch up unique identifiers so the system identifies an entity as new instead of updated. Watch out for that in this tab.
Updated Entities - Are the fields you expected to be updated reflected here? Sometimes data is misformatted in the file and you are making unexpected changes. Or, maybe you did a sort in Excel that switched up the unique identifiers. If you are making major changes to core fields like Name, Address or Phone you should be sure that the changes are deliberate. If too many are updated, your file might be flagged for review (more information below).
Unchanged Entities - These are entities that are in your file but do not have any changes that will be applied. Did you expect to update all entities in your file but some are listed here as unchanged? It’s worth reviewing to make sure you didn’t forget an entity that you expected to be in your file.
Missing Entities - These are entities that are in your account but not in your file. If you expected to be updating all entities in your account, review any entities here.
Review the information in each tab. You can optionally search or tab through the information where applicable.
Optionally, you can click to “Download Entire Summary” to get the changes in Excel format for review.
Optionally, on some tabs you can click to download the data for just that tab.
Check off the confirmation box on each tab and click Continue on all four. Finally, click Submit.
The system will immediately start to process your file. This can take some time depending on the size of your account and the number of entities to add or update from your file. It is possible that your file gets flagged for review due to the number of changes. This is to make sure that you are not making any unintended changes and an employee will review and contact you with any questions. You can expect that process to take 1-3 business days, but you can reach out to your Client Success Manager at any point with questions.
After Uploading
After your upload, you can always reference past uploads by going to Content > Configuration > Data File Uploads.
We highly recommend that you export your data after upload and upload the cleaned or fixed data to your source systems. During the upload process you may have fixed, cleaned, or added to the data and you should make sure you correct it at the source.
After this unit, we’ll review how to troubleshoot and fix errors. In the last unit, we’ll discuss how Upload Configurations can help save you time and effort for any uploads that you plan to upload recurringly.
True or False: You must map all columns in your upload file to fields in Yext
Which of the following examples correctly demonstrates Yext's Fully Capitalize data cleansing rule?
Way to go, you passed! 🏁
