Step 4: Adjust the Connector to Edit Data (Optional)
As with any connector built on top of a native source in Yext, you are welcome to make changes to the configuration so that the correct data enters the platform. Head to Knowledge Graph > Connectors. Locate your connector, and click View, and on the next page, Edit Configuration in the top right corner.
From here, you can edit which fields are brought into the platform, apply transforms to change what the data looks like, or even add a custom typescript function that can transform your data beyond the platform’s capabilities.
Be careful when removing transforms that the connectors have pre-installed, however, as many of these are required to keep GBP data in a format that Yext can ingest. For example, the custom convertTime function ensures that your hours are entering the platform properly. If you remove this transform, you will not be able to pull hours from Google Business Profile into the Yext platform.
For more information on editing connectors, visit our guides on using the Google Business Profile Source or creating a generic pull connector .
Here are some common examples of post installation data manipulation we’ve come across:
Change which URL to sync your GBP Website to
- Head to your recently installed Connector by navigating to Knowledge Graph > Connectors. Locate your connector, click View, and on the next page, Edit Configuration in the top right corner.
- Click Edit Configuration.
- This will open you to the mapping step of your connector. Find the field that is being mapped to the “Website URL > Display URL” field in your connector.
- Click on it and click Clear.
- Find the name of your Custom URL field and choose it. Click Apply.
- Save your connector and re-run it.
Apply Category Overrides
Currently the Google Business Profile connectors do not allow users to employ category overrides upon install. Follow the steps below to add category overrides.
- Create a Custom Field named Temp Category Override of the Single Text Type. Add it to the Entity Type that you are creating entities for via the GBP Connector. Follow this help article for how to add custom fields.
- Head back to your connector and click on Edit Configuration.
- Scroll up and click on the Specify Selectors section. Click Add Selector.
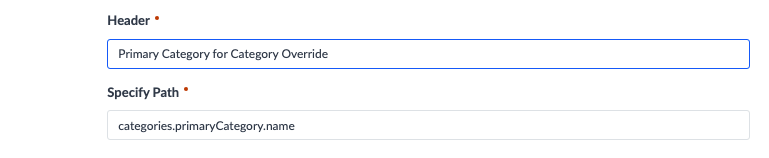
- Add a Selector with the following header and JMES Path:
- Click Save.
- Find the “Find and Replace” transform being used on the Categories column. If you installed one of the connectors it will be the 5th transform. Hover over it and click the pencil icon to edit it.
- Add your new column as one of the columns that the transform will act on. Click Save.
- Find the “Map Publisher Categories” transform. If you installed one of the connectors it will be the 7th transform. Hover over it and click the pencil icon to edit it.
- Add your new column as one of the columns that the transform will act on. Click Save.
- Scroll down to the Map Data step.
- Find the column you just added by scrolling all the way to the bottom and map it to your Temp Category Override field.
- Click Save.
- Run your connector again!
- Once the connector finishes you can export your and confirm that the Primary Category matches the Google Business Profile Category Name.
Adding an “Opening Soon” field
Each Google connector pulls “Coming Soon” information from GBP in case one of your locations has not opened yet. The Google property contains a date specifying when the location is set to open. Any downloaded connector will have pre-selected and transformed this field, labeled in the connector framework as “Coming Soon”.
If you plan to use this field, add a “Coming Soon” date-type field in the Knowledge Graph and map the existing selector in your connector to this field. Then the field will be updated as soon as the connector runs again!
Add more Holiday Hours
By default, the connector only maps ten scheduled Holiday Hours. If your Google Business Profile account has scheduled more than ten upcoming holiday hours, you can add these additional schedules by following these steps:
- Look for the four “Split Columns” transforms on the connector, which should be pre-applied to all the “Holiday Hours” fields.
- Edit each of these transforms, and click +Add Column for each additional Holiday Hours schedule you’d like to include. For neatness, it may be easiest to label the new columns using the pre-existing convention of
HolidayHoursField[x]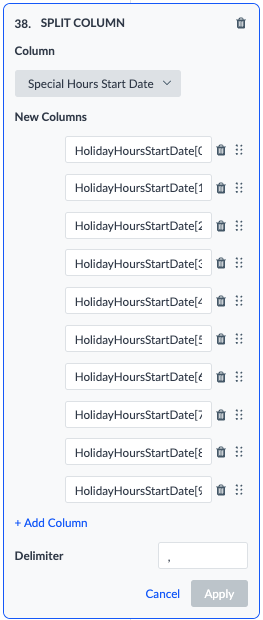
- Once all four of these fields have been edited to include the correct number of holiday schedules, proceed to the final step of the connector, entitled “Map Data”.
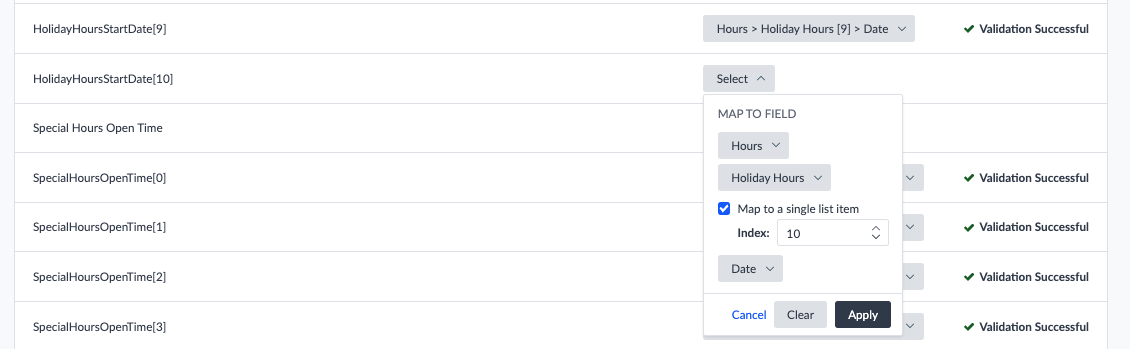
- Find the new columns you created by editing the Split Columns transform, and map these selectors to their corresponding fields in Yext. An example is shown below. You should map however many new schedules you added, for each field (StartDate, Open Time, Close Time, IsClosed).
- Save the connector, and run it immediately if you want the updates now. Otherwise, they will be included the next time the connector is scheduled to run!