

Step 1: Index the Data
Link Your Salesforce Account
In order to pull content from Service Cloud into the Knowledge Graph, you first need to establish a connection between your Salesforce instance and Yext account. By linking your Salesforce instance, you provide the necessary permissions for your Yext account to access and retrieve the Salesforce content you choose to bring into the Knowledge Graph.
Add Data to Yext
There are two main ways to pull your Service Cloud content into the Knowledge Graph:
- Our pre-built Salesforce Connector Apps
- Our native Salesforce Source
Which method you choose largely depends on the type of data you plan to pull in from Salesforce. We have pre-built apps designed to pull in your Cases and Knowledge Articles from the Service Cloud. If there are additional object types you’d like to pull in, our native Salesforce Source provides the flexibility to quickly create a connector for any object type you may have in your Salesforce instance. We will walk through both of these data ingestion methods in further detail below.
Utilize Our Pre-Built Salesforce Connector Apps for Cases and Knowledge Articles
For Cases and Knowledge Articles, we recommend using the pre-built Salesforce Apps already published in the App Directory. Once you have linked your Salesforce account, follow these steps to install our pre-built Salesforce apps:
- Navigate to Apps > Directory.
- Select the desired app, such as the Salesforce Case Connector or the Salesforce Knowledge Article Connector, and click Install.
- You will be prompted to authorize Yext to access and update your account configuration. Click Next.
- Enter your full Salesforce Instance URL, as well as the full Experience Cloud URL where your articles can be accessed if you are installing the Knowledge Article Connector. Both of these should be full URLs. For example, your Salesforce Instance URL could look something like “https://company.my.salesforce.com” and your Experience Cloud URL may look something like “https://support.mycompany.com”.
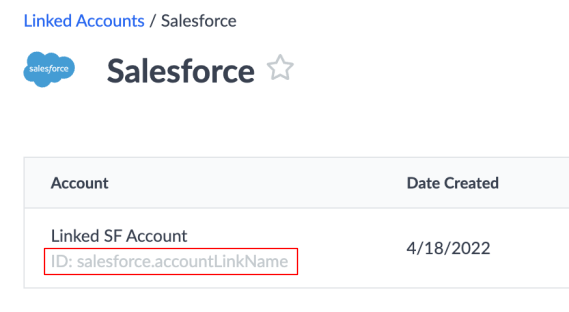
Then, enter the ID of the Linked Salesforce Account you previously configured. You can find the ID by navigating to Knowledge Graph > Configuration > Linked Accounts > Salesforce. The ID will be located under the name of the linked account:
 5. Once you click Authorize, you will be redirected to the connector page and it will run automatically!
The time it takes the connector to run will vary depending on the number of entities being synced to your Knowledge Graph.
Note: If you’d like to pull in custom fields you’ve added to your Cases or Knowledge Articles within Salesforce, refer to the instructions below!
Adding Custom Fields to the Pre-Built Salesforce Connectors
By default, our pre-built Salesforce Connector Apps only pull in data from the standard, built-in Salesforce fields found on each object type. If you’ve created custom fields for your Cases or Knowledge Articles, you can edit the configuration of your connector after installing the app to ensure these fields are pulled into Yext.
- Navigate to Knowledge Graph > Connectors and click on the connector you’d like to customize.
- Click Edit Configuration in the top right corner of the screen.
- In the “Specify Selectors” step, click Add Selector.
- Choose whatever name you’d like for the Header.
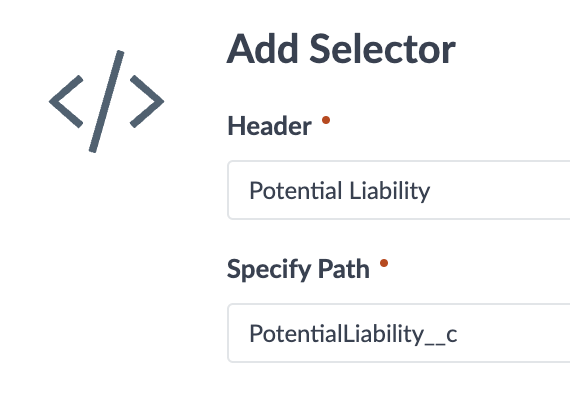
- For the Specify Path field, you’ll need to enter a JMESPath selector matching the custom field as it appears when you click View Raw Response in the top right corner of the configuration screen.
For example, a custom field called Potential Liability might show up in the raw response from Salesforce in the following format:
"PotentialLiability__c": null,The JMESPath selector you’d enter into the “Specify Path” field would be PotentialLiability__c
 6. Once you’ve added your new selector, you can map the value to the desired field in Yext in the final Map Data step!
7. Once you’re finished, click Save. All subsequent connector runs will now pull in your newly added custom fields!
If you’d like to pull in objects from Service Cloud other than Cases and Knowledge Articles, you can utilize our native Salesforce Source to create your own connector as described below!
Create a Custom Connector Using Our Native Salesforce Source
Building a connector using our native Salesforce Source provides the highest level of flexibility, allowing you to pull any object that exists within your Salesforce instance into your Knowledge Graph.
- Navigate to Knowledge Graph > Connectors and click Add Connector.
- Select Salesforce as the Connector Source.
- Select the Linked Salesforce Account you previously configured from the dropdown.
- Provide your full Salesforce Instance URL.
- Enter the name of the Object you’d like to pull in from Salesforce. This could be any standard or custom object type. Click Continue.
- In the “Specify Selectors” step, you are given the chance to select any fields on the object which you’d like to pull into Yext.
- Clicking “View Raw Response” will show all of the raw data coming directly from Salesforce, and show the various fields you can select to be pulled into Yext.
- You can add each selector individually by clicking Add Selector, or start by hitting Add Default Selectors to automatically detect an initial set of values from the raw response.
- If you’d like to manipulate the data before pulling it into your Knowledge Graph, you can select Add Transform to alter the raw data as desired before mapping it to a field within Yext.
- Lastly, in the Map Data step, select the Entity Type you’d like to use to represent these objects in Yext. Then, map each desired piece of data to a field on the selected Entity Type.
- Once you’ve finished mapping each field, click Save. You will be prompted to give your new connector a name and choose whether you’d like to immediately run the connector to begin pulling in data!
- In the Connector Summary section, you can specify a schedule to run your connector automatically on a regular cadence.
When setting the schedule, there are two “Run Modes” to choose from. The Default mode will never delete entities once they’ve been created, even if the associated object in Salesforce no longer exists. The Comprehensive mode, on the other hand, will delete entities if the associated object in Salesforce no longer exists.
Congratulations on building your own custom connector! You can set up as many connectors as you’d like to pull in various object types from your Salesforce Instance.