
Experience Training | Yext Hitchhikers Platform
What You’ll Learn
By the end of this unit, you will be able to:
- Define what Experience Training is
- Explain how you can use experience training for three features: Featured Snippets, Inferred Filters, and Spell Checking
- Demonstrate using experience training tables to approve, reject, and change predictions
Overview
Experience Training is a great way to improve the quality of search results. It allows you to train the Search algorithm by providing it feedback on its predictions. It is a critical tool for debugging backend issues and optimizing results for all search experiences.
Rejecting or modifying a prediction overrides that query immediately. All feedback (approving, rejecting, or changing) helps Search improve the relevancy of results over time. The more feedback that you provide or corrections that you apply here, the better the algorithm can perform in the future.
Experience Training allows you to train the Search algorithm in three areas:
- Featured Snippets
- Inferred Filters
- Spell Checking
To train your experience in the UI, navigate to the desired experience under Search and find the Training section. Here you’ll find a screen for each of the above three areas. You can also find it via configuration as code (CaC) (learn more in the Experience Training config-as-code resource doc).
For a full list of attributes found in the experience training table, check out the Experience Training Table reference doc.
Core Experience Training Features
Each Experience Training screen shows a table of predictions made by an AI/machine learning model within Search, organized by search term for the last seven days. There’s a row for every prediction for each search term, so a search term may have multiple predictions. There are a few reasons why this happens:
- The results set can change (through changes in your Knowledge Graph or in the Search configuration)
- The algorithm gets retrained as it gets more feedback and makes a new prediction
There are a few features that will come in handy when reviewing any of the three experience training tables:
- Search bar: Use the search bar above each table to search for specific search terms you want to see training predictions for.
- New vs. Completed: Use the “Show completed” toggle above each table to see the training predictions that have already been approved, rejected, or modified. This makes it easier for users to find completed training examples, especially when debugging.
- Search Count: The number of searches for that search term in the last 30 days. Sort by this column to see the most frequently searched terms.
- Last Searched: See the most recent search time for each search term. The table is sorted by this column by default.
- Training Actions: In the right column of each table is a set of action buttons to approve (checkmark icon), reject (x icon), or change (wand icon) training predictions suggested by the algorithm.
Featured Snippets
On the Featured Snippets training screen, you’ll see a table of search terms for which the algorithm returned one or more potential featured snippets. Featured snippets extract a direct answer to a user query from unstructured data. Check out the Direct Answers unit for more detail on featured snippets.

With the Featured Snippets training table, you’ll also see entity information, including the entity (hyperlinked) and field that the featured snippet came from, which is crucial context to determine whether or not a featured snippet is correct.
With featured snippets training, there are three possible actions you can take: approve, reject, or change:
- Reject: Suppress it from the results set and never return that snippet back to the end user
- Approve: Train the algorithm. Additionally, this result can now display on search verticals with the featured snippets prediction mode set to
APPROVE_ONLY. - Change: The modified snippet will show in future search results. Editing snippets is not currently supported for snippets pulled from files.
APPROVE_ONLY, changing the underlying content of an approved featured snippet will mean that snippet is no longer approved. You’ll have to re-approve the featured snippet if you want it to appear with the updated content.
Change Featured Snippets Modal
When you click on the change wand button, you will see a pop-up modal that will allow you to approve, reject, or change featured snippets. If the algorithm identifies the incorrect portion of text from your entity, you can select a different portion of text to be used as the featured snippet for the query going forward. You can also change the entity the featured snippet pulls from through the Search Merchandiser change featured snippets mode (you’ll learn more about this in the next unit).
When selecting the new featured snippet to return, the UI will act a bit differently depending on whether the featured snippet uses rich text or not. The right side of the modal shows the algorithm’s answer versus selected answer.
When changing plain text featured snippets, click and drag your mouse across the text you want returned. The modal will automatically expand the highlighted section to only include full words.
When changing rich text featured snippets, enable the Rich Text toggle, and select the text you want to appear in the results by individually clicking the paragraphs or sections in sequential order.
Inferred Filters
On the Inferred Filters training screen, you’ll see a table of search terms that had inferred filters applied. The Filters column shows the vertical the filter was applied to, the field the filter was applied to, and the field value to filter on. Check out the Searchable and Display Fields unit for more detail on inferred filters.
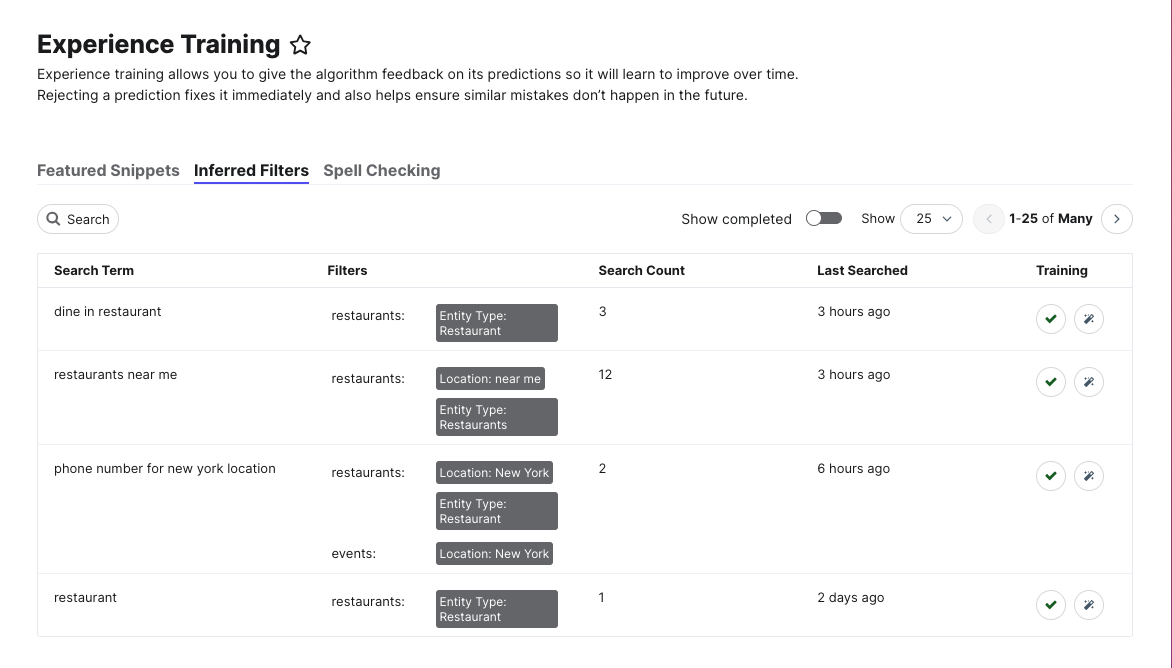
With inferred filters training, there are two possible actions you can take: approve or change. Approving inferred filters helps to train the algorithm to better understand your brand and preferences. Changing the inferred filters overrides other algorithms occurring in the backend to allow the new inferred filters to be applied.
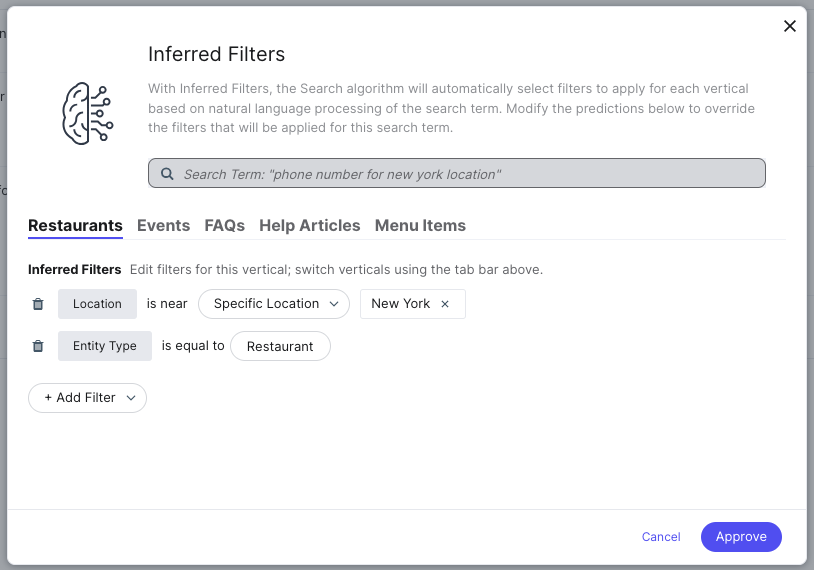
By choosing to change filters, you can add, remove, or change the filters applied for a specific query. Since each filter has a vertical, field, and value, those are the pieces you can change.
For example, when a user searches “jobs in New York” the algorithm may apply the filters Entity Type = Jobs and Location = York to the Jobs vertical. However you want the location filter to be “New York”, not “York”. You can override this result by selecting the proper vertical (i.e., Jobs) in the modal and then editing the Location filter to be near New York.
Spell Checking
On the Spell Checking training screen, you can review any suggested spell checks and approve or reject the corrections. These are solely based on the search terms entered. If you reject a correction, the algorithm will no longer surface that correction when that search term is run for that experience.

A featured snippet shows as approved in the Experience Training screen, but no longer surfaces in the search results. What's the most likely explanation?
What components do you have to select values for to add a new inferred filter for a search term?
What happens when you reject a spell check suggestion in Experience Training? Select all that apply.
You're a star! ⭐
