
Customize Templates | Yext Hitchhikers Platform
What You’ll Learn
In this section, you will:
- Add new Knowledge Graph content
- Update a streams-generated page template and preview those changes
- Update a static page
Overview
Now that you’ve learned about the two types of templates included in the starter repo, let’s learn how to customize them!
The starter repo has fleshed out templates for both the streams-generated page template (location.tsx) and static pages (static.tsx), so we’ll walk through how to customize them from there.
Customize Streams-Generated Page Templates
Since streams-generated page templates create pages for entities from the Yext Knowledge Graph, you’ll need to update both your Knowledge Graph and the template in your repo.
The src/templates/location.tsx file in the starter repo already uses a handful of fields from the location entity — such as name, address, and mainPhone — but you may want to add others.
Let’s say Turtlehead Tacos is now offering catering. Now every location should display a dedicated catering phone number that we’ll surface on location pages. To set this up, we will:
- Add the content in the Knowledge Graph
- Configure the Knowledge Graph to store the content
- Fill in the content for each location
- Update the stream for location.tsx
- Update the template for location.tsx
- Preview your updated template
1. Add Content to the Knowledge Graph
The first step is making sure you have the content you want to use in the Knowledge Graph.
A. Configure the Knowledge Graph
Catering phone numbers are not currently stored in the Knowledge Graph. First add a custom field so you have a place to store the information. In the catering phone number example, you may add a custom field with a configuration like:
- Field Type = number
- Field Name = “Catering Phone Number” (the API name will automatically fill in as
c_cateringPhoneNumber) - Field Availability = location (this says to add the field to the “location” entity type)
B. Fill in the Content
Now that you have a catering phone number field for location entities, fill in the content for each one! You’ve got a few options for updating content in the Knowledge Graph .
We suggest you upload a spreadsheet . You can also navigate to Knowledge Graph > Entities and filter for locations, then click into each individual entity to edit or edit entities in bulk .
2. Update the Stream for location.tsx
A Stream is the vehicle that delivers Knowledge Graph data to Pages as JSON documents. Every Streams-powered template requires a Stream definition, which is a named export of type TemplateConfig. The fields and entity types in the Stream definition determine what data is available to the template.
The Pages architecture generates web pages programmatically through streams. A stream allows you to push a configurable set of data from the Knowledge Graph to Pages for page generation.
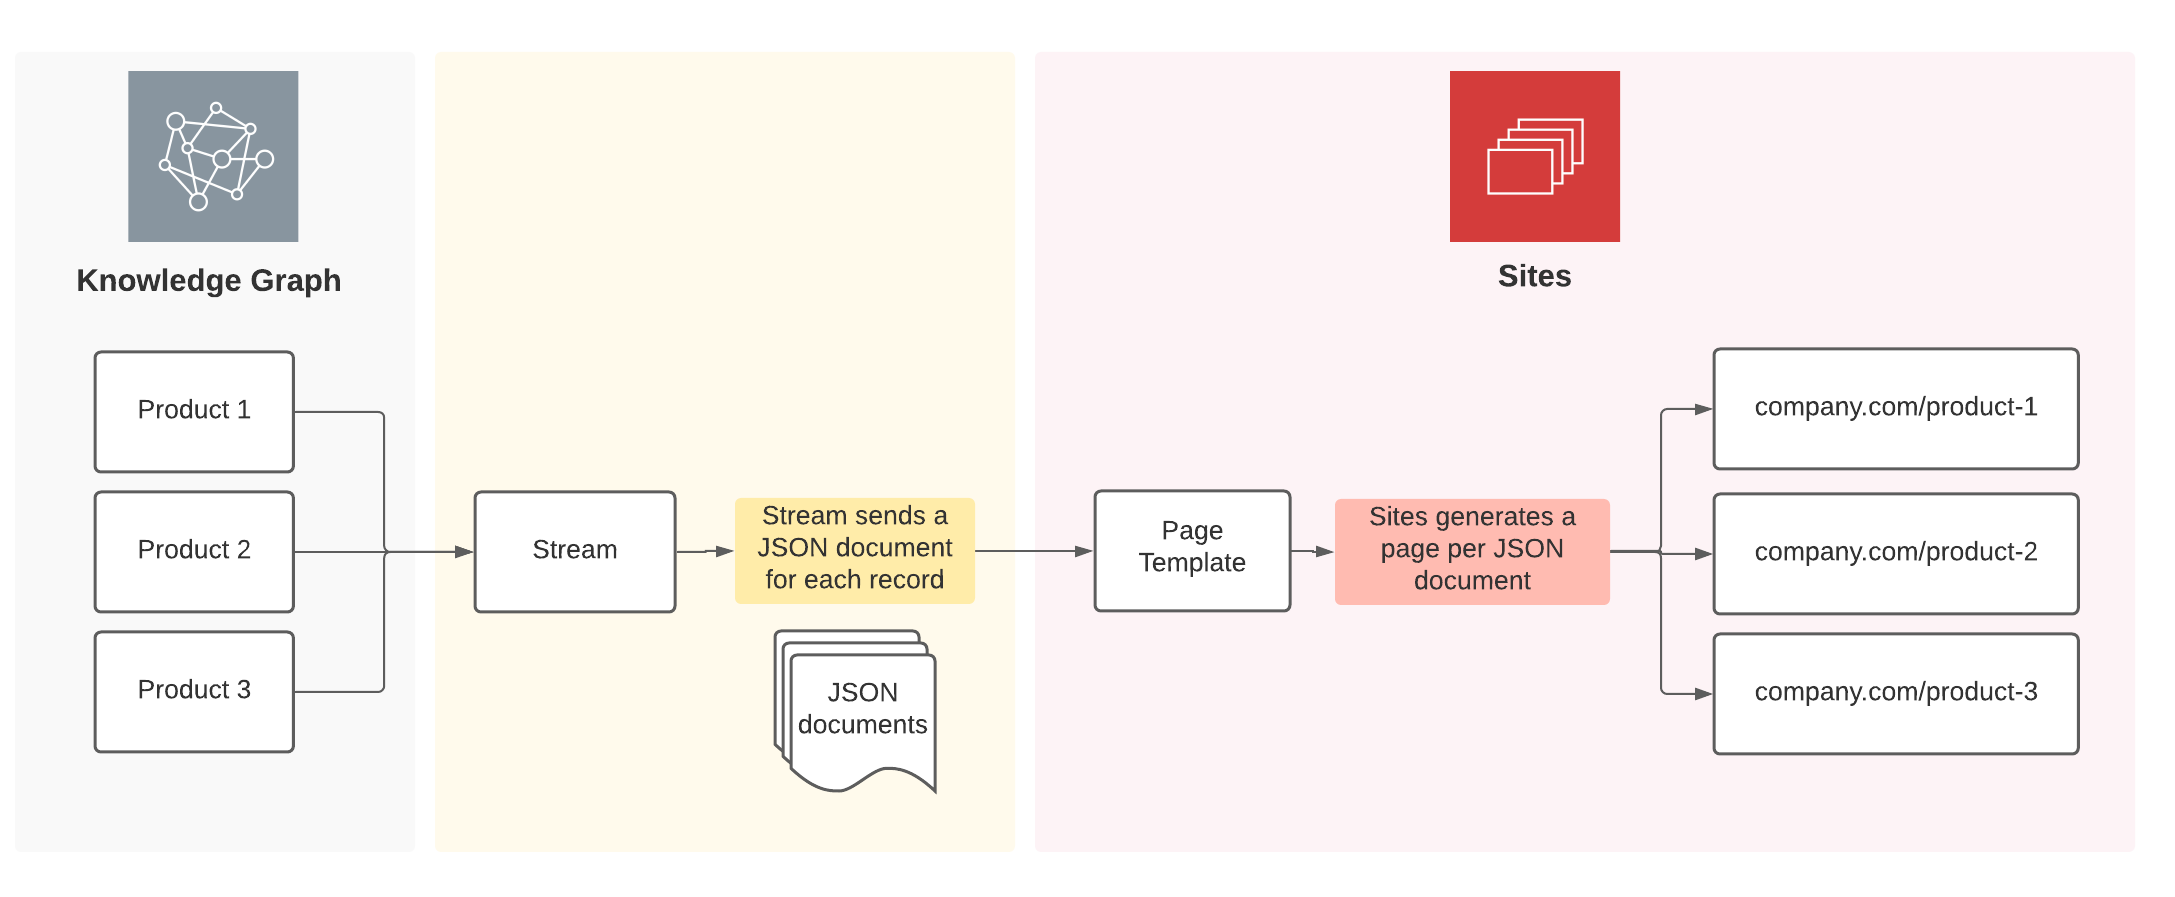
Typically, you will create a separate stream for each entity type to programmatically generate the set of relevant pages. Each stream will use its own template, tailored to the data in that stream.
A. Add Field to the Stream
In your repo, navigate to src/templates/location.tsx . Take a look at the stream defined. You’ll notice a few key sections of the stream:
export const config: TemplateConfig = {
  stream: {
    $id: "my-stream-id-1",
    fields: [ **array of fields here** ],
    filter: {
      entityTypes: ["location"],
    },
    localization: {
      locales: ["en"]
    },
  },
};
The fields array designates the fields that are being pulled in from these entities. Since we want to use a new field in the HTML template, add the API name of the field to this array: c_cateringPhoneNumber
"c_relatedProducts.name", "c_relatedProducts.price".
B. Pull Stream Changes into Local Data
- Navigate to your
/localDatafolder and open one of the streams json files that we generated earlier. Notice that it contains strictly the fields we specified in the previous version of our Stream. - In your terminal, ensure you’ve killed your previous local dev server command (CTRL + C) and run
npm run devwhich will rebuild yourfeatures.jsonto specify the new field. Your local data files will regenerate to account for this change.
You should now see the catering phone number field we just added pulled directly into the document from your Knowledge Graph!
C. Other Stream Customizations
There are other configurations you can modify:
filter- This stream filters by the entity type “location”, meaning all location-type entities will have a landing page generated using this template.- It is most common to filter based on entity type, but you can also use saved filters here or filter on specific fields, say if there is a field that indicates whether entities should have a landing page.
localization- By default, pages will be generated only for theen(English) entity language profile. Update or add language profiles in thelocalizationfield to generate pages in other language profiles.
3. Update the Template for location.tsx
This is the fun part! Now you can use the fields you imported to display content where and how you want.
Since c_cateringPhoneNumber is specified in the fields array of the config, you will now have access to it in the default export. Just like the other fields, you can access c_cateringPhoneNumber on props.document. A super simple example:
const Location: Template<TemplateRenderProps> = ( { document }) => {
  const { c_cateringPhoneNumber } = document;

  return (
    <>
      <h1>
        Catering Phone Number {c_cateringPhoneNumber}
      </h1>
    </>
  );
};
If you are following along, practice pulling in the new field, and check it out on one of your location pages.
4. Preview Your Updated Template
To start your local dev server and preview changes as you make them, run the following command in your CLI:
npm run devThis will spin up your site at localhost:5173 in your browser. Navigate to the pages of your site just as we did before in the
Create & Deploy Your Site unit
.
If you go to the one of the location pages for which you added a catering phone number, you should now be able to see it.
Customize Static Pages
Static pages can be updated like any web page page using HTML, CSS, JS, and React. Let’s update the copy on the about page - it’s currently got some Latin placeholder text.
In your repo, navigate to ./src/templates/static.tsx and modify the JSX to your heart’s content.
Notice that the starter repo pulls in data from an external API, which is then rendered in the template. Experiment with pulling in external data, bearing in mind that the call to the external API occurs at build-time, not when the page is visited in the browser.
.const Static: Template<ExternalImageRenderData> = ({ relativePrefixToRoot, path, document}) => {

  return (
    <>
      <PageLayout>
        <div className="centered-container">
          <div className="bg-red-900 text-5xl font-bold text-white p-10 flex items-center justify-center flex-col gap-x-14 gap-y-10 md:flex-row">
            <h1>Welcome to Turtlehead Tacos</h1>
          </div>
          <div className="space-y-5">
            <p>
              Lorem ipsum dolor sit amet, consectetur adipiscing elit, sed do eiusmod tempor incididunt ut labore et dolore magna aliqua. Ut enim ad minim veniam, quis nostrud exercitation ullamco laboris nisi ut aliquip ex ea commodo consequat. Duis aute irure dolor in reprehenderit in voluptate velit esse cillum dolore eu fugiat nulla pariatur. Excepteur sint occaecat cupidatat non proident, sunt in culpa qui officia deserunt mollit anim id est laborum.
            </p>
            <p>
              Sed ut perspiciatis unde omnis iste natus error sit voluptatem accusantium doloremque laudantium, totam rem aperiam, eaque ipsa quae ab illo inventore veritatis et quasi architecto beatae vitae dicta sunt explicabo. Nemo enim ipsam voluptatem quia voluptas sit aspernatur aut odit aut fugit, sed quia consequuntur magni dolores eos qui ratione voluptatem sequi nesciunt. Neque porro quisquam est, qui dolorem ipsum quia dolor sit amet, consectetur, adipisci velit, sed quia non numquam eius modi tempora incidunt ut labore et dolore magnam aliquam quaerat voluptatem. Ut enim ad minima veniam, quis nostrum exercitationem ullam corporis suscipit laboriosam, nisi ut aliquid ex ea commodi consequatur? Quis autem vel eum iure reprehenderit qui in ea voluptate velit esse quam nihil molestiae consequatur, vel illum qui dolorem eum fugiat quo voluptas nulla pariatur?
            </p>
            <div>
              <Card {...externalImage} />
            </div>
          </div>
        </div>
      </PageLayout>
    </>
  );
};
Save your changes and take a look at the updated page in your local dev server (if you’re not running your local dev server, run npm run dev)!
While Yext Pages is primarily used to create landing pages from entities in the Knowledge Graph, most website have a handful of static pages, such as “index’ or “about” pages.
Customize Components
You’ll also notice that the templates also uses custom components defined in the ./src/components folder. It’s best practice to create custom components for any content on your site that will be repeated, like the header and footer.
You can also create your own custom components. If you prefer a different directory structure, feel free to put your components wherever, but you must observe two rules:
- All custom files or directories must live under the
srcdirectory if you want to import them into your templates - Any custom files or directories that are not templates must NOT live in
templates
Why does every streams-powered page template need a stream definition?
Where in the page template do you specify where and how you want fields to display on the page?
Climbing that leaderboard! 📈
