
Set Up Multi-Lang Streams | Yext Hitchhikers Platform
What You’ll Learn
In this section, you will learn:
- How to access language profile data in your Pages UI
- How to preview multi-lang pages
Overview
Streams power the transfer of language profile data from the Knowledge Graph to your Pages templates. Once your stream is correctly configured, PagesJS will generate a unique page for each language profile.
By using the built-in Streams API, Pages does all the heavy-lifting for you, so you don’t have to worry about language-specific code.
Configuring your Stream
To access language profile data, we need to configure the stream used to power the location templates. In src/templates/location.tsx , we will add an “es” locale. See the code below:
export const config: TemplateConfig = {
  stream: {
    $id: "my-stream-id-1",
    fields: [
      "id",
      "uid",
      "meta",
      "name",
      "address",
      "mainPhone",
      "description",
      "hours",
      "slug",
      "geocodedCoordinate",
      "services",
    ],
    filter: {
      entityTypes: ["location"]
    },
    localization: {
      // We are including "es" in the locales array to generate a Spanish page for every location entity
      locales: ["en", "es"]
    },
  }
};
For the simplest case, we have just added "es" to the locales array to specify that Pages should generate a Spanish language page for each location entity with a Spanish profile.
If you add other language profiles to your Knowledge Graph, all you need to do is add the appropriate localeCode to the locales array. Note that primary must be false when you have more than one locale.
In the example above, we are filtering by location entity type, which means the stream will only return entities of type location. While this will certainly work, it is a best practice to use a saved filter to ensure that all entities meet certain criteria. Common examples of saved filters check that the slug field is not null or that a business is not closed.
You can learn more about saved filters here . For more details about setting up production-grade multi-lang pages, be sure to check out this reference doc .
Configuring Your Path
We also need to set up our path to use the Slug field we configured in the Knowledge Graph. In our case, we want our locations to live at following URL pattern: /[[localeCode]]/[[entityId]]
You are free to use whatever path you choose, but you must ensure every page has a unique URL to avoid URL collision build errors. Configure your getPath function to return document.slug or you can use the function below.
 export const getPath: GetPath<TemplateProps> = ({ document }) => {
  return document.slug;
};
Because we have already configured the slug in the Knowledge Graph, we can simply return the slug in the getPath function.
Once you have configured your getPath function no further modifications will be necessary if you add other language profiles in the future. Just make sure to specify the correct slug structure in your Knowledge Graph as demonstrated in the previous unit.
Test It Out
Amazingly, that is all the configuration required to power your Pages UI with multi-language data! Pages will use the multi-locale stream configuration to generate a location page for each English and Spanish profile.
In the last unit, we translated the name of Turtlehead Tacos into Spanish (Restaurante Turtlehead Tacos), so on all location pages that live at /es/* we should see the Spanish title. Let’s test it.
To test locally, you will need to do a production build to ensure the local URL paths exactly match those use in production.
It is possible to preview your pages in development mode using npm run dev. Currently, local development defaults to displaying pages in English (en). To preview a page in another language, add the following query parameter to the end of your URLs: ?locale=[localeCode]. For example, http://localhost:5173/location/xxxxxxxxx?locale=fr.
If you are editing your templates structure, dev mode works well, but to preview the URL structure exactly as it will work in production, we recommend testing using the production build. To run and preview a production build, run yext pages develop.
You should run the following commands:
yext pages generate- Build and generate the required pages for local testing.
yext pages generate-test-data- Pull test data from the Knowledge Graph into the
localDatafolder. - If you want to generate test data only for your Spanish language profiles, you can run
yext pages generate-test-data --locale es.
- Pull test data from the Knowledge Graph into the
yext pages serve
- Serve your site locally.
Now you can visit Turtlehead Tacos at localhost:8000 and check out the Spanish language pages.
When you pull local data from your Knowledge Graph, only a subset of entities will be available on your local machine. To see which pages you have locally, navigate to localhost:8000/s or any page that returns a 404. This will take you to the Yext Development Page, where you can see which pages are available locally, like this:
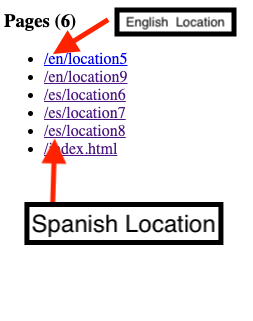
Your location IDs might differ, but the title on /en/location5 reads, “Turtlehead Tacos” and the title on /es/location8 reads “Restaurante Turtlehead Tacos.” Exactly what we wanted!
Any fields used in your template that have profile-specific values will now be reflected in your Pages UI.
What steps do you need to take in your Pages templates to generate pages for a new language profile?
High five! ✋
