

Step 1: Pulling WordPress Data into Yext
You have three options to pull in WordPress data to Yext, depending on the content type and whether your site is public or private.
Part 1: Using Built-in WordPress Connectors
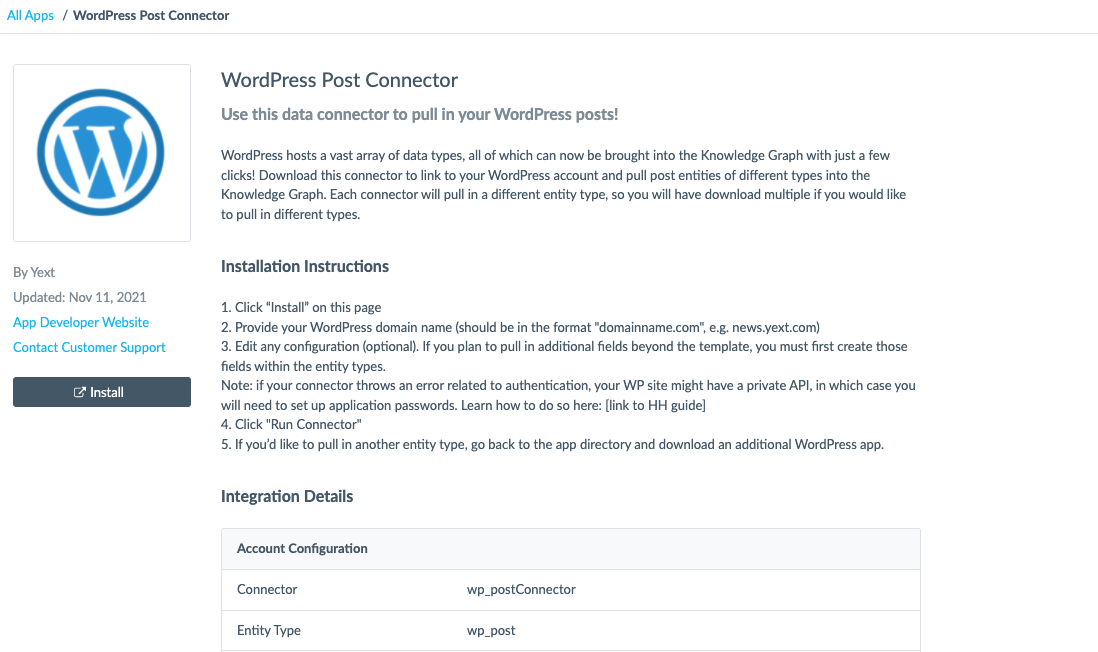
To pull in posts, pages, or media from your WordPress site, you can use one of our pre-built connectors that streamline the data connection process. If you’d like to pull in a different entity type, skip to the next section of this guide.
- Navigate to Apps > Directory and select WordPress Post / Page / Media Connector.
- Review the instructions and click Install.
- Provide your WordPress domain name. It should be in the format
https://www.domainname.com. Note: do not add any final slash or slugs to the URL.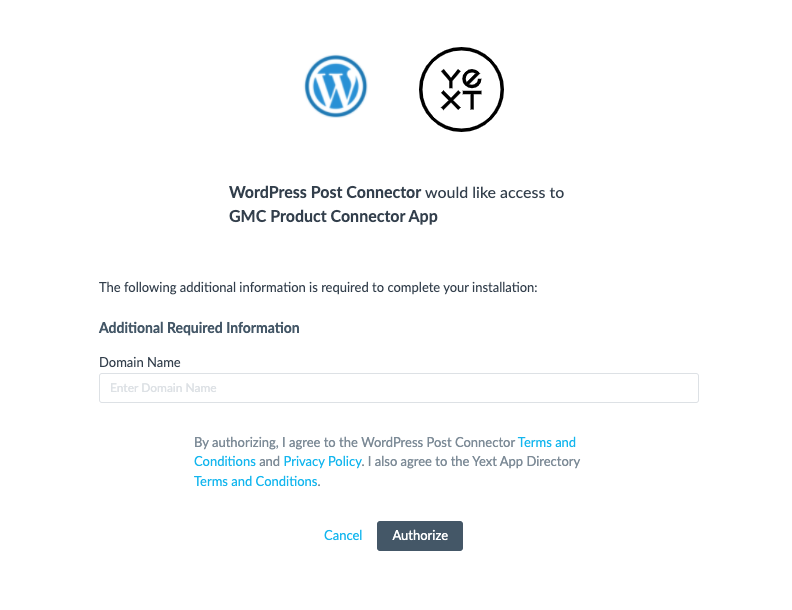
- You will be redirected and the connector will automatically run. If no entities are pulled in, click Edit Configuration to see if there is an authentication-related error. If so, your WordPress site may have a private API, in which case you will need to set up application passwords. Learn how to do so in Part 3 below .
- (Optional) If you would like to add or edit fields on the incoming entities, you can click Edit Configuration. You can then add or remove selectors, add transforms, or re-map fields (read more about configuring connectors in steps 3-5 of
this guide
).
- Note: If you plan to pull in any additional fields beyond the template, you must first create those fields within the entity types.
- If you’d like to pull in another entity type (posts, pages or media), go back to the app directory and download an additional WordPress app. If you’d like to pull in any other entity type, keep reading onto the next step!
Part 2: Pulling in other entity types (not pages, posts, or media)
If you’d like to pull in a different WordPress entity type like users, categories, or a custom entity type, you can do so by following these steps! Note: You will need to know the name of the WordPress entity type to complete these steps. If the entity type is not listed here, consult the developer who built your WordPress site to identify the entity type’s name.
Before setting up the connector, you’ll have to make sure you have a Custom Entity Type and Fields set for the new content type you want to pull in. You can do this by following these guides:
Once your custom entity type is set up and enabled, navigate to Knowledge Graph > Connectors in Yext.
Click the + Add Connector button.
When prompted to select a Connector Source, select WordPress.
You will then see two operations: Fetch Content and Fetch Content (Private API). If you know that your WordPress site requires authentication to reach its API endpoint, choose the second option and follow the instructions in the next section to access your credentials. Otherwise, just select Fetch Content.
Next, select your content type. You can choose posts, pages, media, or a custom entity type of your choice. Select Custom Type and input the name of the desired entity type.
Click Continue in the bottom right corner to go to the Specify Selectors page. Note: for an in-depth guide for the following steps, we recommend consulting our generic Data Connector module .
Add Selectors to identify which fields of your custom entity type to pull in. Add transforms to manipulate data as necessary. Click Next.
Map the appropriate fields to fields on the Yext entity.
Run the connector and watch your new entities enter the Knowledge Graph!
Part 3: Authenticating into Private APIs
If your API pulls in the previous steps were unsuccessful due to an authentication-related error, use the steps below to handle this. There are two main approaches to handling this problem: 1) Make your WordPress Rest API endpoints public or 2) Use a password to give Yext access to your Rest API (and keep it private).
If you’d like to make the site public, follow these steps:
- Download a ZIP file of this WordPress plugin by clicking the green Code button, and then Download .zip.
- Navigate to your WordPress site dashboard and click on Plugins on the left-side navigation bar.
- On the top of the page, click Add New.
- On the top of the page, click Upload Plugin and choose the file you just downloaded to upload to WordPress. Click Install Now.
- After the plugin has been installed, click Activate Now.
- Navigate to Settings > Reading from the left-side navigation bar
- Under the REST API Availability section, click Publicly Accessible to make your Rest API endpoints public.
- Wait about 15 minutes, and then return to Yext to run the connector one more time. Your REST API should now be public and the connector should pull in entities! If an error persists, contact your Yext Administrator to troubleshoot further.
If you’d like to add application passwords, follow these steps:
- On your WordPress site dashboard, navigate to Users > All Users.
- Hover over any user with the role Administrator, and click Edit below their name.
- Scroll down to the Application Passwords section. Type in a New Application Password name and click Add New Application Password.
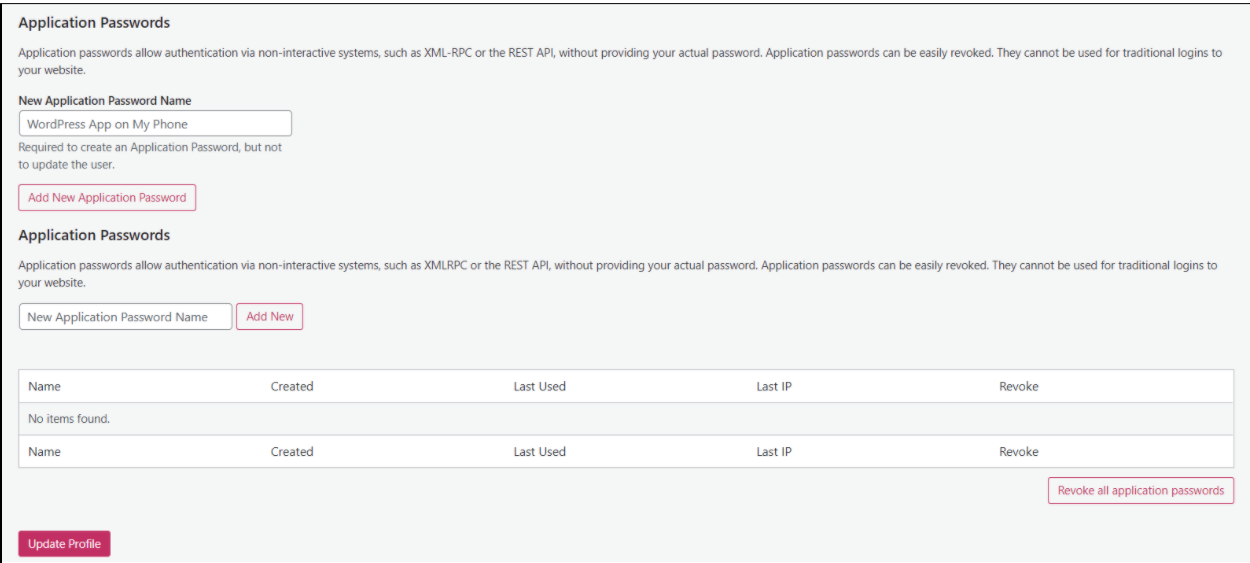
- A pop-up notification will show you your application password. Copy it down elsewhere, as you will not be able to access this 16-digit code once again.
- Wait roughly 15 minutes, and then return to the Yext to create a new connector by selecting + Add Connector > WordPress. As your operation, select Fetch Content (Private API).
- Under Username, input your WordPress username (not your email– you can find your username on your WordPress profile settings). Under Password, copy your 16 digit application password.
- Click through the rest of the connector flow, Save the connector, and click Run! The connector should pull in entities without a problem, but if an error persists, contact your Yext Administrator to troubleshoot further.