Step 7: Further Integration Options
Optional: Typed Animation in Search Bar
One UI trick to encourage more users to search is to include rotating prompts in the search bar. While the Search JS library doesn’t support this by default, this can easily be added using Typed.js.
To integrate typed animation into your search bar, you’ll replace the code provided for your document_head.hbs file in step
Add to your Help Center
with the code block below. Be sure to replace the variables with values specific to your Search experience.
<meta content="width=device-width, initial-scale=1.0" name="viewport" />
<head>
<!-- Other stuff in the head here -->
<link
   rel="stylesheet"
   type="text/css"
   href="https://assets.sitescdn.net/answers-search-bar/v1.6/answers.css"
/>
<script src="https://assets.sitescdn.net/answers-search-bar/v1.6/answerstemplates.compiled.min.js"></script>
<script src="https://cdn.jsdelivr.net/npm/typed.js@2.0.11"></script>
<script src="https://cdn.jsdelivr.net/npm/axios/dist/axios.min.js"></script>
<script>
  function initAnswers() {
    const apiKey = "[[REPLACE API KEY]]";
    const experienceKey = "[[REPLACE EXPERIENCE KEY]]";
    const experienceVersion = "PRODUCTION";
    const businessId = "[[REPLACE BUSINESS ID]]";
    const locale = "en";
    ANSWERS.init({
      apiKey: apiKey,
      experienceKey: experienceKey,
      experienceVersion: experienceVersion,
      locale: locale, // e.g. en
      businessId: businessId,
      templateBundle: TemplateBundle.default,
      onReady: function() {
        this.addComponent("SearchBar", {
          container: ".search_form",
          name: "search-bar", //Must be unique for every search bar on the same page
          redirectUrl: "[[REPLACE REDIRECT URL]]",
        });

        // Make API Call to Options
        var url = 'https://liveapi-cached.yext.com/v2/accounts/me/answers/autocomplete';
        url += '?v=20190101';
        url += '&api_key=' + apiKey;
        url += '&sessionTrackingEnabled=false';
        url += '&experienceKey=' + experienceKey;
        url += '&input=';
        url += '&version=' + experienceVersion;
        url += '&locale=' + "en";

        axios.get(url).then(function(response) {
          // Get strings from response
          const strings = response.data.response.results.map(function(r) {
            return r.value;
          });

            // Set up Typed
          var options = {
            strings: strings,
            showCursor: true,
            cursorChar: "|",
            typeSpeed: 55,
            backSpeed: 30,
            smartBackspace: true,
            loop: true,
            startDelay: 500,
            backDelay: 2000,
            attr: "placeholder",
          };

          var typed = new Typed(".js-yext-query", options);
        });
      },
    });
  }
</script>
<script
   src="https://assets.sitescdn.net/answers-search-bar/v1.6/answers.min.js"
   onload="ANSWERS.domReady(initAnswers)"
   async
   defer
></script>
</head>
You can find our Hitchhikers guide as well as a working example here .
Optional: Integrate via Overlay
What if you want the search experience to be easily accessible on all pages across your site? You can add the search bar and search results experience within a single, simple overlay module.
With the Search Overlay, you’ll be able to add a module to any page of your choosing that allows users to search & view results from within the module itself.
To integrate Yext Search via overlay you can follow the steps found in the
Integrate with the Overlay
step or our Search Integration Guide. You can integrate the overlay onto any page, but we recommend putting it in your home_page.hbs file to start.
Feel free to alter the inputs so the overlay frontend aligns with your branding.
Optional: Zendesk Frontend Carousel
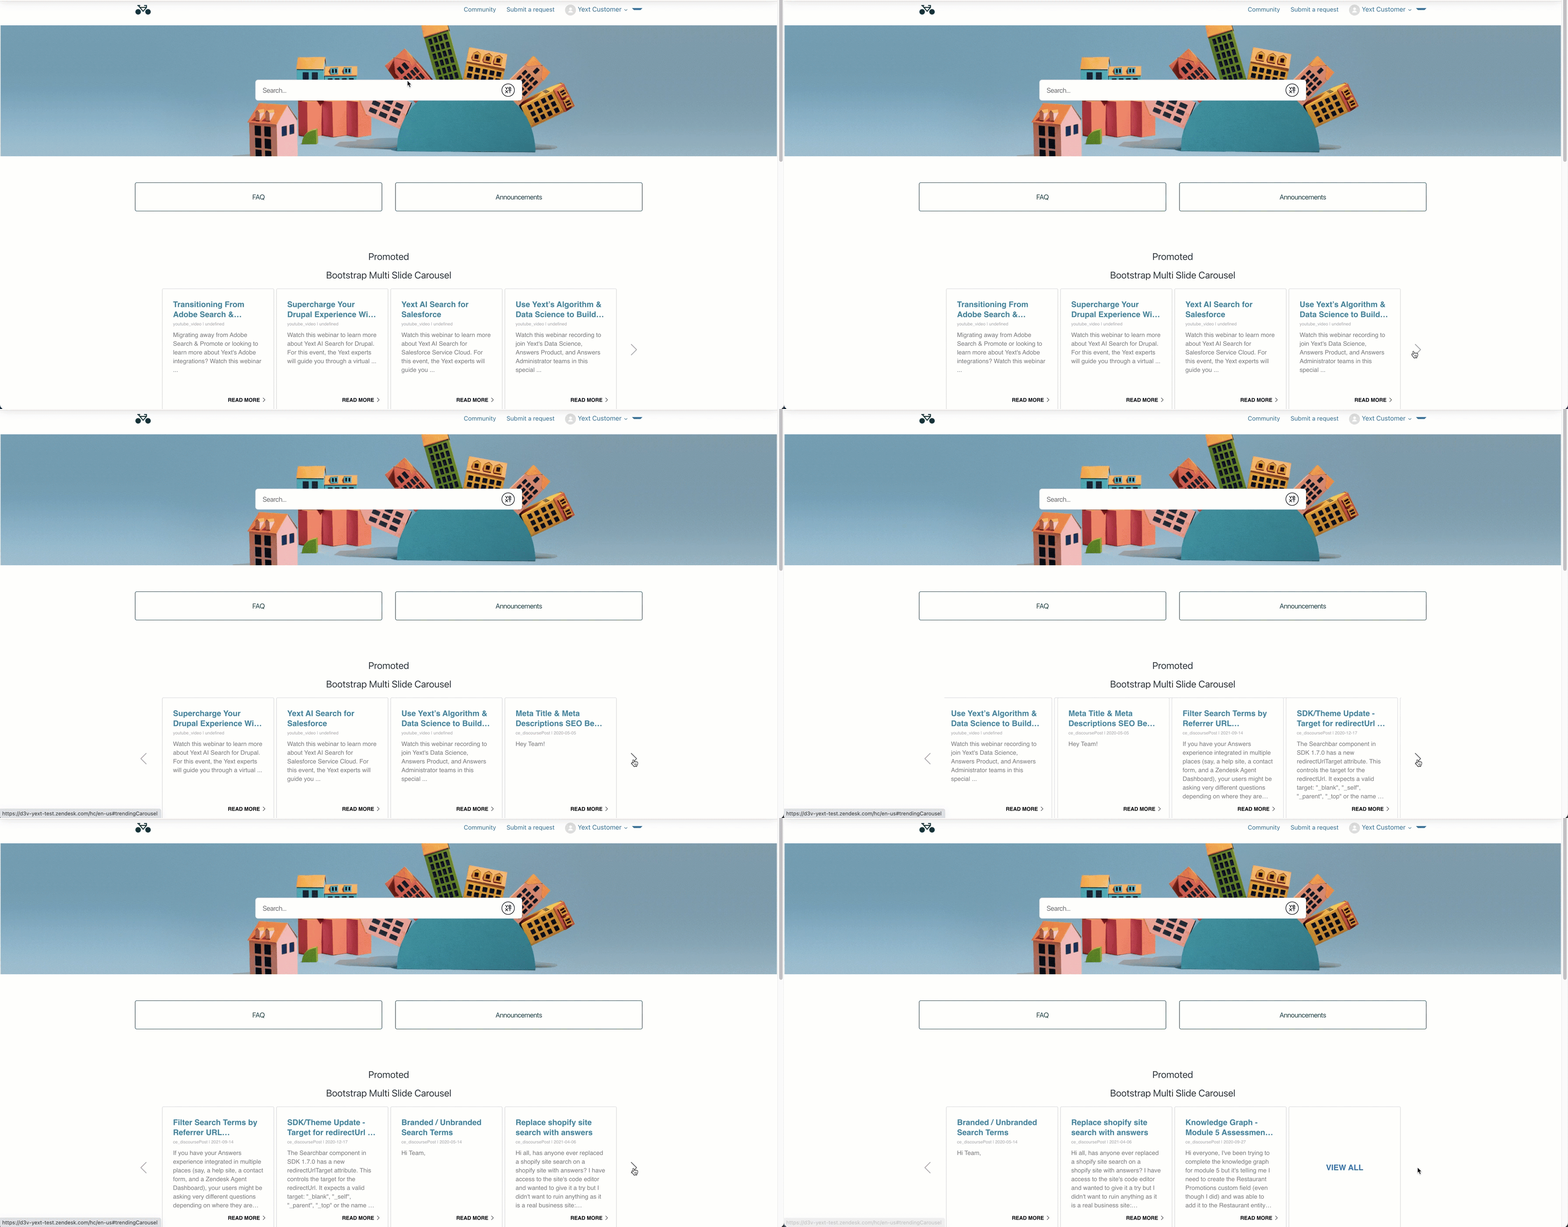
Use the Yext Search API to power a stream of content on your help site
There are a variety of creative ways to leverage the structured information in the Knowledge Graph beyond serving a traditional Search experience. Yext’s variety of consumer-grade APIs makes it easy for developers to use data (entities, results, analytics) from their Knowledge Graph to power a variety of creative applications.
One such way in the support space, is to call the Universal Search Endpoint and map the returned fields to a rotating carousel of content cards displayed on your help site. This is just one example of an incredibly flexible framework (just change your query input!) that’s equally as lightweight to implement.
Zendesk admins should reference this GitHub repo to see what changes are needed to implement an example of this carousel and achieve the below result. Simply copy and paste the provided code into the specified portal files, making sure to update the ‘REPLACE_ME…’ variables with your Yext-specific Search experience details.


