

Authentication | Yext Hitchhikers Platform
Yext allows you to authorize access of your website (or parts of it) to a specific set of users.
This is useful if you want to create company intranet experiences, host “private” content, or require a password for your site during an early access period.
Levels of Security
Yext supports the following levels of access for your site (refer to the secure sites guide to learn more). These levels of security can be applied to your full site, or to specific paths within your site:
- Public: Default setting for all Yext sites; allows anyone in the world to access your site
- Basic Password Protection: Allows any user with a specific password to access your site
- OIDC: Allows site access to authenticated users via an IdP (identity provider), such as Okta , Auth0 , or Azure
- Yext IdP: Allows users logged into a specific Yext Account to access to your site
Setting up Secure Sites
Securing your site can be accomplished in two steps:
- Create an authentication policy.
- Link the authentication policy to your Pages repository.
Refer to the Set Up a Yext Auth-Protected Site guide for a full walkthrough.
Authentication Policy
An authentication policy (auth policy for short) is a JSON object that defines the authentication method Yext uses when someone accesses your site. In other words, it defines how Yext will identify who a user is, and whether or not they meet the authentication criteria of the policy.
Auth policies are defined in your Yext account, and can be created through the Admin Console (refer to the Create your Yext Auth Policy step in this guide for a walkthrough).
Refer to the simple example below, which authenticates via password:
{
  "$id": "example-auth-policy",
  "$schema": "https://schema.yext.com/config/pages/authentication-policy/v1",
  "name": "Password Policy",
  "authentication": {
    "password": {
      "passwordValue": "hello world"
    }
  }
}
To learn about other auth policy configuration options, such as OIDC and Yext IdP, refer to the authentication-policy JSON schema for a full list of properties.
Site-Level Authentication
Once you have defined an auth policy in your account, you can associate it with your site via the config.yaml file in your repo; simply specify your desired policyName within the authentication YAML block.
This means Yext will authenticate every page in your site, via the method defined in the provided auth policy.
Refer to the example below:
# Authenticates your site via each linked authentication policy
authentication:
  policyName: Password Policy
Page-Level Authentication
To secure specific pages in your site, you can specify a set of paths to associate with an auth policy. This can be useful if you want most of your website to be public, but lock down a specific section of pages based on a path pattern.
To do so, you can leverage the includePaths list to specify a list of paths and path patterns. Refer to the example below:
# Authenticates your site via each linked authentication policy
authentication:
  policyName: Password Policy
  includePaths:
    - /internal/*
Alternatively, you can specify a set of paths to not be associated with an auth policy. This is useful if you want most of your website to be secured, except for a specific section of pages that can be public.
To do so, you can leverage the excludePaths list to specify a list of paths and path patterns. Refer to the example below:
# Authenticates your site via each linked authentication policy
authentication:
  policyName: Password Policy
  excludePaths:
    - /external/*
Note: Only one of includePaths or excludePaths can be present in an authentication policy.
Deploying Your Site
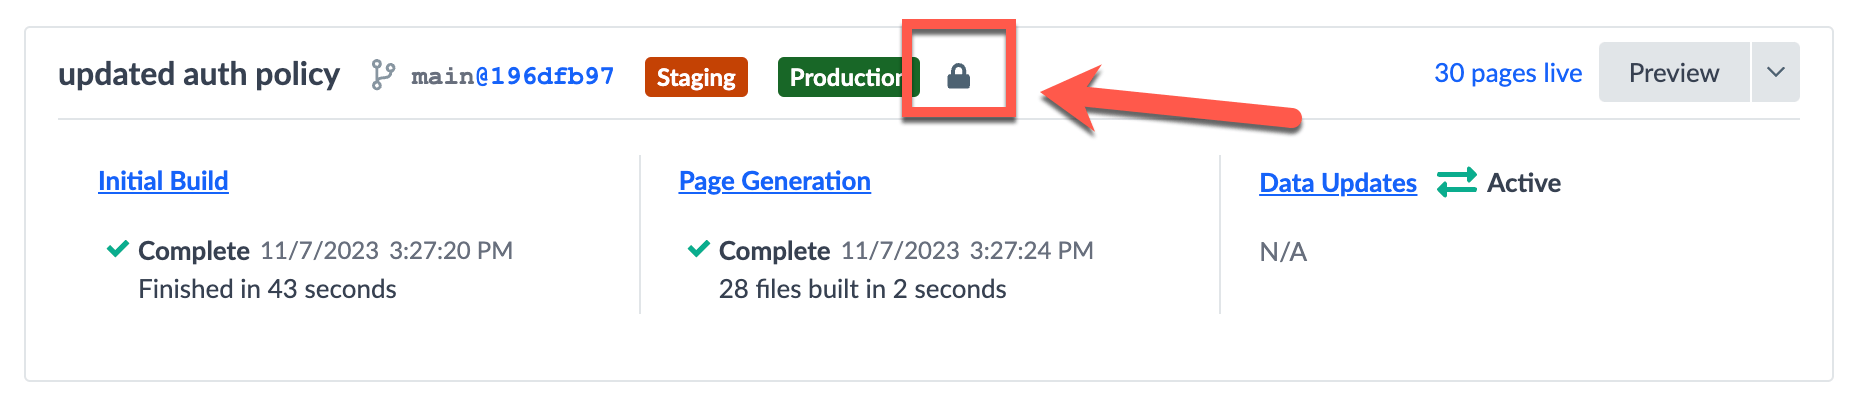
In order for your authentication rules to take effect, you must deploy your config.yaml file to production. Once your deployment completes successfully, you can confirm your auth policy is in effect via the “lock” icon next to your deployment.
FAQs and Troubleshooting
Q: How can I update an existing authentication policy?
A: Auth policies are immutable. In other words, once you define a policy, you must create a new auth policy if you wish to change it. To create a new auth policy, you can follow the instructions in the Create your Yext Auth Policy step in this guide.
Q: Can I set up a dynamic rewrite from an un-authorized path to a path that is gated behind an auth policy?
A: Yes. If a user is authenticated (and the Yext auth cookie exists in their browser), a user can access content that is fetched via dynamic rewrite.
Q: Can I test this during local development?
A: Consumer auth is not supported during local development; testing must be done by creating a deployment in the Yext platform.