Multi-Scope Repositories (aka "Multi-Brand") | Yext Hitchhikers Platform
Yext makes it easy to power multiple distinct websites based on the same underlying code repository. This is useful for creating many templated websites, each with their own unique requirements, while still being able to share code and structure across each website from a single repository.
This can be achieved by using “scopes”, which are values you can use to specify which code in your repository should be used for which site.
Repository Structure
You can create scopes by configuring the follow sections of your repository:
config.yaml
Each of your website scopes will require its own
configuration file
. To set this up, create a sub-folder per scope at the root of your project; each with their own config.yaml file:
.
├── [CONFIGURATION_SCOPE_1] // (e.g. locations.brand1.com)
│   └── config.yaml
├── [CONFIGURATION_SCOPE_2] // (e.g. locations.brand2.com)
│   └── config.yaml
├── src
│   ├── assets
│   ├── components
│   ├── styles
│   └── templates
│       ├── [CONFIGURATION_SCOPE_1]
│       │   ├── index.tsx
│       │   └── 404.tsx
│       └── [CONFIGURATION_SCOPE_1]
│           ├── index.tsx
│           └── 404.tsx
├── package.json
├── package-lock.json
├── tsconfig.json
├── tailwind.config.js
└── vite.config.js
Creating a config.yaml file per scope allows the Pages system to run a unique build for each of your scopes. This is what ultimately points to the templates and build assets required to generate the site for that scope.
Your config.yaml file should include the —-scope flag and point to your specific SCOPE_CONFIGURATION. Refer to the example below:
# example config.yaml
buildConfiguration:
  buildCommand: npm run build -- --scope REPLACE_WITH_SCOPE_CONFIGURATION
  installDependenciesStep:
    command: npm ci
    requiredFiles:
      - package.json
      - package-lock.json
      - .npmrc
Templates (src/templates)
Here, you can define a sub-folder per scope; this allows you to define a set of templates to be generated on a per-scope basis
In the example below, if you deploy a site using CONFIGURATION_SCOPE_1, Pages will generate brand1.tsx. If you deploy a site using CONFIGURATION_SCOPE_2, Pages will instead generate brand2.tsx.
.
├── [CONFIGURATION_SCOPE_1]
│   └── config.yaml
├── [CONFIGURATION_SCOPE_2]
│   └── config.yaml
├── src
│   ├── assets
│   ├── components
│   ├── styles
│   └── templates
│       ├── [CONFIGURATION_SCOPE_1] // e.g. locations.brand1.com
│       │   ├── brand1.tsx
│       │   └── 404.tsx
│       └── [CONFIGURATION_SCOPE_2] // e.g. locations.brand2.com
│           ├── brand2.tsx
│           └── 404.tsx
├── package.json
├── package-lock.json
├── tsconfig.json
├── tailwind.config.js
└── vite.config.js
If you want to use a template across all scopes, you can configure it at the root of your templates folder. For example, in the repository structure below, robots.ts would be used and generated for both scopes.
.
├── [CONFIGURATION_SCOPE_1]
│   └── config.yaml
├── [CONFIGURATION_SCOPE_2]
│   └── config.yaml
├── src
│   ├── assets
│   ├── components
│   ├── styles
│   └── templates
│       ├── robots.ts // generated for all scopes
│       ├── [CONFIGURATION_SCOPE_1]
│       │   ├── brand1.tsx
│       │   └── 404.tsx
│       └── [CONFIGURATION_SCOPE_2]
│           ├── brand1.tsx
│           └── 404.tsx
├── package.json
├── package-lock.json
├── tsconfig.json
├── tailwind.config.js
└── vite.config.js
Similarly, you can override a “global template” by providing a template with the same name within one of your scopes. Refer to the example below, which shows how location.tsx is configured globally, but overridden for CONFIGURATION_SCOPE_1.
.
├── [CONFIGURATION_SCOPE_1]
│   └── config.yaml
├── [CONFIGURATION_SCOPE_2]
│   └── config.yaml
├── src
│   ├── assets
│   ├── components
│   ├── styles
│   └── templates
│       ├── location.tsx // generated for all scopes
│       ├── robots.ts
│       ├── [CONFIGURATION_SCOPE_1]
│       │   ├── brand1.tsx
│       │   └── location.tsx // overrides the root-level location.tsx file
│       └── [CONFIGURATION_SCOPE_2]
│           └── brand2.tsx
├── package.json
├── package-lock.json
├── tsconfig.json
├── tailwind.config.js
└── vite.config.js
Local Development
To use and test this feature during local development, you must specify a scope when running your dev command. Refer to the command below:
npx pages dev --scope REPLACE_WITH_SCOPE_CONFIGURATIONTo test your production build, simply switch your command from dev to prod:
npx pages prod --scope REPLACE_WITH_SCOPE_CONFIGURATIONDeploying to Production
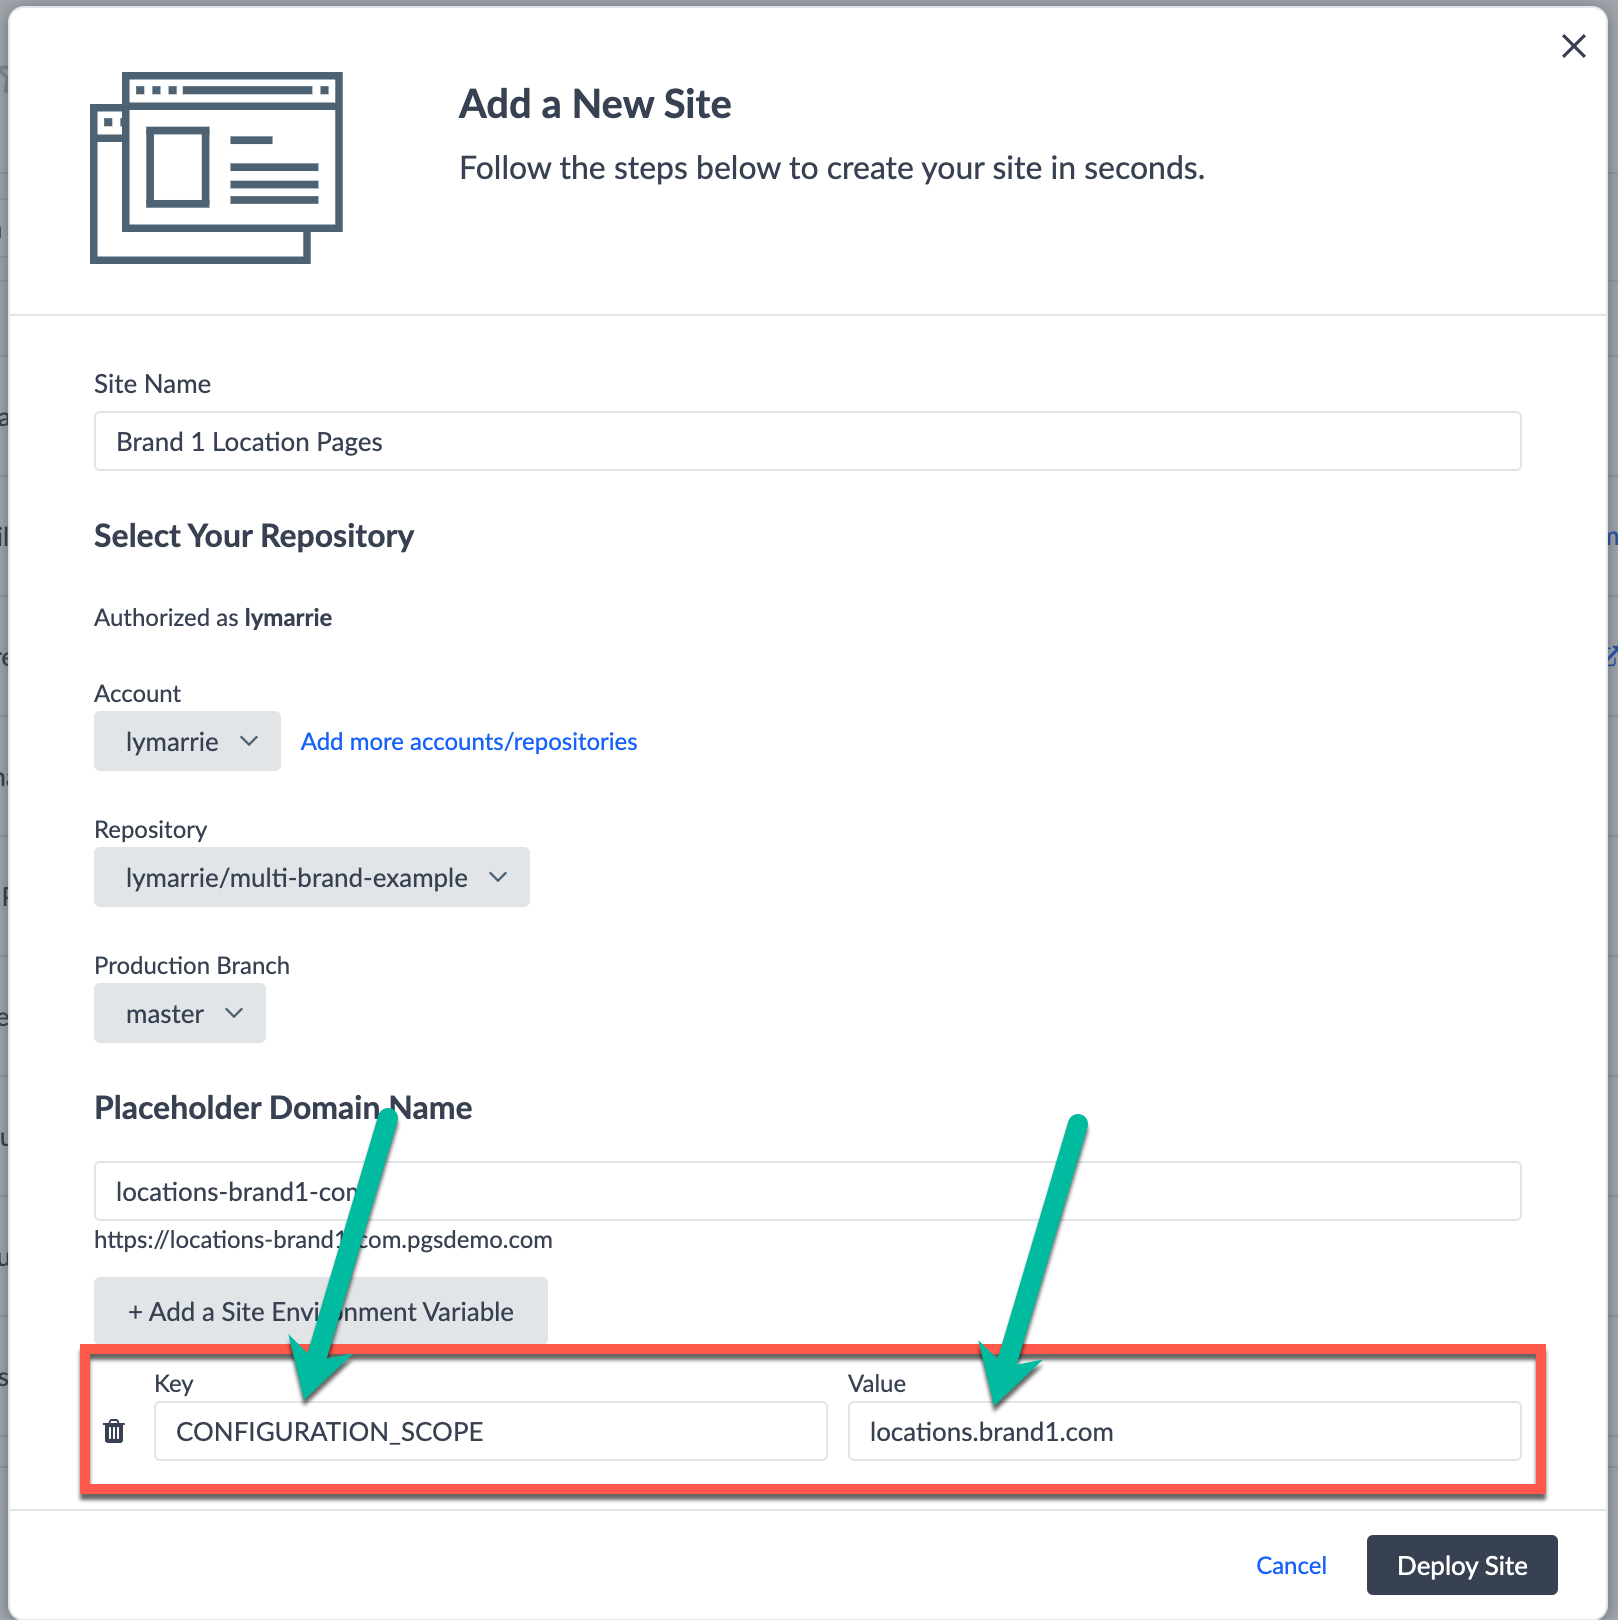
To deploy a website based on a scope, you need to define an environment variable called CONFIGURATION_SCOPE. The value you provide is what tells the Pages system which section of your repository to use for your deployment.
In the screenshot below, locations.brand1.com is defined as the configuration scope.

When that website deploys, each locations.brand1.com scope within the repository structure below will be used:
.
├── locations.brand1.com // This config.yaml is deployed
│   └── config.yaml
├── locations.brand2.com
│   └── config.yaml
├── src
│   ├── assets
│   ├── components
│   ├── styles
│   └── templates
│       ├── locations.brand1.com // This set of templates is deployed
│       │   └── brand1.tsx
│       └── locations.brand2.com
│           └── brand2.tsx
├── package.json
├── package-lock.json
├── tsconfig.json
├── tailwind.config.js
└── vite.config.js
Reverse Proxy
If you have multiple websites that require a
reverse proxy
setup, and the subdirectory differs between scopes, then you will need to configure a unique vite.config.js per scope.
For example, if you are powering the following websites (note that locations and restaurants are different subdirectories):
www.brand1.com/locationswww.brand2.com/restaurants
To support this type of website setup, you will need to use the following repository structure, and configure a unique vite.config.js within each of your root-level scope folders:
.
├── [CONFIGURATION_SCOPE_1]
│   ├── vite.config.js // scope-level vite.config.js
│   └── config.yaml
├── [CONFIGURATION_SCOPE_2]
│   ├── vite.config.js // scope-level vite.config.js
│   └── config.yaml
├── src
│   ├── assets
│   ├── components
│   ├── styles
│   └── templates
│       ├── location.tsx // generated for all scopes
│       ├── robots.ts
│       ├── [CONFIGURATION_SCOPE_1]
│       │   ├── brand1.tsx
│       │   └── location.tsx // overrides the root-level location.tsx file
│       └── [CONFIGURATION_SCOPE_2]
│           └── brand2.tsx
├── package.json
├── package-lock.json
├── tsconfig.json
└── tailwind.config.js
This is because, typically, for reverse proxy implementations, we recommend configuring the
assetsDir
property to match your reverseProxyPrefix. Refer to the example below, which shows how the vite configuration would need to be configured for each scopes:
www.brand1.com/locations
// [CONFIGURATION_SCOPE_1]/vite.config.js
export default defineConfig({
  plugins: [react(), yextSSG()],
  build: {
    assetsDir: "locations/assets"
  }
});
www.brand2.com/restaurants
// [CONFIGURATION_SCOPE_2]/vite.config.js
export default defineConfig({
  plugins: [react(), yextSSG()],
  build: {
    assetsDir: "restaurants/assets"
  }
});
Refer to our Reverse Proxy reference article to ensure that the rest of your project is set up correctly for reverse proxying.

